| View previous topic :: View next topic |
| Author |
Message |
BW
Joined: 01 Feb 2018
Posts: 218
Location: Lick Creek, Alabama
|
 Posted: Sat Apr 10, 2021 4:46 pm Post subject: Red Farmer's 1972 Torino Posted: Sat Apr 10, 2021 4:46 pm Post subject: Red Farmer's 1972 Torino |
 |
|
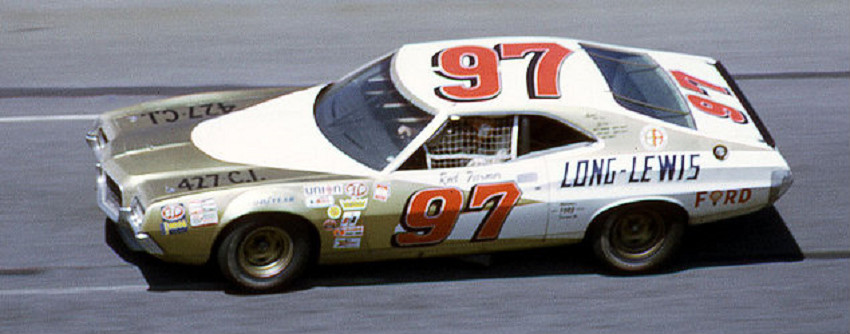
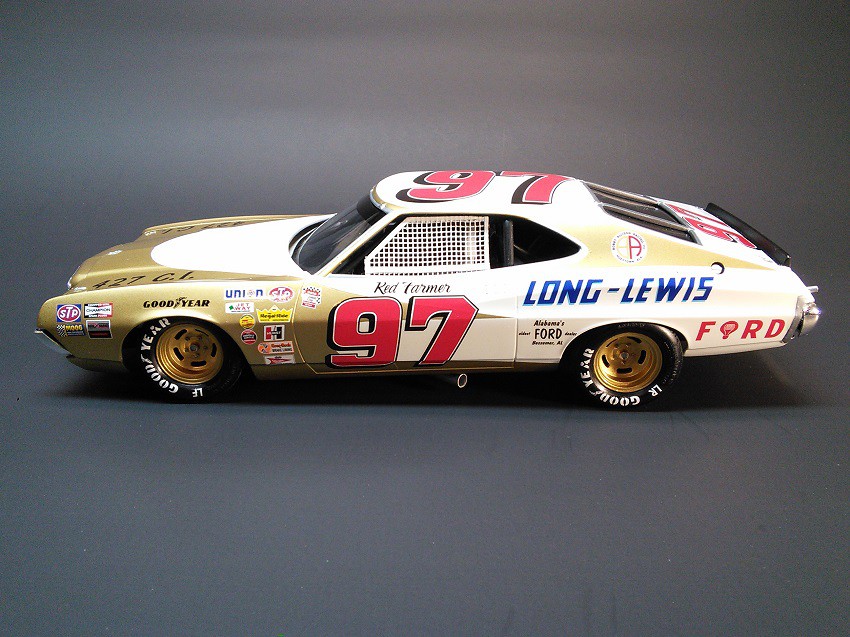
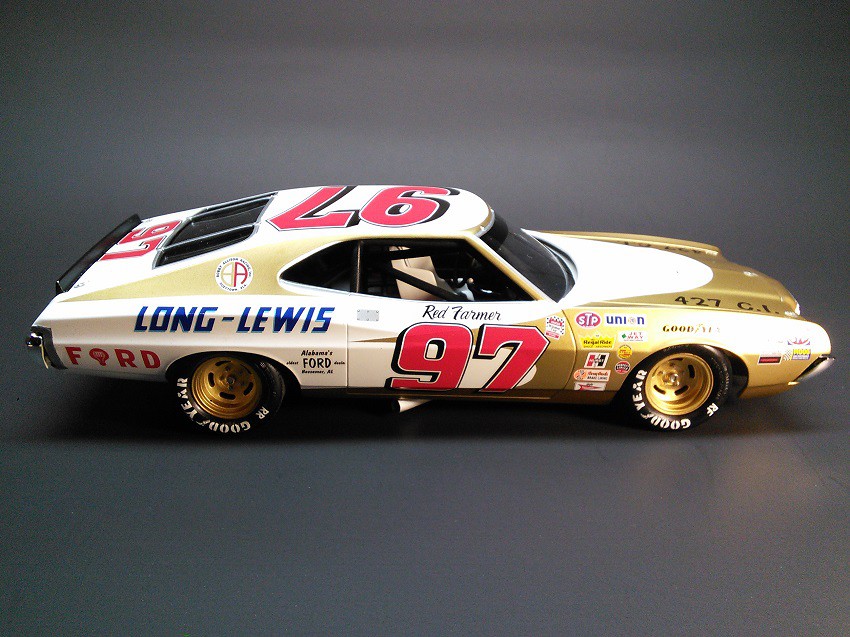
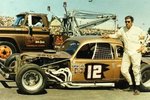
Red Farmer's 1972 Torino
KIT: Body is AMT/Model King re-release. Chassis is from JoHan's '72 Torino kit.
DECALS: Yesterday's and Powerslide. Some were homemade.
PAINT: Tamiya TS-26 Gloss White, Tamiya TS-21 Gold. Interior is Tamiya XF-1 Flat Black. Metal parts painted using Model Master Metalizers.
TIRES & WHEELS: PPP
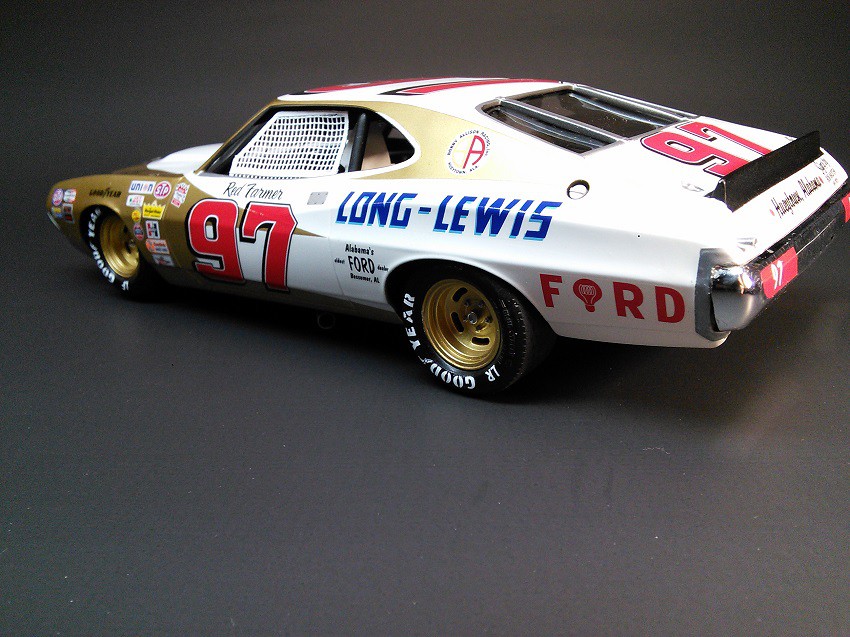
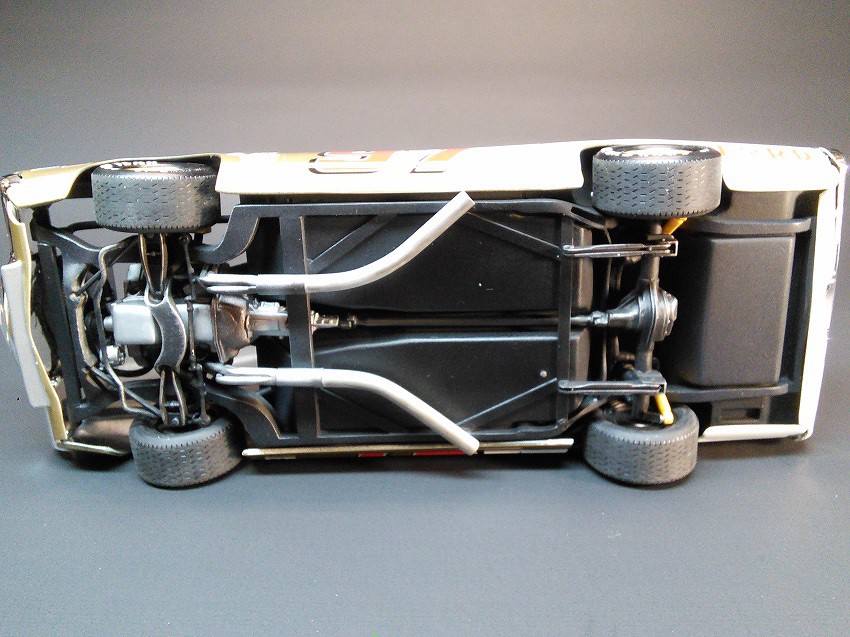
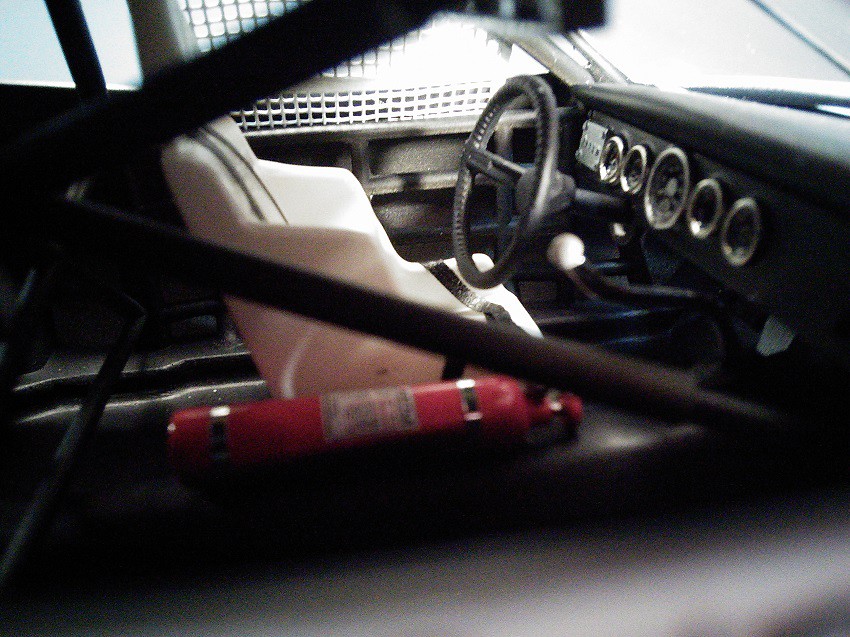
BUILD NOTES: Body is straight from box. Chassis was modified to adjust ride height. Also, scratch built shocks and front spindles. Added a few braces on chassis using Evergreen plastic. Exhaust dumps made using K&S 5/32" tubing.Made window net using porch screening and tape. Added the home made Hueytown, Alabama decal on back panel.
*I can never get the front and rear bumpers to fit correctly on this Torino kit. No matter how much dry fitting I do before painting body and final construction, I can never get them to fit. Everything else went fine.
REAL CAR NOTES: Red's cars are always one of the most recognizable in his iconic white with gold scallops with the red numbers. Red still drives today using a similar paint scheme. Red drove this car a few times in Winston Cup during the early 1970s.
THE REAL THING:
 [img][/img] [img][/img]
 [img][/img] [img][/img]
 [img] [img]
[img
 [img][/img] [img][/img]
 [img][/img] [img][/img]
 [img][/img] [img][/img]
 [img][/img] [img][/img]
This is my first completed build for 2021. Thanks for looking. Comments always welome.
-Bobby |
|
| Back to top |
|
 |
DaveVan
Joined: 27 Jan 2018
Posts: 1586
|
| Posted: Sat Apr 10, 2021 5:15 pm Post subject: |
|
|
I think it looks great....I see no issue with bumpers.......
It does look like you removed the stock trim off body....that is a good amount of work alone!
Are the relocated rear trailing arms something Red did on his cars??? |
|
| Back to top |
|
|
Pierre Rivard
Joined: 25 Feb 2021
Posts: 378
Location: Montreal, Canada
|
| Posted: Sat Apr 10, 2021 5:24 pm Post subject: |
|
|
Absolutely beautiful, like all your builds are.
May I ask how you do your gauges? They are amazing.
_________________
"When you arrive at a fork in the road, take it" - Yogi Berra |
|
| Back to top |
|
|
sentsat71
Joined: 03 Feb 2018
Posts: 1237
Location: Fenton, IA
|
| Posted: Sun Apr 11, 2021 5:48 am Post subject: |
|
|
WOW!!!!
GREAT looking build!!!
Never knew much about Red until this site and other sites, most which have gone by the wayside. Have seen many models of various cars he has raced throughout his racing careers....
Thanks for posting!
_________________
Ed. K |
|
| Back to top |
|
|
Henryjint

Joined: 28 Jan 2018
Posts: 1983
Location: NY State's Hudson Valley
|
| Posted: Sun Apr 11, 2021 8:59 am Post subject: |
|
|
Came out great!!! Like the relocated rear trailing arms. I remember an article with photos of the relocated arms but I don't recall where.
_________________
Forum member since 10/25/2010 |
|
| Back to top |
|
|
BW
Joined: 01 Feb 2018
Posts: 218
Location: Lick Creek, Alabama
|
| Posted: Sun Apr 11, 2021 11:07 am Post subject: |
|
|
| DaveVan wrote: | I think it looks great....I see no issue with bumpers.......
It does look like you removed the stock trim off body....that is a good amount of work alone!
Are the relocated rear trailing arms something Red did on his cars??? |
Thanks Dave. There was a post here on Randy's about Red's re-positioned trailing arms. It was lost when the site crashed a few years ago. Someone had taken photos of Red's Torino in the Talladega museum showing the short trailing arms. I was told that Red eventually went to the longer style trailing arms on subsequent Torinos. On this build I just "winged it" according to my memory so it may not be 100% correct. Firefly posted an outstanding article on here showing how he made his long trailing arms on his outstanding Bud Moore Torino. Here's the link:
http://www.randyayersmodeling.com/modelingforum/viewtopic.php?t=620&sid=75d8bfabe4ef8589a9b5c90b3484af71
Thanks again Dave.
-Bobby |
|
| Back to top |
|
|
BW
Joined: 01 Feb 2018
Posts: 218
Location: Lick Creek, Alabama
|
| Posted: Sun Apr 11, 2021 11:14 am Post subject: |
|
|
| Pierre Rivard wrote: | Absolutely beautiful, like all your builds are.
May I ask how you do your gauges? They are amazing. |
Thanks Pierre! I make my instrument panels/gauges by first making the panel using Evergreen sheet styrene. I cut to size for the dash. To make the bezels I use jewelry making rings (see photo) I bought from Hobby Lobby. I paint the instrument panel black. After drying, I position the rings on the panel and place a drop of Micro Krystal Klear in each bezel. After drying, I punch out the decal dial (Powerslide) and attach inside each bezel. After the decals dry I place another drop of Krystal Klear in each bezel to replicate the glass dial. After everything is dry, I glue the panel onto the dash. I cannot take credit for this technique because I got it from a member (cannot remember his name) here on Randy's years ago. I haven't seen this member post anything in years.
For the switch plate, I make it out of thin Evergreen sheet plastic and punch out tiny dots of plastic for the switches and attach to the panel.
Hope this helps!
-Bobby
 [img][/img] [img][/img]
Last edited by BW on Sun Apr 11, 2021 11:19 am; edited 3 times in total |
|
| Back to top |
|
|
Toys4Don
Joined: 31 Jan 2018
Posts: 226
|
| Posted: Sun Apr 11, 2021 11:17 am Post subject: |
|
|
| Excellent job. One of the best Red Farmer builds I have seen. |
|
| Back to top |
|
|
BW
Joined: 01 Feb 2018
Posts: 218
Location: Lick Creek, Alabama
|
|
| Back to top |
|
|
Pierre Rivard
Joined: 25 Feb 2021
Posts: 378
Location: Montreal, Canada
|
| Posted: Sun Apr 11, 2021 2:31 pm Post subject: |
|
|
| BW wrote: | | Pierre Rivard wrote: | Absolutely beautiful, like all your builds are.
May I ask how you do your gauges? They are amazing. |
Thanks Pierre! I make my instrument panels/gauges by first making the panel using Evergreen sheet styrene. I cut to size for the dash. To make the bezels I use jewelry making rings (see photo) I bought from Hobby Lobby. I paint the instrument panel black. After drying, I position the rings on the panel and place a drop of Micro Krystal Klear in each bezel. After drying, I punch out the decal dial (Powerslide) and attach inside each bezel. After the decals dry I place another drop of Krystal Klear in each bezel to replicate the glass dial. After everything is dry, I glue the panel onto the dash. I cannot take credit for this technique because I got it from a member (cannot remember his name) here on Randy's years ago. I haven't seen this member post anything in years.
For the switch plate, I make it out of thin Evergreen sheet plastic and punch out tiny dots of plastic for the switches and attach to the panel.
Hope this helps!
-Bobby
[img][/img] |
But all the credit to you for sharing your methods. I am new to the hobby and learning so much from master builders such as yourself.
Thank you very much.
_________________
"When you arrive at a fork in the road, take it" - Yogi Berra |
|
| Back to top |
|
|
Lee "Spud" Lo
Joined: 30 Jan 2018
Posts: 137
|
| Posted: Sun Apr 11, 2021 9:08 pm Post subject: |
|
|
| Amazing work as always. Red is always a favorite of mine. Amazing he is still racing at his age. I think he will never retire. |
|
| Back to top |
|
|
lefty1820
Joined: 17 Sep 2019
Posts: 317
|
| Posted: Sun Apr 11, 2021 11:23 pm Post subject: nice |
|
|
Sweet!!  |
|
| Back to top |
|
|
MarkJ
Joined: 29 Jan 2018
Posts: 1317
|
| Posted: Mon Apr 12, 2021 9:07 am Post subject: |
|
|
| When I saw the subject matter, I knew this was going to be something special and it surely is. Another fabulous build from your bench. Excellent in every way possible. |
|
| Back to top |
|
|
Crime Dog
Joined: 27 Jan 2018
Posts: 340
|
| Posted: Mon Apr 12, 2021 9:25 am Post subject: |
|
|
| Wow, fabulously stunning build as usual. Great work |
|
| Back to top |
|
|
afx

Joined: 28 Jan 2018
Posts: 270
|
| Posted: Tue Apr 13, 2021 7:33 am Post subject: |
|
|
| Another great build. |
|
| Back to top |
|
|
Firefly

Joined: 28 Jan 2018
Posts: 814
Location: New Jersey
|
| Posted: Tue Apr 13, 2021 1:23 pm Post subject: |
|
|
| BW wrote: | | DaveVan wrote: | I think it looks great....I see no issue with bumpers.......
It does look like you removed the stock trim off body....that is a good amount of work alone!
Are the relocated rear trailing arms something Red did on his cars??? |
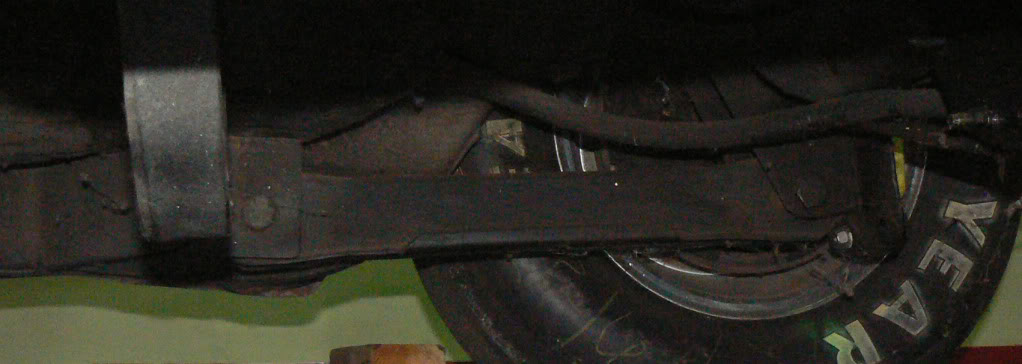
Thanks Dave. There was a post here on Randy's about Red's re-positioned trailing arms. It was lost when the site crashed a few years ago. Someone had taken photos of Red's Torino in the Talladega museum showing the short trailing arms. I was told that Red eventually went to the longer style trailing arms on subsequent Torinos. On this build I just "winged it" according to my memory so it may not be 100% correct. Firefly posted an outstanding article on here showing how he made his long trailing arms on his outstanding Bud Moore Torino. Here's the link:
http://www.randyayersmodeling.com/modelingforum/viewtopic.php?t=620&sid=75d8bfabe4ef8589a9b5c90b3484af71
Thanks again Dave.
-Bobby |
Here are the shots I took at the Talladega museum. Looks like you got it right!

_________________
Bill Jobson is my real name. |
|
| Back to top |
|
|
DaveVan
Joined: 27 Jan 2018
Posts: 1586
|
| Posted: Tue Apr 13, 2021 2:41 pm Post subject: |
|
|
| Wonder what the advantage was of using the stock trailing arms in the new location. COOL STUFF!!! THX |
|
| Back to top |
|
|
bangor boy
Joined: 29 Jan 2018
Posts: 452
|
| Posted: Tue Apr 13, 2021 10:50 pm Post subject: |
|
|
Someone needs to interview Red.
Great looking model. |
|
| Back to top |
|
|
Firefly
Joined: 28 Jan 2018
Posts: 814
Location: New Jersey
|
| Posted: Wed Apr 14, 2021 12:46 pm Post subject: |
|
|
| DaveVan wrote: | | Wonder what the advantage was of using the stock trailing arms in the new location. COOL STUFF!!! THX |
Possibly tire clearance, as the stock geometry has the forward link aimed outboard - actually in the framerail. Also wondering if that angle was not best in terms of handling- the usual race setup has the forward link inward toward the center.
_________________
Bill Jobson is my real name. |
|
| Back to top |
|
|
R.J.
Joined: 28 Jan 2018
Posts: 384
|
| Posted: Fri Sep 17, 2021 9:24 pm Post subject: |
|
|
Great looking build Bobby, doing the Alabama Gang proud.
_________________
Roanoke, VA. |
|
| Back to top |
|
|
joe b
Joined: 31 Jan 2018
Posts: 209
Location: New Jersey
|
| Posted: Wed Sep 29, 2021 11:18 am Post subject: |
|
|
| BW wrote: | | Pierre Rivard wrote: | Absolutely beautiful, like all your builds are.
May I ask how you do your gauges? They are amazing. |
Thanks Pierre! I make my instrument panels/gauges by first making the panel using Evergreen sheet styrene. I cut to size for the dash. To make the bezels I use jewelry making rings (see photo) I bought from Hobby Lobby. I paint the instrument panel black. After drying, I position the rings on the panel and place a drop of Micro Krystal Klear in each bezel. After drying, I punch out the decal dial (Powerslide) and attach inside each bezel. After the decals dry I place another drop of Krystal Klear in each bezel to replicate the glass dial. After everything is dry, I glue the panel onto the dash. I cannot take credit for this technique because I got it from a member (cannot remember his name) here on Randy's years ago. I haven't seen this member post anything in years.
For the switch plate, I make it out of thin Evergreen sheet plastic and punch out tiny dots of plastic for the switches and attach to the panel.
Hope this helps!
-Bobby
[img][/img] |
think that might have been me bobby, not sure but you took it one step further since i only suggested the rings. i'm around just have not posted much since the crash. also not been building much.
joe
_________________
Joined Jan 30, 2008
Over 2000 posts |
|
| Back to top |
|
|
spotter23
Joined: 26 Feb 2018
Posts: 75
|
| Posted: Thu Sep 30, 2021 1:48 pm Post subject: |
|
|
| Very Nice! |
|
| Back to top |
|
|
Wakefan77
Joined: 22 Apr 2020
Posts: 145
Location: North Carolina
|
| Posted: Fri Oct 08, 2021 7:15 am Post subject: |
|
|
Very nice! Love the attention to detail.
_________________
<a><img></a> |
|
| Back to top |
|
|
Matt T.
Joined: 03 Feb 2018
Posts: 114
Location: Albany, NY
|
| Posted: Thu Nov 11, 2021 8:45 am Post subject: |
|
|
| Bobby, this looks so good! That stance! I just ordered a set of Yesterday’s decals and will try to replicate your look. Love it. |
|
| Back to top |
|
|
Michael F
Joined: 03 Feb 2018
Posts: 97
Location: Kempen/Germany
|
| Posted: Fri Nov 12, 2021 10:12 am Post subject: |
|
|
This is so cool !!!
I like the paint sheme of the Red Farmer cars and i have the great yesterdays decal sheet to do Red´s cars.
The Torino is on my to do list as well!
Very nice 
_________________
Greetings from germany!! |
|
| Back to top |
|
|
|

