| View previous topic :: View next topic |
| Author |
Message |
Danh4
Joined: 25 Apr 2023
Posts: 35
|
 Posted: Sun Nov 12, 2023 10:01 am Post subject: Wes's Model Car Corner Ole Blue Modified Posted: Sun Nov 12, 2023 10:01 am Post subject: Wes's Model Car Corner Ole Blue Modified |
 |
|
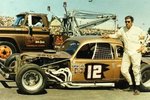
Finished this up last night. This is the second one of these kits that I've built and it went a bit faster than the first one because I knew what to expect and didn't do all of the plumbing this time, just plug wires. I'm a big fan of the whole Len Boehler story so I'm happy to get this on the shelf.
-Dan


 |
|
| Back to top |
|
 |
Razorback 46
Joined: 30 Jan 2018
Posts: 454
|
| Posted: Sun Nov 12, 2023 10:39 am Post subject: |
|
|
| Slick looking ride!! Nice work!! |
|
| Back to top |
|
|
TN Vols fan
Joined: 18 Jan 2022
Posts: 286
Location: Crossett, AR
|
| Posted: Sun Nov 12, 2023 10:57 am Post subject: |
|
|
That's a great looking modified, well done!
_________________
"Many men fish all their lives without knowing it is not the fish they are after." Henry David Thoreau
"I am, Sir, a brother of the angle" quote from The Compleat Angler, lzzak Walton 1654 |
|
| Back to top |
|
|
hurricane21
Joined: 05 Feb 2018
Posts: 211
Location: Fayetteville NC
|
| Posted: Sun Nov 12, 2023 11:44 am Post subject: |
|
|
| Wow. Clean build. The modified kits have been a bit tricky for me. Definitely requires more patience. |
|
| Back to top |
|
|
bighoo
Joined: 01 Feb 2018
Posts: 227
|
| Posted: Sun Nov 12, 2023 8:50 pm Post subject: |
|
|
| Nice one - looks great |
|
| Back to top |
|
|
Wakefan77
Joined: 22 Apr 2020
Posts: 140
Location: North Carolina
|
| Posted: Mon Nov 13, 2023 8:10 am Post subject: |
|
|
Well done! Fantastic build and very clean.
_________________
<a><img></a> |
|
| Back to top |
|
|
Papadoc
Joined: 30 Apr 2018
Posts: 97
|
| Posted: Mon Nov 13, 2023 9:00 am Post subject: |
|
|
| hurricane21 wrote: | | Wow. Clean build. The modified kits have been a bit tricky for me. Definitely requires more patience. |
Same here.. my first was a fail and I bought a 2nd one. Hoping for better results.
Blue is fantastic! |
|
| Back to top |
|
|
Henryjint

Joined: 28 Jan 2018
Posts: 1973
Location: NY State's Hudson Valley
|
| Posted: Mon Nov 13, 2023 7:34 pm Post subject: |
|
|
VERY nicely done!!!
_________________
Forum member since 10/25/2010 |
|
| Back to top |
|
|
Racer14
Joined: 13 Feb 2018
Posts: 282
Location: Rockford, IL
|
| Posted: Tue Nov 14, 2023 6:24 pm Post subject: |
|
|
| Another super nice mod build! |
|
| Back to top |
|
|
Rattlecan Dan
Joined: 13 Sep 2023
Posts: 230
|
| Posted: Wed Nov 15, 2023 9:26 pm Post subject: |
|
|
| Very nice build. |
|
| Back to top |
|
|
GAS
Joined: 02 Jul 2018
Posts: 39
Location: Hoover Al
|
| Posted: Tue Nov 21, 2023 11:48 am Post subject: engine fit? |
|
|
| Did you have a problem with the engine sitting down into the frame? I did, and wondering what you did to make the engine fit. Thanks |
|
| Back to top |
|
|
Danh4
Joined: 25 Apr 2023
Posts: 35
|
| Posted: Tue Nov 21, 2023 12:12 pm Post subject: Re: engine fit? |
|
|
| GAS wrote: | | Did you have a problem with the engine sitting down into the frame? I did, and wondering what you did to make the engine fit. Thanks |
I did! I spent a bit of time test-fitting and opening up holes, etc. but it still wasn't exactly perfect when I installed it. I did manage to get it in without having to trim away the belts on the bottom this time though. Not sure where the fit problem happens but I'd trim away the mounting peg on the front of the footwell forward panel and try to get the remaining 3 to line up. If that doesn't work, just shoot for getting the forward ones lined up. |
|
| Back to top |
|
|
GAS
Joined: 02 Jul 2018
Posts: 39
Location: Hoover Al
|
| Posted: Tue Nov 21, 2023 12:23 pm Post subject: modified engine fit |
|
|
| I will try that. Thanks. Your modified looks great. |
|
| Back to top |
|
|
Danh4
Joined: 25 Apr 2023
Posts: 35
|
| Posted: Tue Nov 21, 2023 1:51 pm Post subject: Re: modified engine fit |
|
|
| GAS wrote: | | I will try that. Thanks. Your modified looks great. |
Thanks, I really like this kit a lot.
I'll tell you about a couple other things I did different from the instructions that you (and others) might find helpful- Glue the long torque arm to the rear diff before trying to install it, then you can slip the forward end of the arm onto its peg and hold it in place with a piece of foam jammed into the drive shaft tunnel. Now your rear end is located fore and aft but can still swing up and down, helps a lot when gluing the axle tubes to the shocks.
I found it worked quite well to glue the rear fender wells to the inside of the bodywork rather than to the chassis. Just leave room at the rear for the thickness of the rear panel so that fits inside of the side panels when the time comes to install it. I like doing it this way because you are guaranteed that the wheel wells will align with the wheel openings in the side panels. with no gaps, etc. |
|
| Back to top |
|
|
|

