| View previous topic :: View next topic |
| Author |
Message |
jbherri2
Joined: 30 Jan 2018
Posts: 213
Location: Lost! In Space ...
|
 Posted: Mon Oct 24, 2022 2:55 pm Post subject: Let's say I'd like to build the 1957 Chevy ...? Posted: Mon Oct 24, 2022 2:55 pm Post subject: Let's say I'd like to build the 1957 Chevy ...? |
 |
|
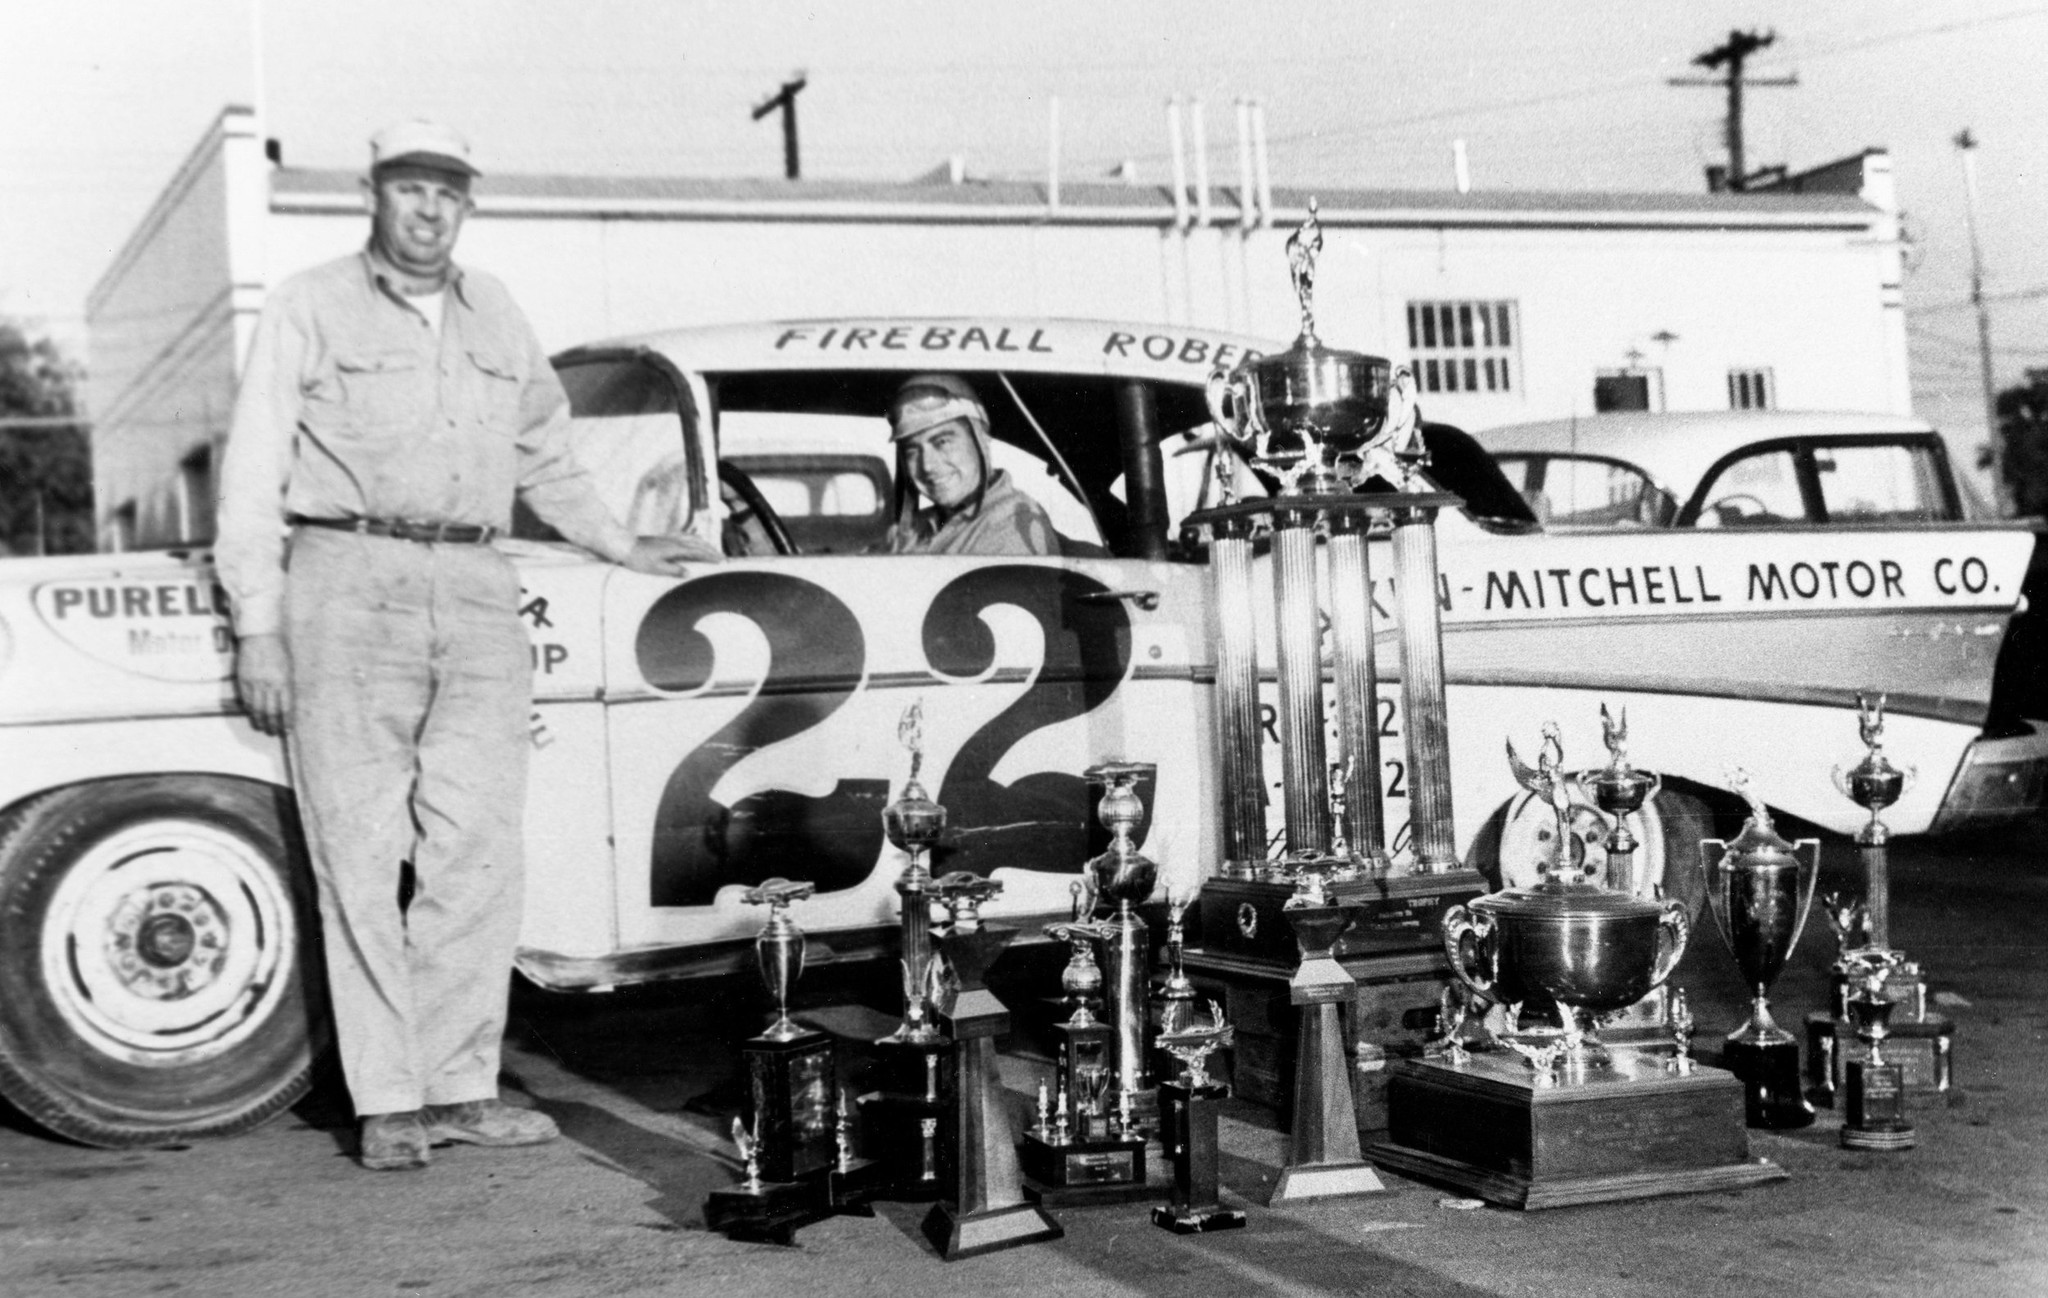
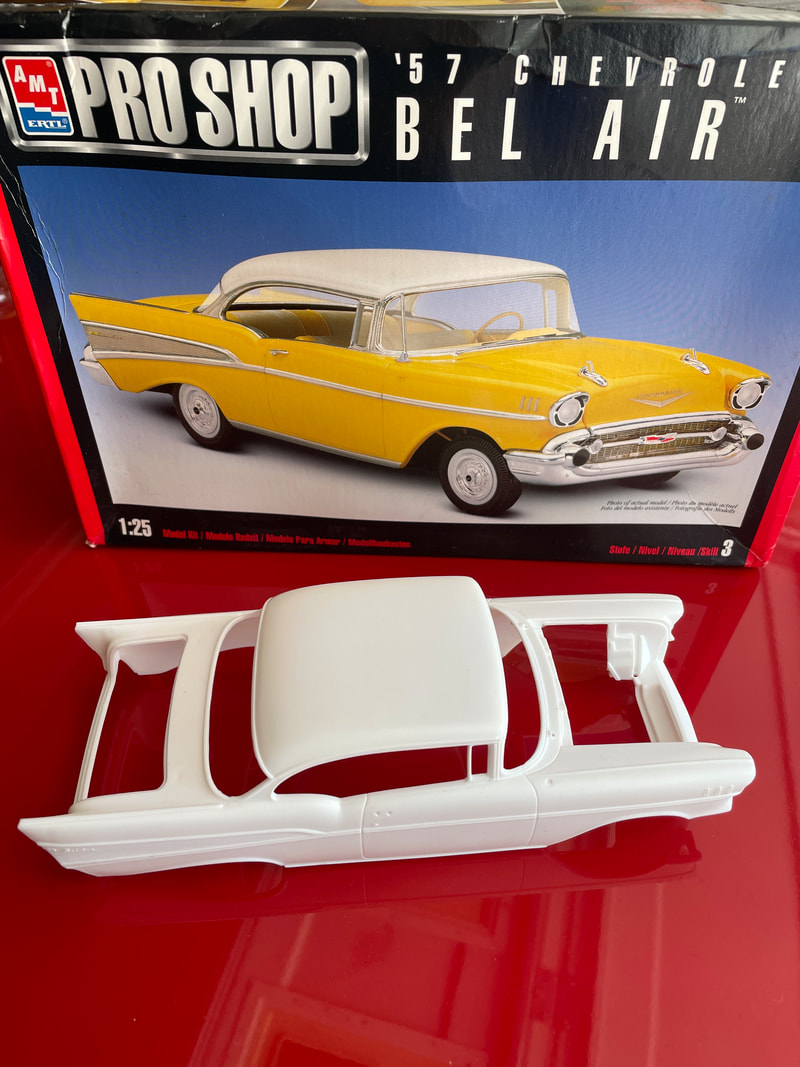
I'd like to build the 1957 Chevy that Fireball Roberts ran at the 1958 Darlington race.
I have the Fred Cady decals for the car. I think it had 6 lug wheels, I've read that it was carb'd and not fuel injection. I assume the rollcage to be black.
Would any of these kits be good to start with? I'd considered using the Revell Black Widow for the chassis and interior, although that kit does have the FI engine.
My goal:


Kits I thought might be worth starting with:


Any insight or help would be appreciated. MarkJ built a beautiful representation of the car; and I hope mine is half as good as his. |
|
| Back to top |
|
 |
jh63fan
Joined: 10 Sep 2021
Posts: 362
Location: Tarheel State
|
| Posted: Mon Oct 24, 2022 5:23 pm Post subject: |
|
|
| The kit that I am familiar with, the Pro Shop version, is what I am using to build that particular car. It has more detail and photo etched parts. Plus, most model vendors seem to be selling it for less than the other kits. If I remember correctly, the main thing I had to get was a single carb intake and breather. Back seat and exhaust system are separate pieces, that helps also |
|
| Back to top |
|
|
Tom M.
Board Moderator
Joined: 01 Feb 2018
Posts: 606
|
| Posted: Mon Nov 14, 2022 11:21 am Post subject: |
|
|
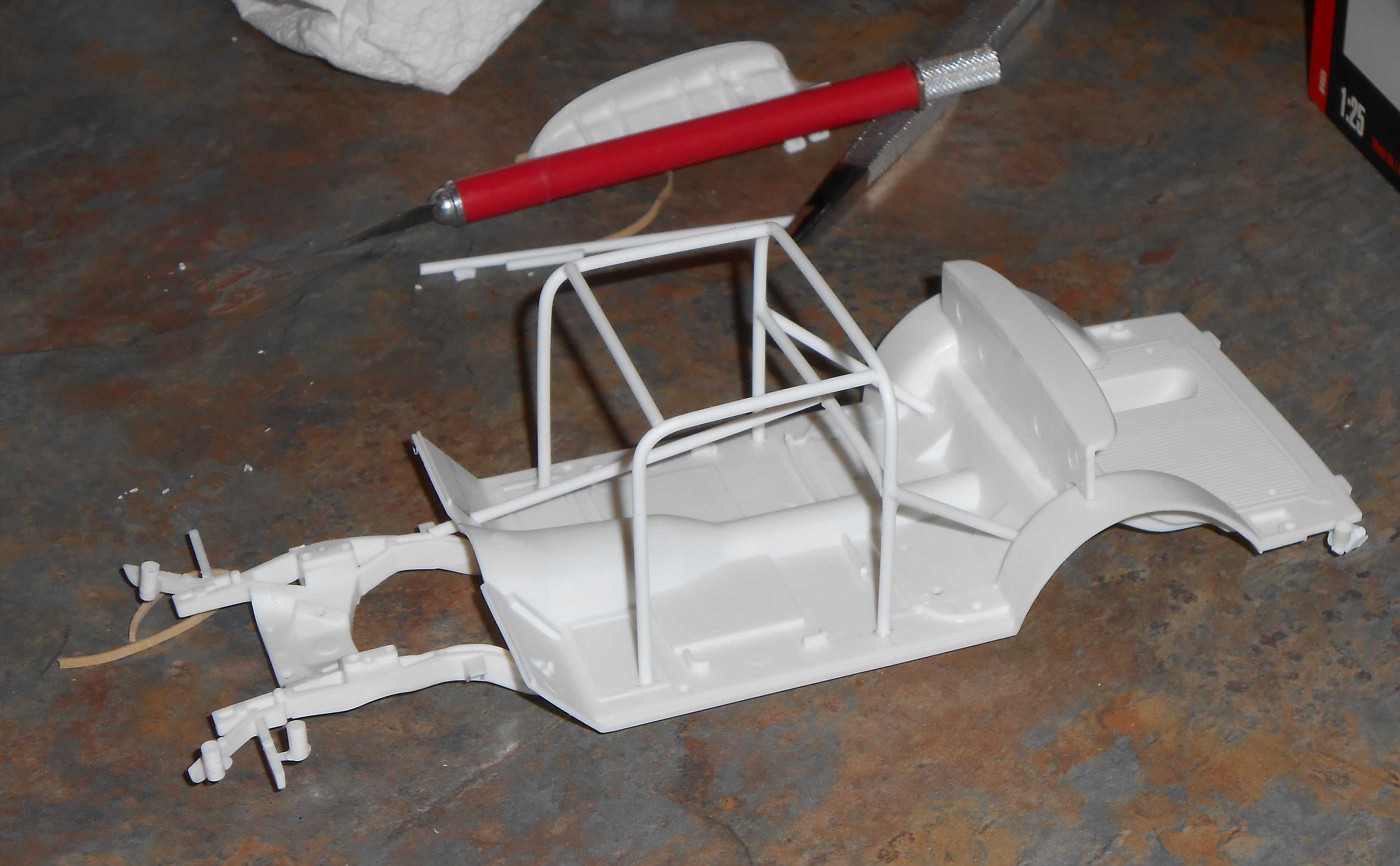
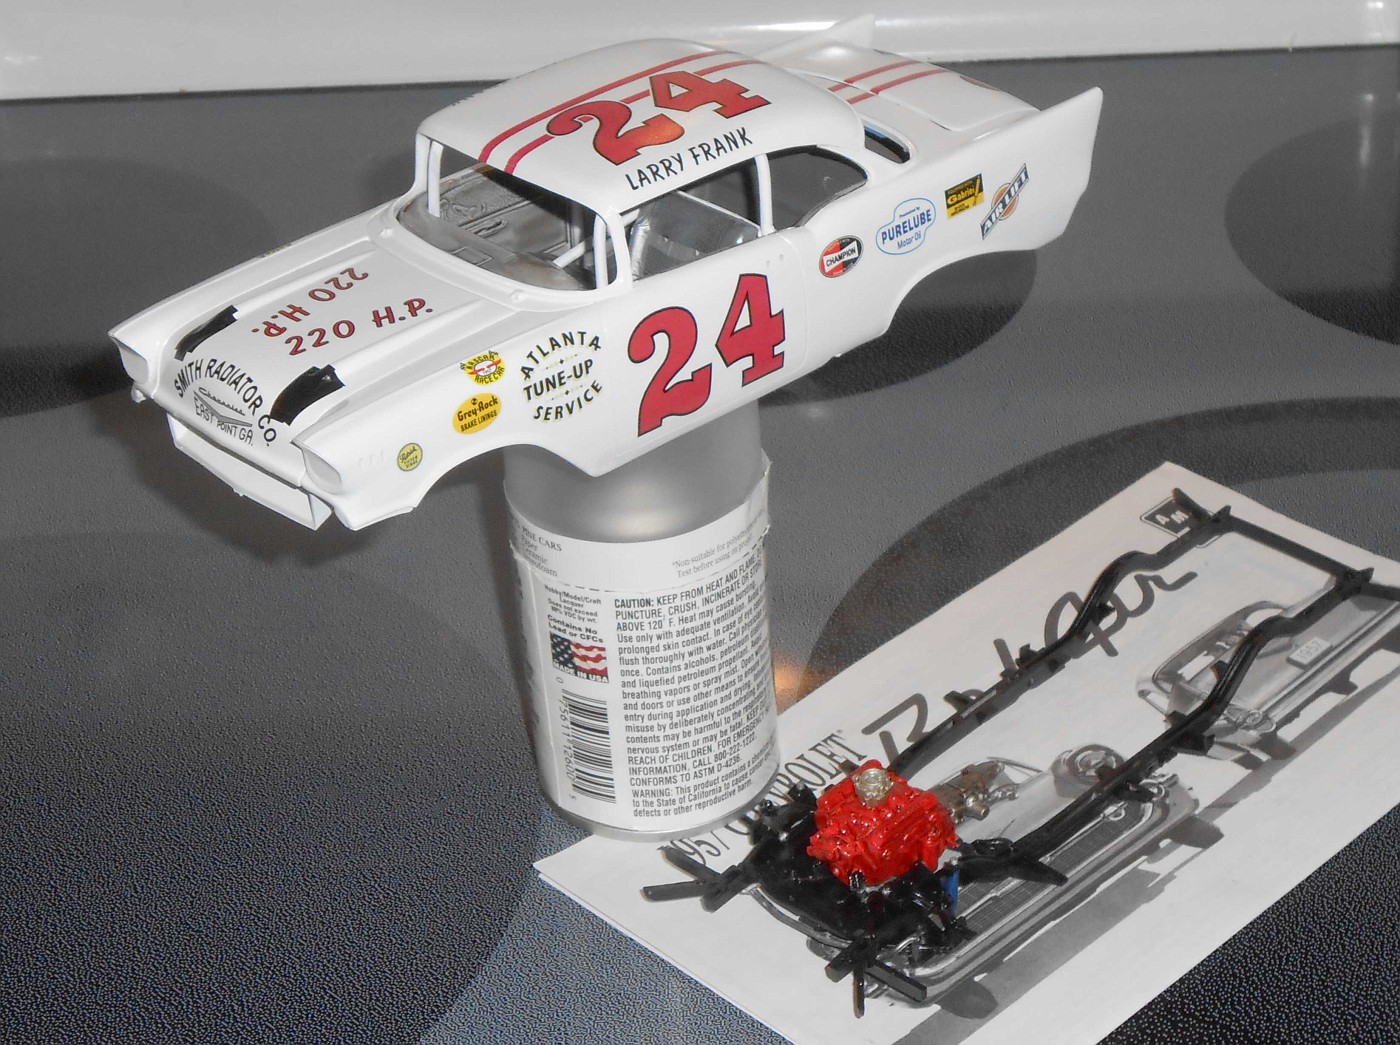
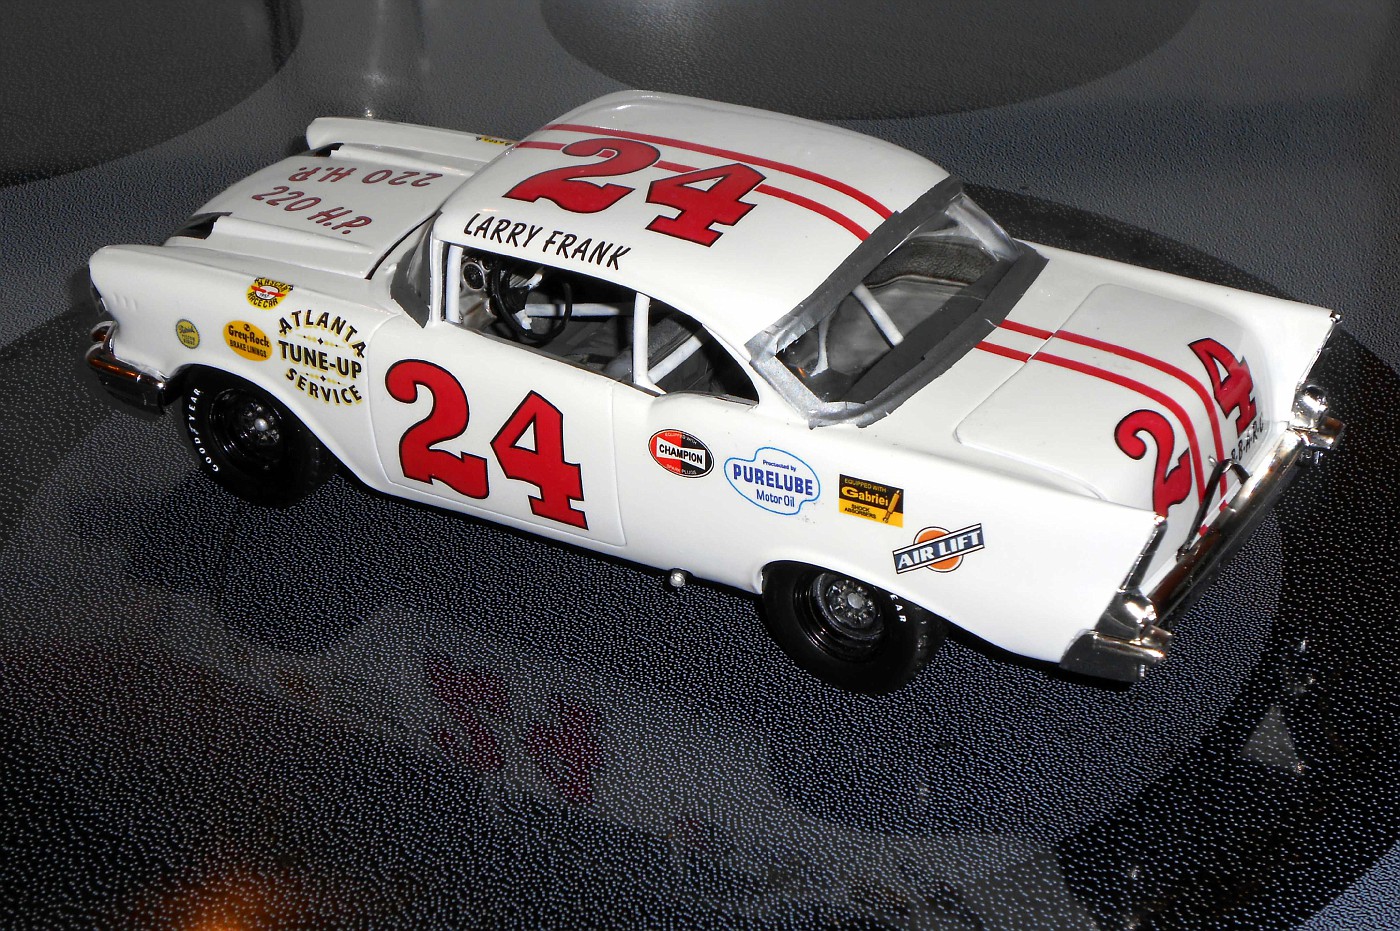
I used the Pro Shop kit to build the Larry Frank team car from that race. I did end up hacking up a Revell Black Widow for the front fender gills that didn't have any trim engraved into them. The contours matched perfectly, I don't think I even needed any filler. Proportions look good to my eye.
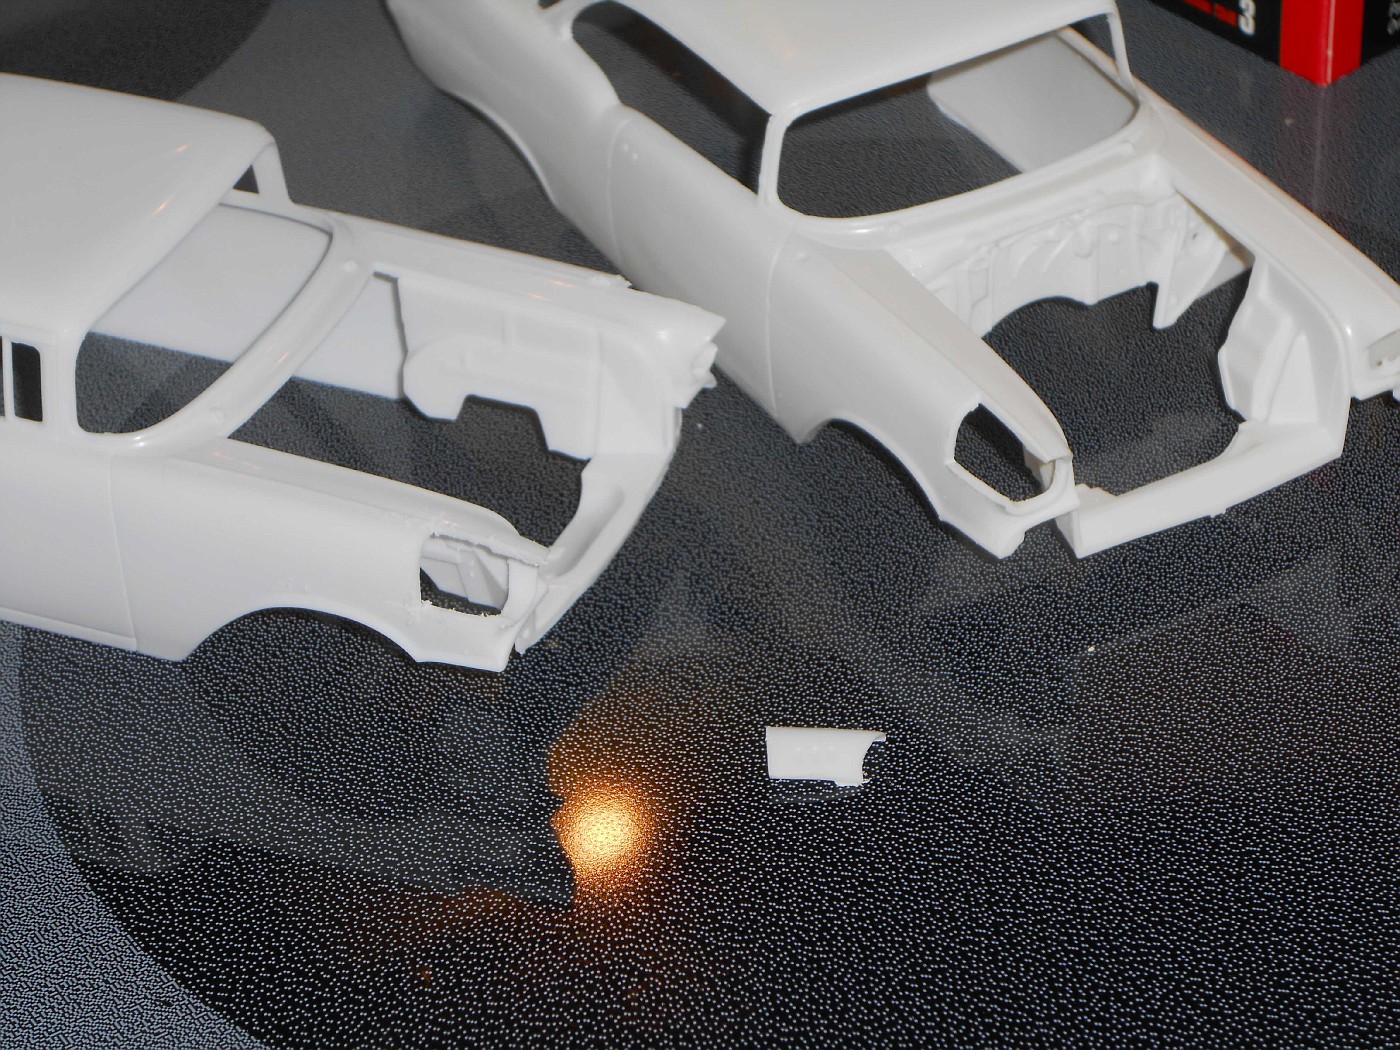

Scratchbuilt cage:
 |
|
| Back to top |
|
|
1fozziebear
Joined: 08 Mar 2019
Posts: 232
|
| Posted: Mon Nov 14, 2022 9:12 pm Post subject: |
|
|
| Beautiful build. I learned that duct tape was around in the mid-late 50s from this board. Never would've thought.... |
|
| Back to top |
|
|
Henryjint

Joined: 28 Jan 2018
Posts: 1976
Location: NY State's Hudson Valley
|
| Posted: Tue Nov 15, 2022 6:54 pm Post subject: |
|
|
Very nicely done!!!
_________________
Forum member since 10/25/2010 |
|
| Back to top |
|
|
jbherri2
Joined: 30 Jan 2018
Posts: 213
Location: Lost! In Space ...
|
| Posted: Sun Dec 04, 2022 8:12 pm Post subject: |
|
|
| Wow! That is beautiful work. Thank you for sharing! |
|
| Back to top |
|
|
jbherri2
Joined: 30 Jan 2018
Posts: 213
Location: Lost! In Space ...
|
| Posted: Sun Dec 04, 2022 8:14 pm Post subject: |
|
|
| I did pick up the AMT Pro Shop 57 Chevy kit and a set of PPP wheels and tires. Would the tires actually have been Firestone for Fireball Roberts in the 1958 race at Darlington? Or am I just imagining that? |
|
| Back to top |
|
|
bangor boy
Joined: 29 Jan 2018
Posts: 451
|
| Posted: Thu Dec 08, 2022 1:28 pm Post subject: |
|
|
Firestone tires in this pic. But can't see any clear tire branding from Darlington images:
 |
|
| Back to top |
|
|
MarkJ
Joined: 29 Jan 2018
Posts: 1310
|
| Posted: Fri Dec 09, 2022 8:16 am Post subject: |
|
|
| Just abourt any 2-door hardtop kit will work. Just don't go too big on the wheels and tires. I will p.m. you my version if you would like to see it. I made my own decals so I could get the special stuff he had on the car that day on the hood. Let me know if you'd like to see it. I think I used the third kit down, but the box art was different. |
|
| Back to top |
|
|
jbherri2
Joined: 30 Jan 2018
Posts: 213
Location: Lost! In Space ...
|
| Posted: Fri Jun 09, 2023 12:35 pm Post subject: |
|
|
Thank you all again for the comments.
Bringing this back to the top - I picked up the AMT Pro Shop kit and am starting with that.
My understanding is that Fireball Roberts did not use a fuel injected engine for the 1958 Darlington Race (forgot where I read that). He was running a 1957 Bel Air (not Black Widow) for the '58 race.
Regarding the engine - would it have been dual carbs? Single 4-barrel? Certainly it wasn't "just" a factory 283?
What other modifications might have been made for the race? I know there would be some roll bar, wipers removed, I assume back seat removed and probably the back of the passenger seat removed. Was a fuel cell even a thing back in 1958?
Thank you for any input! |
|
| Back to top |
|
|
George Andrews
Joined: 30 Jan 2018
Posts: 460
|
| Posted: Sun Jun 11, 2023 9:22 pm Post subject: |
|
|
| I recall that, after the factories withdrew from NASCAR in 1957, all the trick induction systems were banned. Only 1 Four Barrel carburetor was allowed from mis-1957 to 1968 ( ? ), when NASCAR allowed the Fords to run dual 4 barrel carbs to keep up with the MOPAR HEMI. |
|
| Back to top |
|
|
jbherri2
Joined: 30 Jan 2018
Posts: 213
Location: Lost! In Space ...
|
| Posted: Wed Jun 14, 2023 8:13 am Post subject: |
|
|
Thank you all for your continued help. A big thank you to MarkJ for sharing some pictures of his beautiful build and to Tom for pointing me towards the AMT Pro Shop kit.
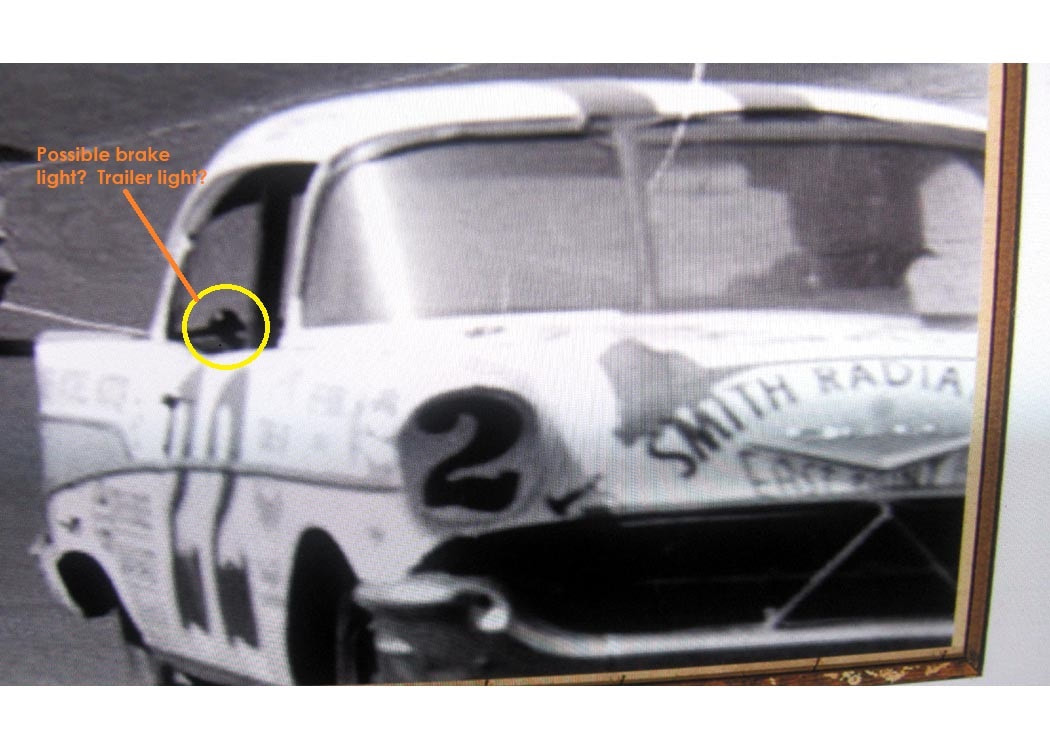
I have a question - I'm sure more questions are coming as I think of them - in this picture, is this possibly a brake light? Maybe for when the car was pulled to the track? (Assuming it was pulled or trailered)
 |
|
| Back to top |
|
|
jbherri2
Joined: 30 Jan 2018
Posts: 213
Location: Lost! In Space ...
|
| Posted: Wed Jun 14, 2023 8:13 am Post subject: |
|
|
Thank you all for your continued help. A big thank you to MarkJ for sharing some pictures of his beautiful build and to Tom for pointing me towards the AMT Pro Shop kit.
I have a question - I'm sure more questions are coming as I think of them - in this picture, is this possibly a brake light? Maybe for when the car was pulled to the track? (Assuming it was pulled or trailered)
|
|
| Back to top |
|
|
MarkJ
Joined: 29 Jan 2018
Posts: 1310
|
| Posted: Wed Jun 14, 2023 8:52 am Post subject: |
|
|
| Yes, there is one on each side of the package shelf. It must have been pulled because if it was trailered, I'm not sure if they bothered with extra taillights unless back then trailers did not have to have taillights. You can tell from this picture that the car did not have lightning bolts on the hood. a lot of diecasts of this car come with them. |
|
| Back to top |
|
|
jbherri2
Joined: 30 Jan 2018
Posts: 213
Location: Lost! In Space ...
|
| Posted: Wed Jun 14, 2023 12:14 pm Post subject: |
|
|
@Mark - great catch. I have the Fred Cady sheet and it includes the red lightning bolts. I'm glad you pointed that out.
Still looking for any pictures I can find - thank you again for the help. |
|
| Back to top |
|
|
jbherri2
Joined: 30 Jan 2018
Posts: 213
Location: Lost! In Space ...
|
| Posted: Wed Jun 14, 2023 12:37 pm Post subject: |
|
|
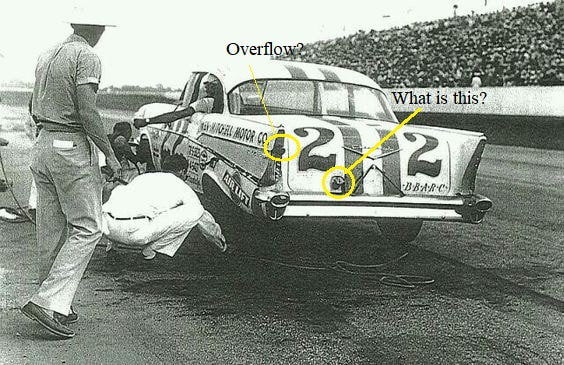
Oh! Another question for the group (for today at least) ... these cars, would they have had some sort of fuel cell? It looks like an overflow of some sort where the left tail light used to be. Also, what is on the lower left side of the trunk?
 |
|
| Back to top |
|
|
MarkJ
Joined: 29 Jan 2018
Posts: 1310
|
| Posted: Wed Jun 14, 2023 3:39 pm Post subject: |
|
|
| Correct on the overflow. The other item is the gas cap on the fuel filler neck. No fuel cell yet. Just a gas tank that may have been reinforced. |
|
| Back to top |
|
|
George Andrews
Joined: 30 Jan 2018
Posts: 460
|
| Posted: Sun Jun 18, 2023 3:58 pm Post subject: |
|
|
| I recall the 1957 Chevy had an weird fuel tank filler behind a hinged door under the left taillight. Looks like the team moved it over to the location shown, perhaps to get it away from the LR tire changer ??? |
|
| Back to top |
|
|
jbherri2
Joined: 30 Jan 2018
Posts: 213
Location: Lost! In Space ...
|
| Posted: Tue Jun 20, 2023 9:48 pm Post subject: |
|
|
Thank you, both.
It looks to me - almost - like the vertical chrome trim that would normally be at the end of the '57 fin was replaced with sheet metal. The driver's side having the overflow tube routed through where the factory filler neck would be. Maybe?
Anyway - I'm committed now. Cut up the front seat, flared in the headlights with "sheet metal", but out the front quarter windows. I'll post pictures soon. Thank you all for the continued input. |
|
| Back to top |
|
|
MarkJ
Joined: 29 Jan 2018
Posts: 1310
|
| Posted: Wed Jun 21, 2023 8:54 am Post subject: |
|
|
| Jonathan, I hope you post a wip so we can follow along on your journey.. |
|
| Back to top |
|
|
jbherri2
Joined: 30 Jan 2018
Posts: 213
Location: Lost! In Space ...
|
| Posted: Thu Jun 22, 2023 1:52 pm Post subject: |
|
|
Well ... Guess I'm committed now.
First off - I'm a slow builder and I have a severe case of Modeler's Attention Deficient Disorder, so let's just get that out there. 
If this should be moved to the Fab Shop, I understand.
First up, I selected the AMT Pro Shop '57 Chevy. Funny thing is, I sold one of these about a year or so ago - so I had to find another one.
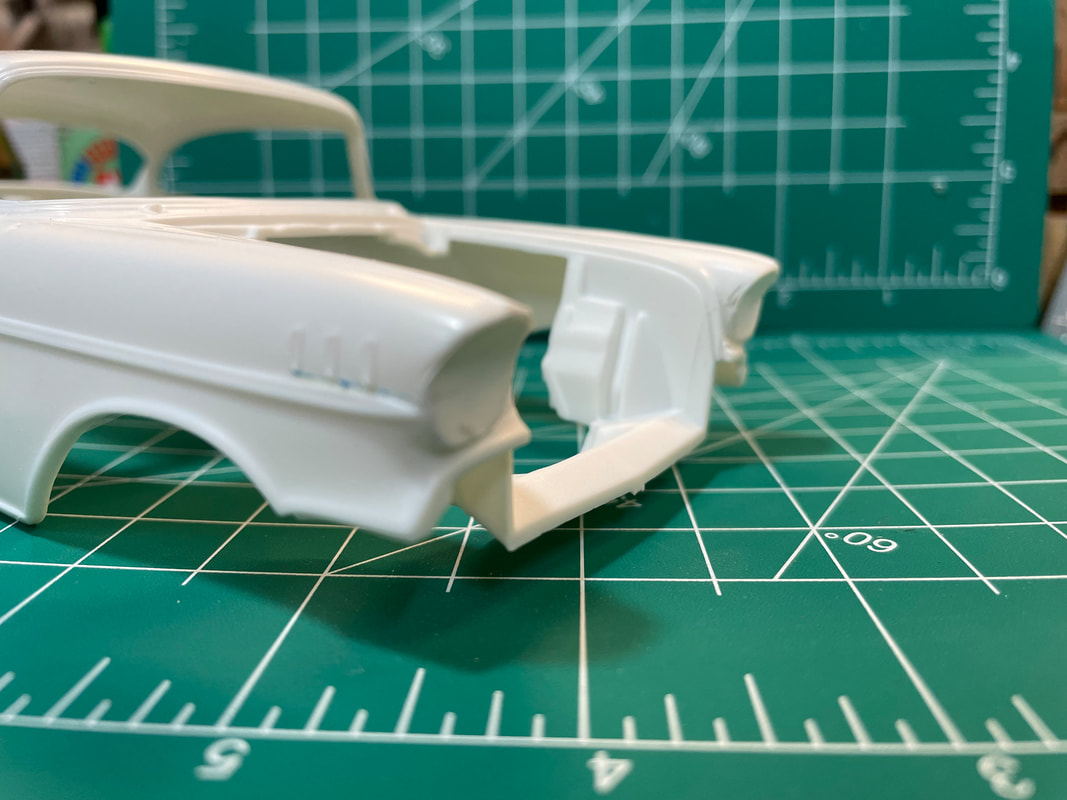
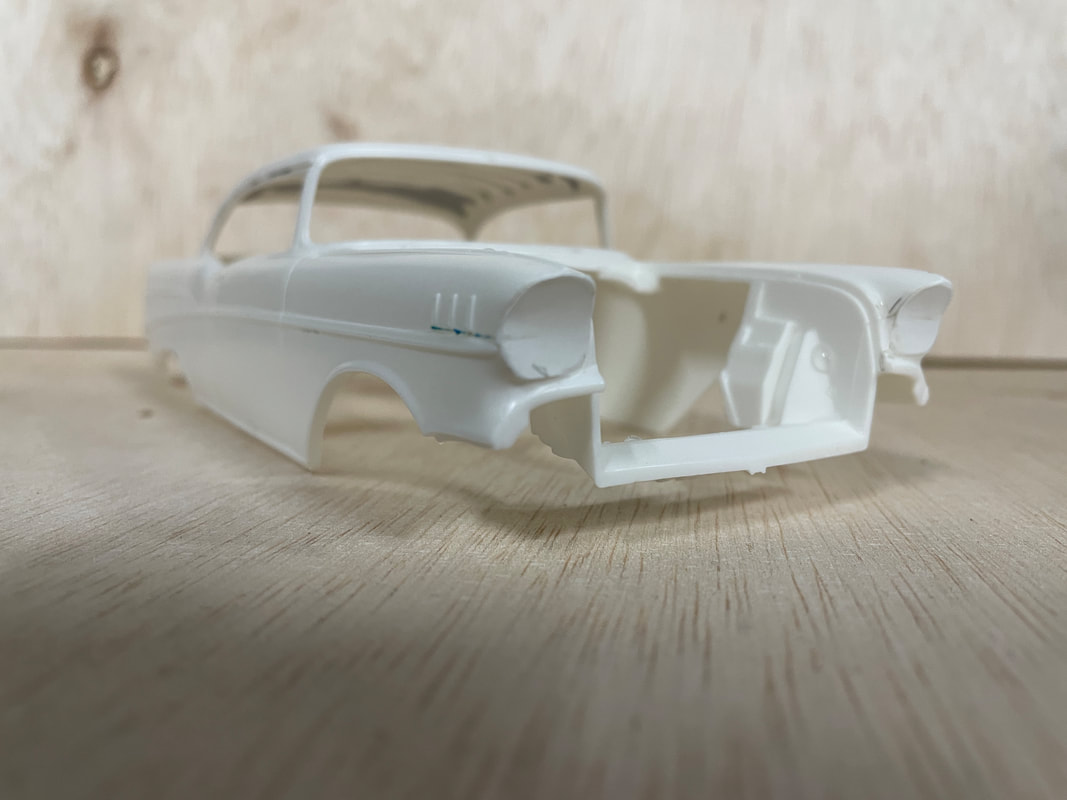
I've removed the vent window:
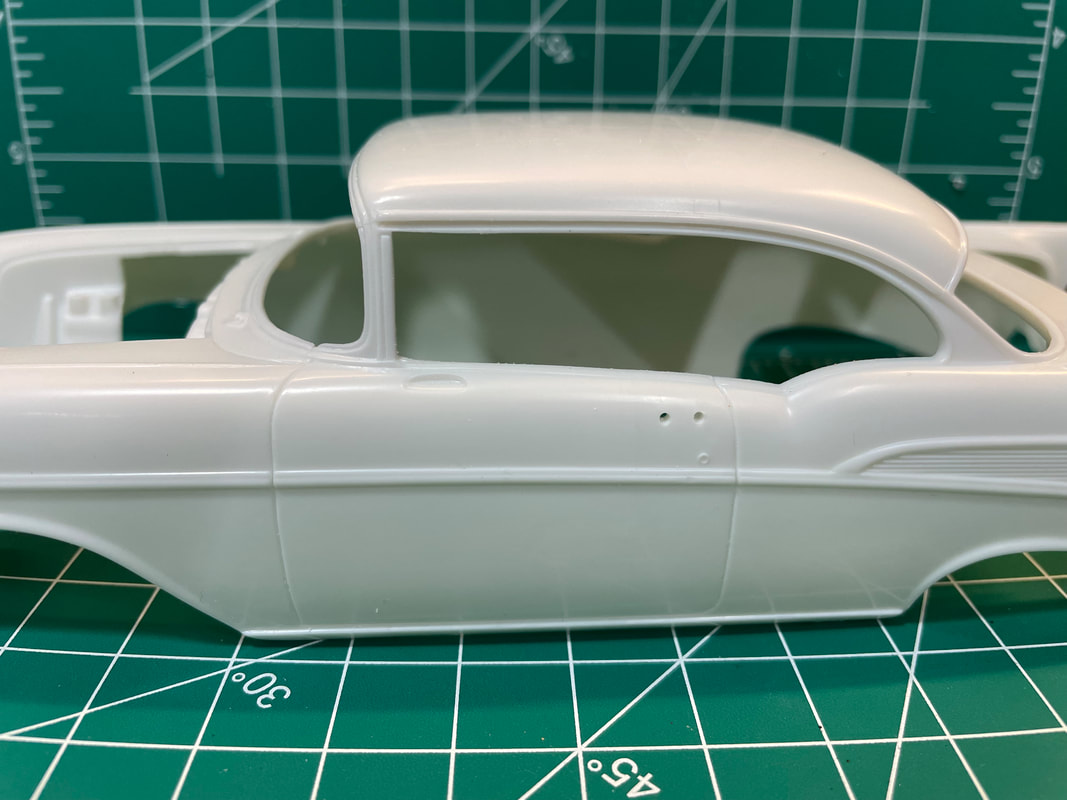
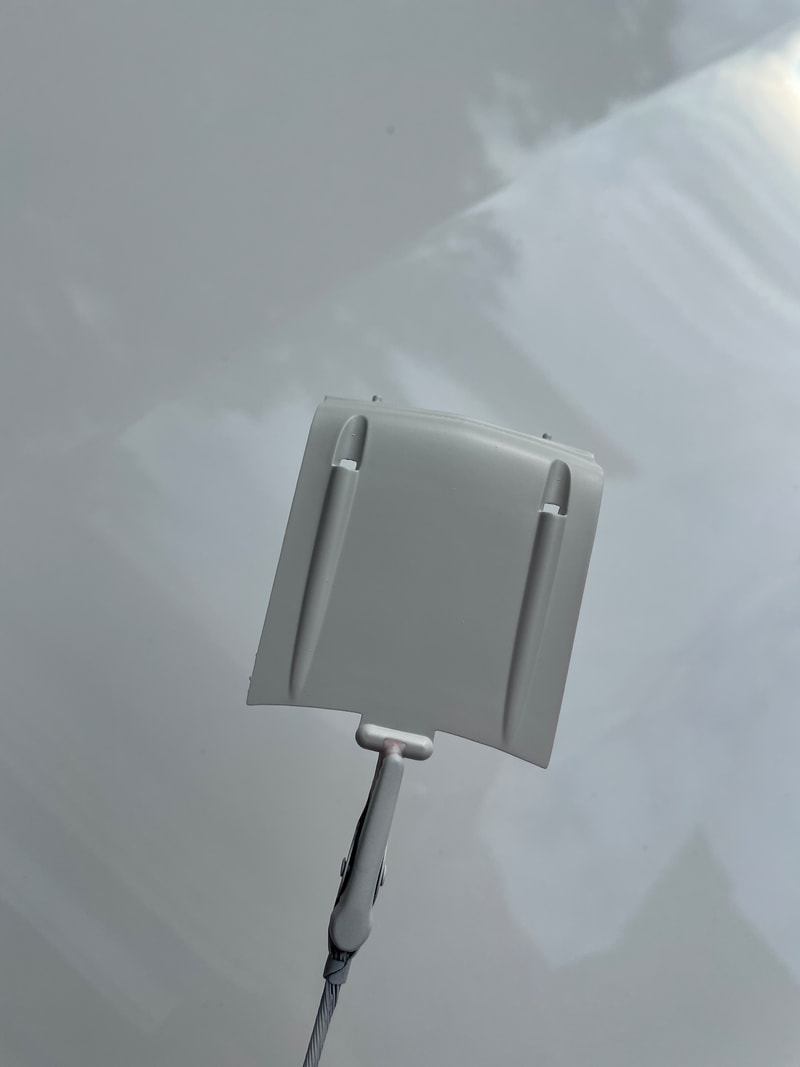
And I've filled in the headlights with "sheet metal":
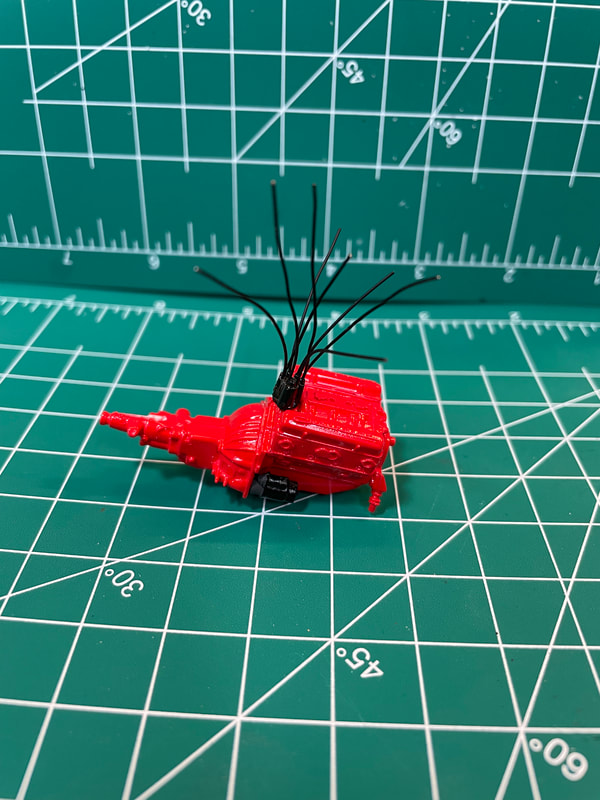
For some silly reason, I've decided to try to wire this engine.
Not pictured, I've cut down the front seat. I'll post a picture eventually. 
Thank you all for the inspiration and the assistance!
Last edited by jbherri2 on Thu Jul 20, 2023 7:49 am; edited 1 time in total |
|
| Back to top |
|
|
MarkJ
Joined: 29 Jan 2018
Posts: 1310
|
| Posted: Thu Jun 22, 2023 6:08 pm Post subject: |
|
|
| Nice job on the engine. Very clean work. I'm sure one of the mods will move it to the fab shop for you. |
|
| Back to top |
|
|
jbherri2
Joined: 30 Jan 2018
Posts: 213
Location: Lost! In Space ...
|
| Posted: Wed Jun 28, 2023 12:44 pm Post subject: |
|
|
Not even an update, really.
It occurred to me that the headliner was probably not in the car, especially with the rollbar and what appears to be much of the trim removed from the side glass. So, I've removed the dome light, and will soon sand down the molded-in sunvisors and headliner texture.
I also started shaping the seat. Chopped off the passenger backrest and filled in the resulting missing plastic with some styrene sheet. I still need to make a bolster or whatever you call it for the driver to lean on.
Lastly, I found that the 6 lug wheels and Firestone tires from the AMT 1950 Chevy pickup look like they may fit rather nicely. I do have a set of the PPP wheels and tires - and they are nicely molded, but I think MarkJ is right - they're a tad big for this build. |
|
| Back to top |
|
|
MarkJ
Joined: 29 Jan 2018
Posts: 1310
|
| Posted: Wed Jun 28, 2023 12:58 pm Post subject: |
|
|
| Sounds like you are well on your way. I like your choice for the wheels and tires. Sometimes you can use a piece of sprue for the seat bolster if you don't have the right size piece of tubing that would have to be capped off, at least at the top end. |
|
| Back to top |
|
|
jbherri2
Joined: 30 Jan 2018
Posts: 213
Location: Lost! In Space ...
|
|
| Back to top |
|
|
MarkJ
Joined: 29 Jan 2018
Posts: 1310
|
| Posted: Tue Jul 04, 2023 11:24 am Post subject: |
|
|
| Jonathan, I have no clue what they used in the 57 Chevys but in the early sixtys they used an asbestos type padding to insulate the floor and of course it was not flammable. Not sure if it caused cancer. |
|
| Back to top |
|
|
jbherri2
Joined: 30 Jan 2018
Posts: 213
Location: Lost! In Space ...
|
| Posted: Tue Jul 04, 2023 2:24 pm Post subject: |
|
|
| I might use a little artistic license in this case. |
|
| Back to top |
|
|
MarkJ
Joined: 29 Jan 2018
Posts: 1310
|
| Posted: Tue Jul 04, 2023 4:41 pm Post subject: |
|
|
| Sounds good to me. |
|
| Back to top |
|
|
jbherri2
Joined: 30 Jan 2018
Posts: 213
Location: Lost! In Space ...
|
| Posted: Thu Jul 06, 2023 7:12 am Post subject: |
|
|
Small progress.
Filled and sanded the headliner detail. Clearly this needs more work, as you can still see the sun visors!
I think I'm mostly happy with the headlight covers, but we'll know more once it's in primer.
It's hard to see here, but I've got the underside in Red Oxide primer, with some white overspray (Tamiya Insignia White). I'm using various matt, semi-, and gloss blacks for the frame, etc.
And I've cut off and filled the seat back. Still need to fashion a bolster, as discussed earlier. I'm using some textured paint to try to restore the seat pattern that was sanded away while working on this.
 |
|
| Back to top |
|
|
jbherri2
Joined: 30 Jan 2018
Posts: 213
Location: Lost! In Space ...
|
| Posted: Thu Jul 06, 2023 7:12 am Post subject: |
|
|
Small progress.
Filled and sanded the headliner detail. Clearly this needs more work, as you can still see the sun visors!
I think I'm mostly happy with the headlight covers, but we'll know more once it's in primer.
It's hard to see here, but I've got the underside in Red Oxide primer, with some white overspray (Tamiya Insignia White). I'm using various matt, semi-, and gloss blacks for the frame, etc.
And I've cut off and filled the seat back. Still need to fashion a bolster, as discussed earlier. I'm using some textured paint to try to restore the seat pattern that was sanded away while working on this.
|
|
| Back to top |
|
|
MarkJ
Joined: 29 Jan 2018
Posts: 1310
|
| Posted: Thu Jul 06, 2023 7:44 am Post subject: |
|
|
| Jonathan, lots of good work going on here. Red primer looks really good |
|
| Back to top |
|
|
jbherri2
Joined: 30 Jan 2018
Posts: 213
Location: Lost! In Space ...
|
| Posted: Thu Jul 13, 2023 7:10 am Post subject: |
|
|
Such a minor update.
I thought I'd remove the headliner from the kit and add some framing in it's place. I started by filling the headliner detail with Tamiya's liquid putty, and sanding. I've started a little framework. I suppose this won't really be seen, but I'm committed now.
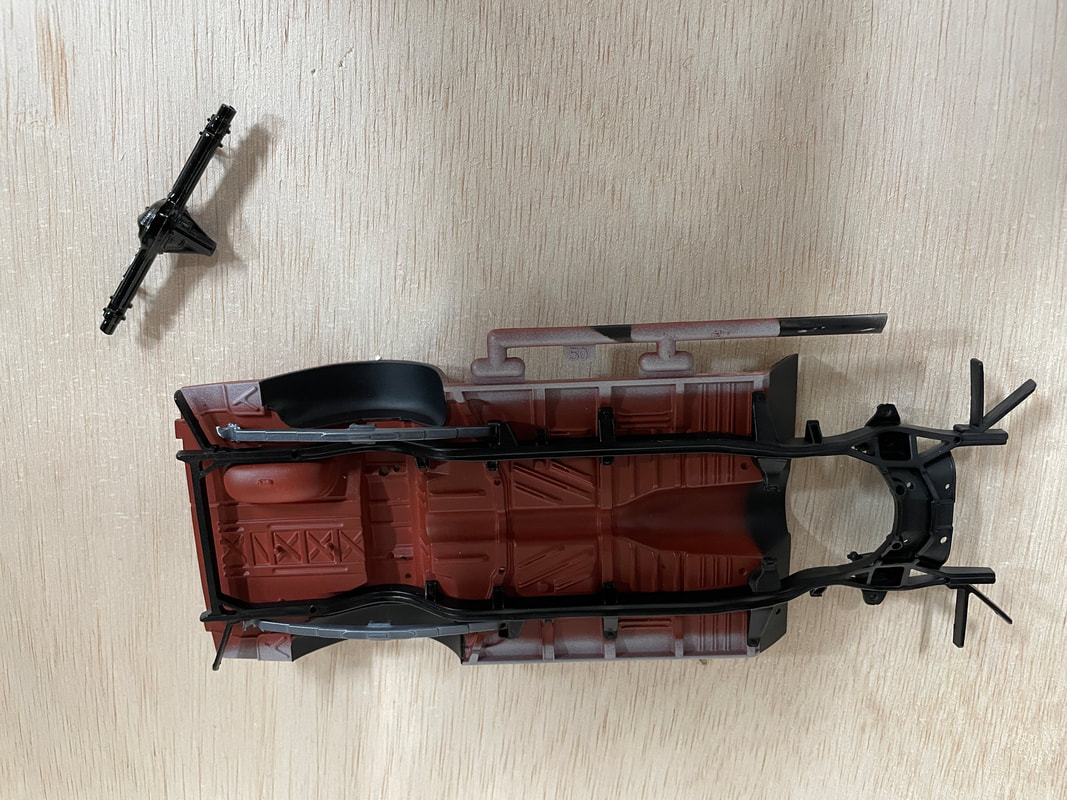
I need to figure out how to mount dual shocks - which I think the rear is pretty straightforward. I'm not even sure if I'll add the supplementary dual shocks on the front, although I did run across documentation from Chevrolet that indicated dual shocks would be present at all four corners. Here's the chassis so far, just dry fitted. Of course, I could just leave it as-is.
 |
|
| Back to top |
|
|
MarkJ
Joined: 29 Jan 2018
Posts: 1310
|
| Posted: Thu Jul 13, 2023 7:41 am Post subject: |
|
|
| If you need to make shocks, you can use .080 evergreen tube and slide whatever rod that will go in it. It's probably .025 rod or somewhere close to that. To make ends for the shocks you just do sausage cuts of the .080 tube or maybe something smaller, if that seems too large. Pretty easy to make actually. |
|
| Back to top |
|
|
jbherri2
Joined: 30 Jan 2018
Posts: 213
Location: Lost! In Space ...
|
| Posted: Sun Jul 16, 2023 2:08 pm Post subject: |
|
|
| admins or moderators - is it possible to move this tread to The Fab Shop? |
|
| Back to top |
|
|
jbherri2
Joined: 30 Jan 2018
Posts: 213
Location: Lost! In Space ...
|
| Posted: Sun Jul 16, 2023 2:08 pm Post subject: |
|
|
| admins or moderators - is it possible to move this tread to The Fab Shop? |
|
| Back to top |
|
|
jbherri2
Joined: 30 Jan 2018
Posts: 213
Location: Lost! In Space ...
|
| Posted: Wed Jul 19, 2023 7:39 am Post subject: |
|
|
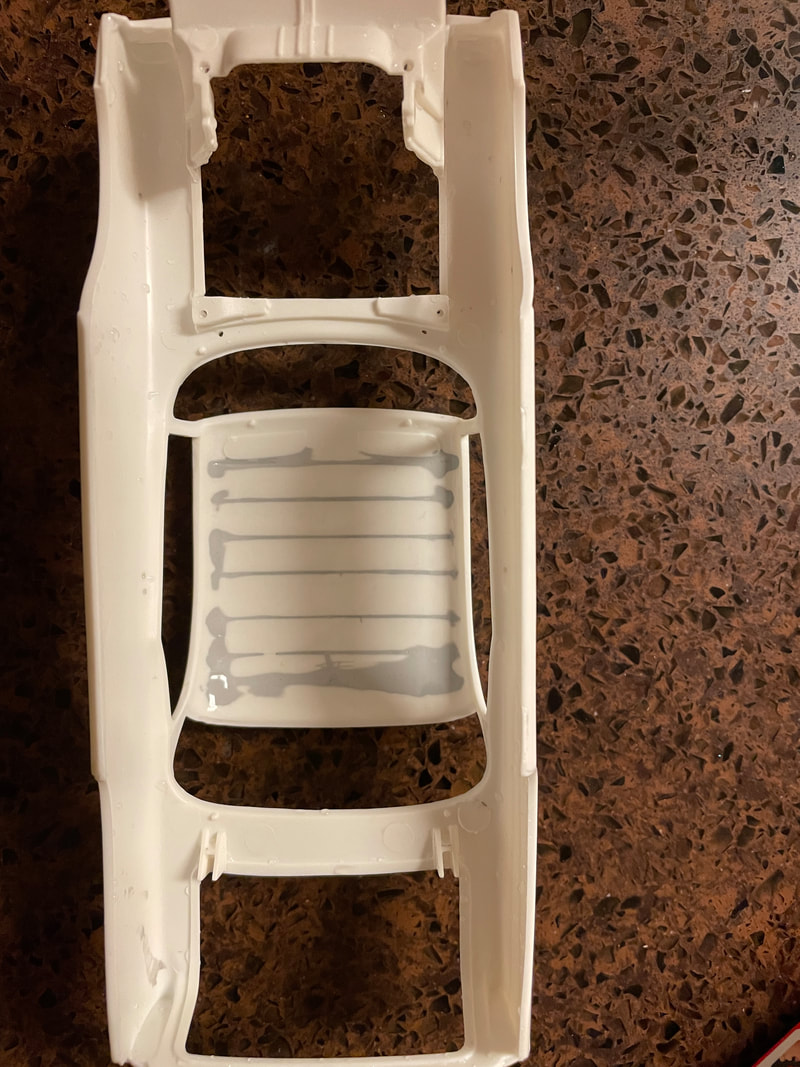
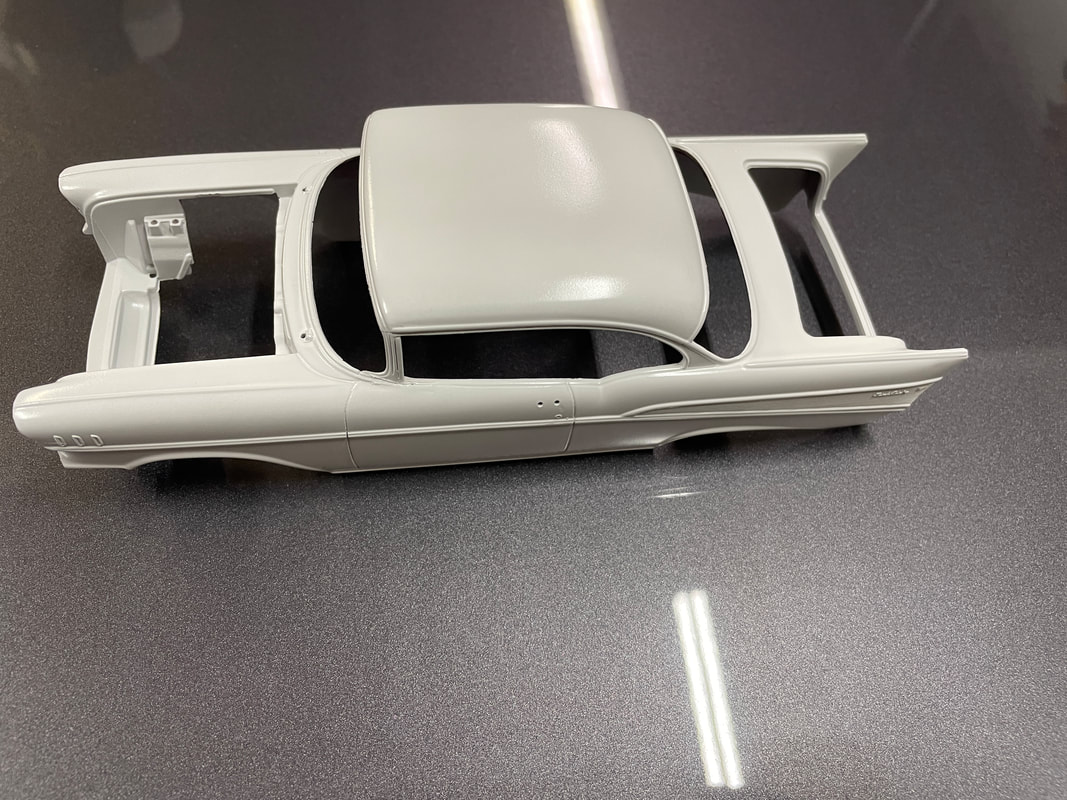
Going with Tamiya Insignia White as the base color - I think.
I feel like matching colors to old school black and white photos is a total gamble, anyway.
Anyway, Tamiya Fine White Primer, followed by a shot of Tamiya Insignia White (a flat color) - will need to clear with, probably, Tamiya Clear Gloss
 |
|
| Back to top |
|
|
MarkJ
Joined: 29 Jan 2018
Posts: 1310
|
| Posted: Wed Jul 19, 2023 2:43 pm Post subject: |
|
|
| Good to see this one is in the fab shop. |
|
| Back to top |
|
|
jbherri2
Joined: 30 Jan 2018
Posts: 213
Location: Lost! In Space ...
|
| Posted: Thu Jul 20, 2023 7:35 am Post subject: |
|
|
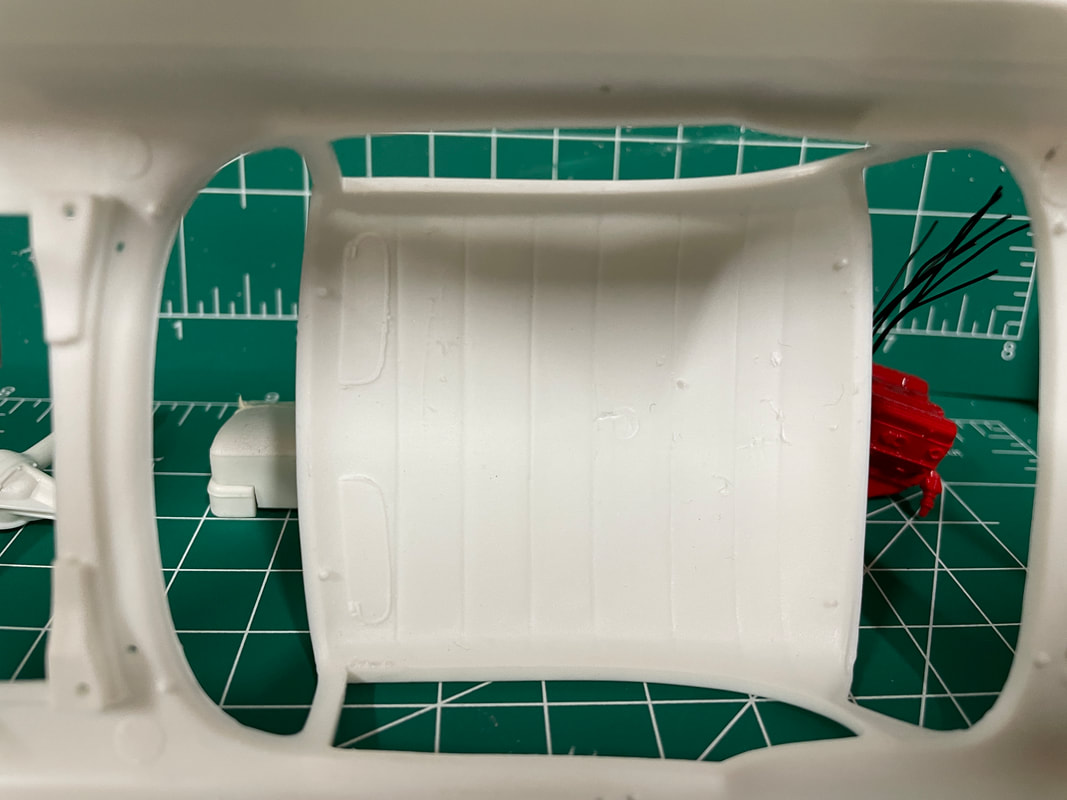
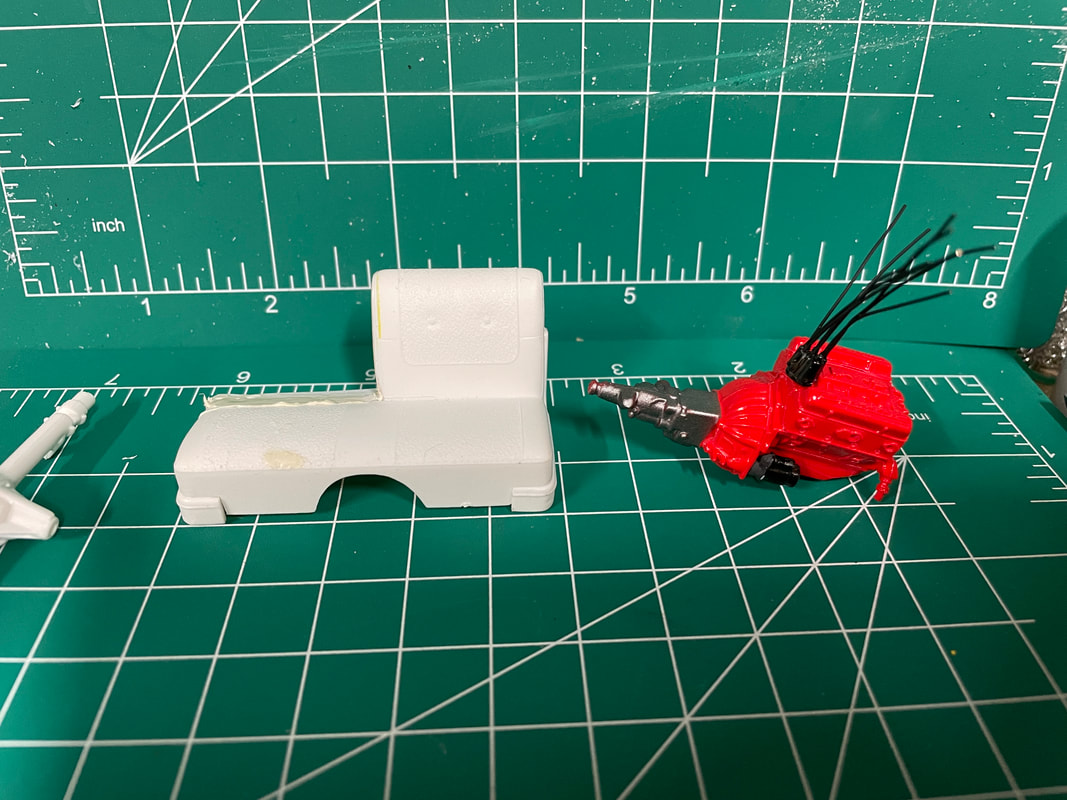
Minor stuff. I'm kind of a slow builder, so bear with me. I'm using the AMT Pro Shop 1957 kit.
I stumbled across a digital copy of "The 1957 Chevrolet Stock Car Competition Guide", which I suspect many of you have seen. I also found a "what color was it?" guide to 1957 Chevrolets. With that, and a hefty amount of artistic license, I've moved ahead.
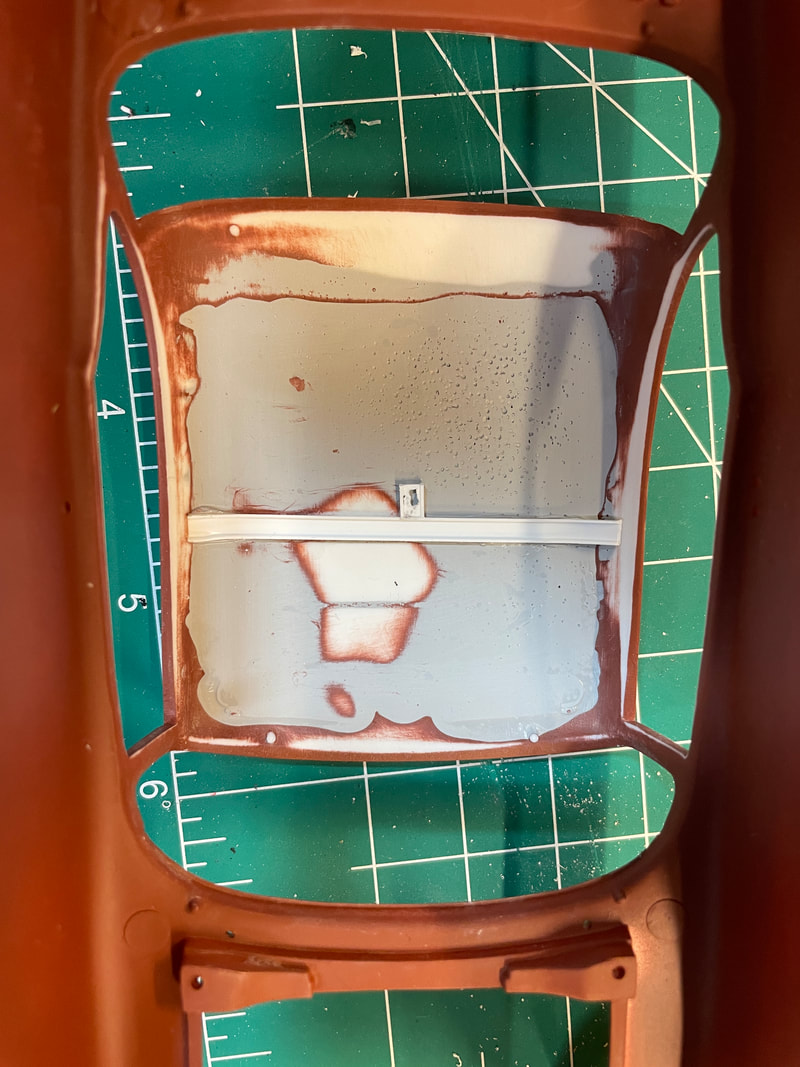
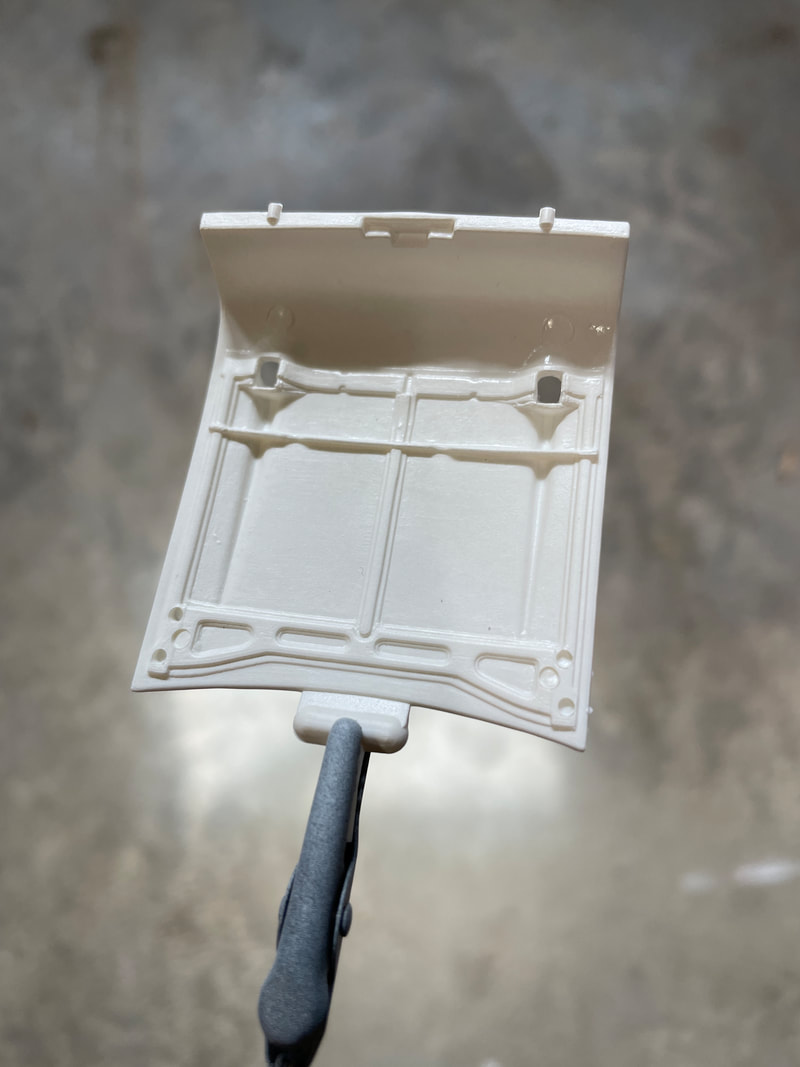
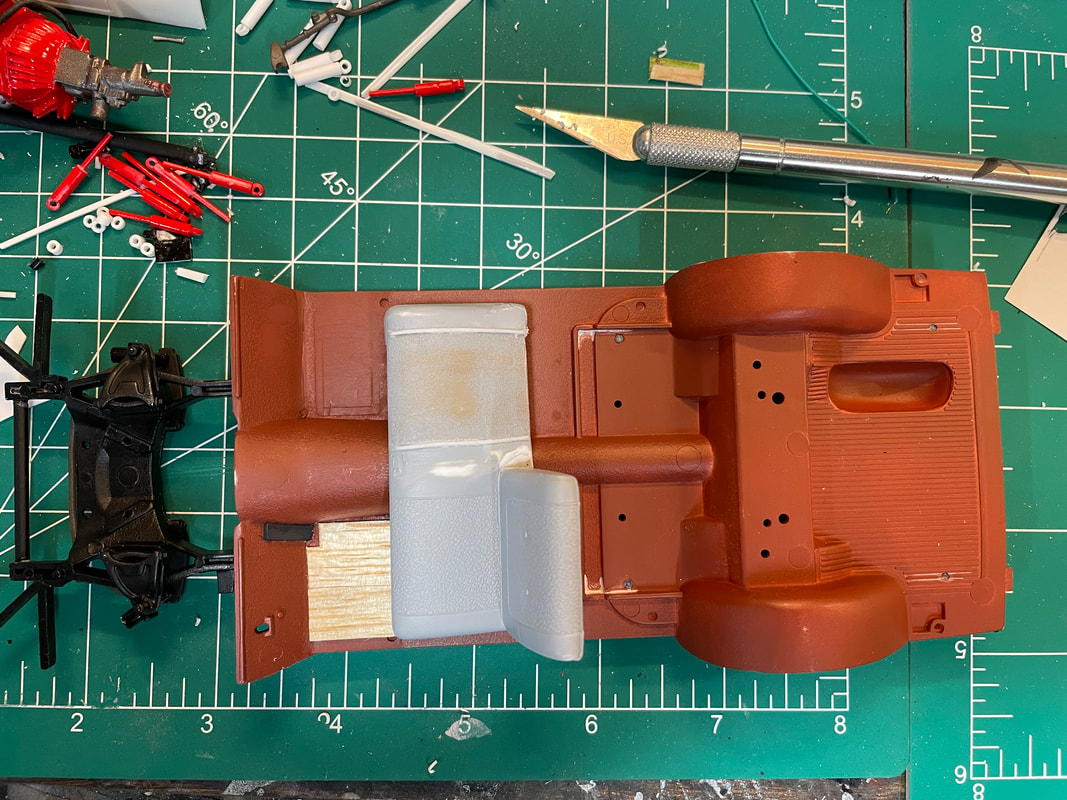
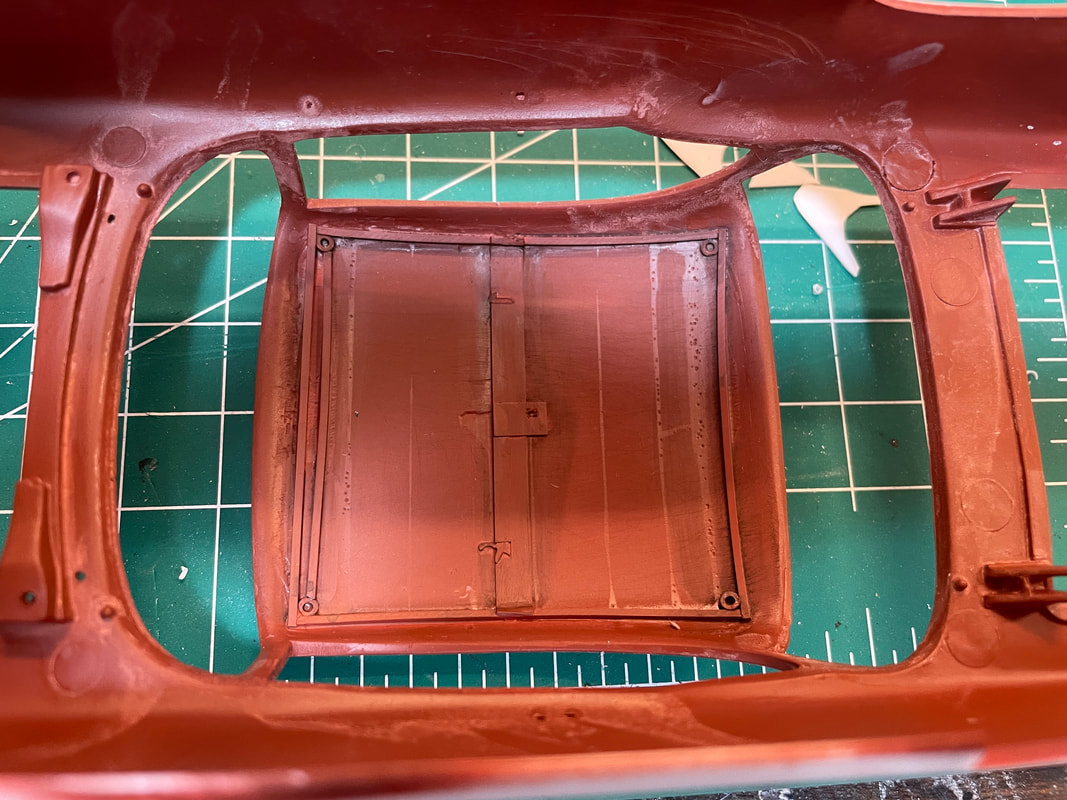
From what (little) I've gathered, it seems that a lot of the car was left in a Red Oxide type of primer - the floor pan, above the headliner, basically anything that was covered by something else. So with that in mind, I assumed the floorboard and the roof would be primer. I have zero evidence to suggest the floor board may have had a piece of plywood on it to protect the driver's feet from the heat, but it adds a tiny bit of interest, so I went with it. I scraped out the molded in floor mats, primed with Tamiya Red Oxide primer, and used a scrape of balsa to make the small "plywood" panel. I now see that I need to work on the passenger side a bit more.
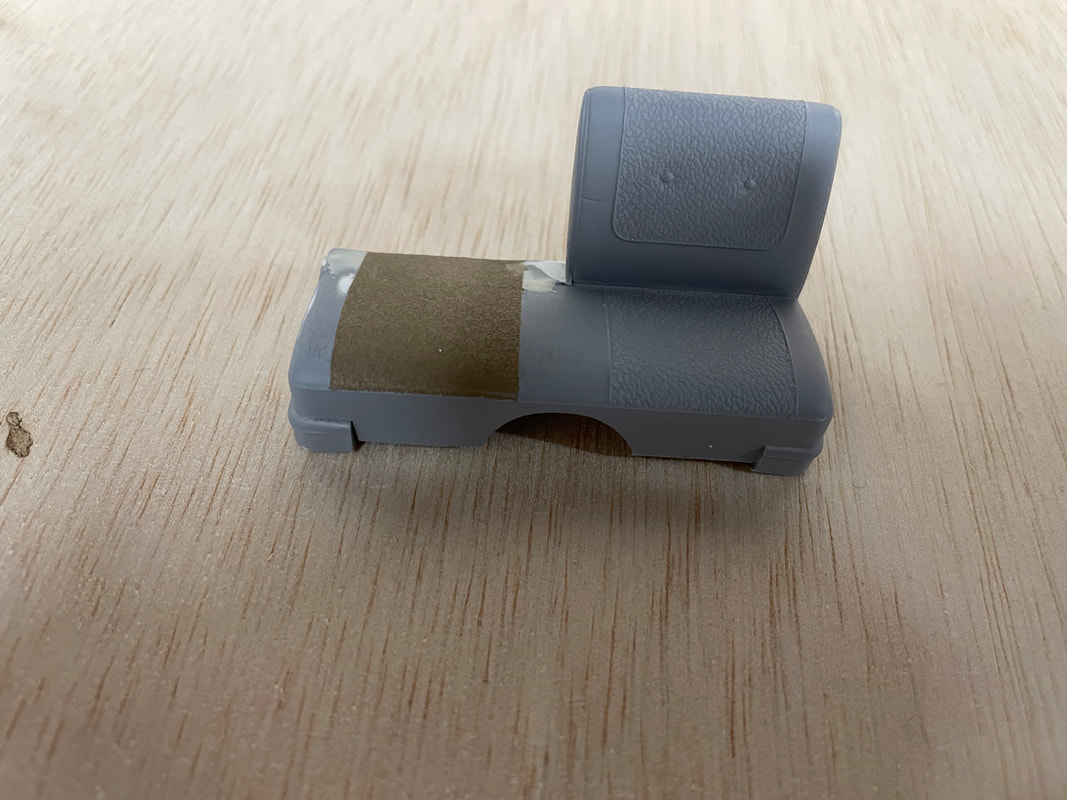
Passenger seat has been cut down and I used some Styrene strip to recreate the lost detail - which the camera shows just how crooked I got my "piping".
Poor iPhone Camera shot of the engine. After getting this far, I realized the Fireball Roberts car most likely had a single carb. Plus, y'all mentioned above that it was a single carb car. (I don't listen, apparently!)
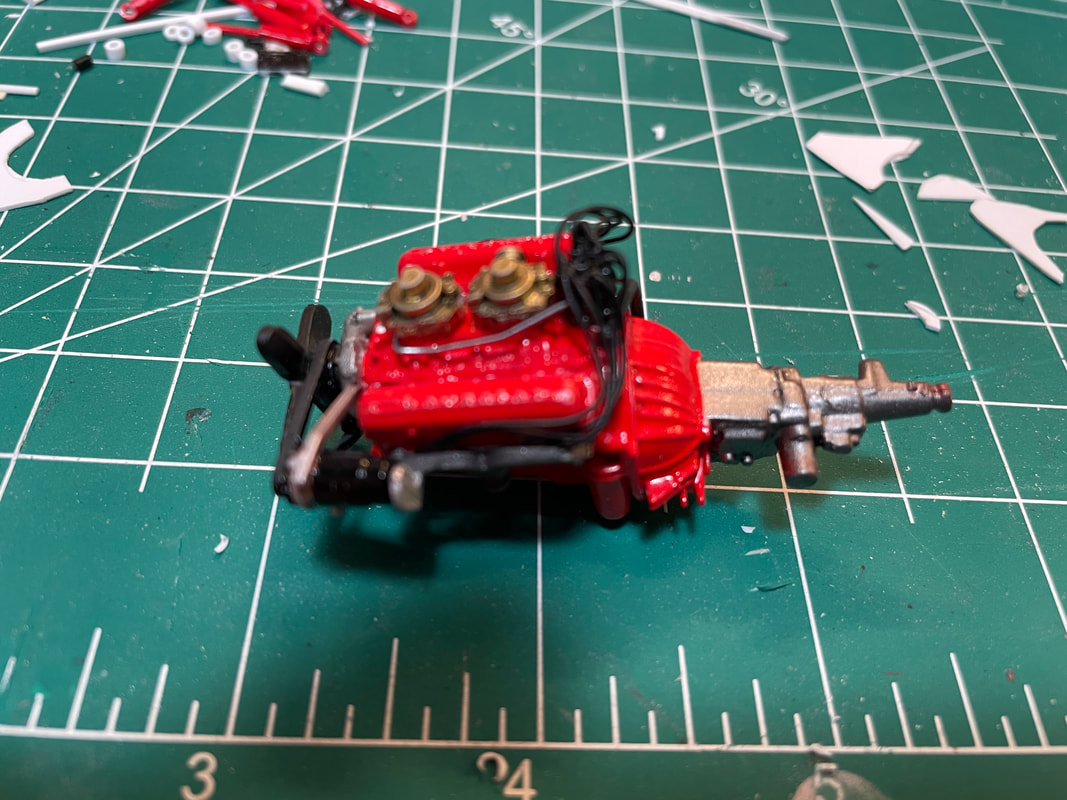
But, the carb will be (mostly) hidden by a large air filter, similar to this one - if I can fashion such.

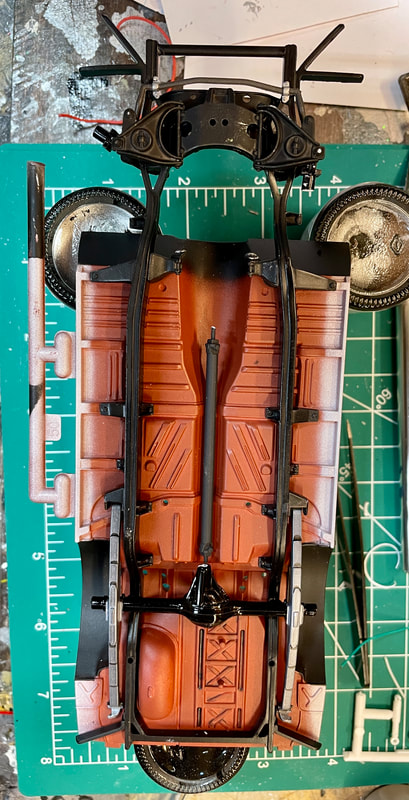
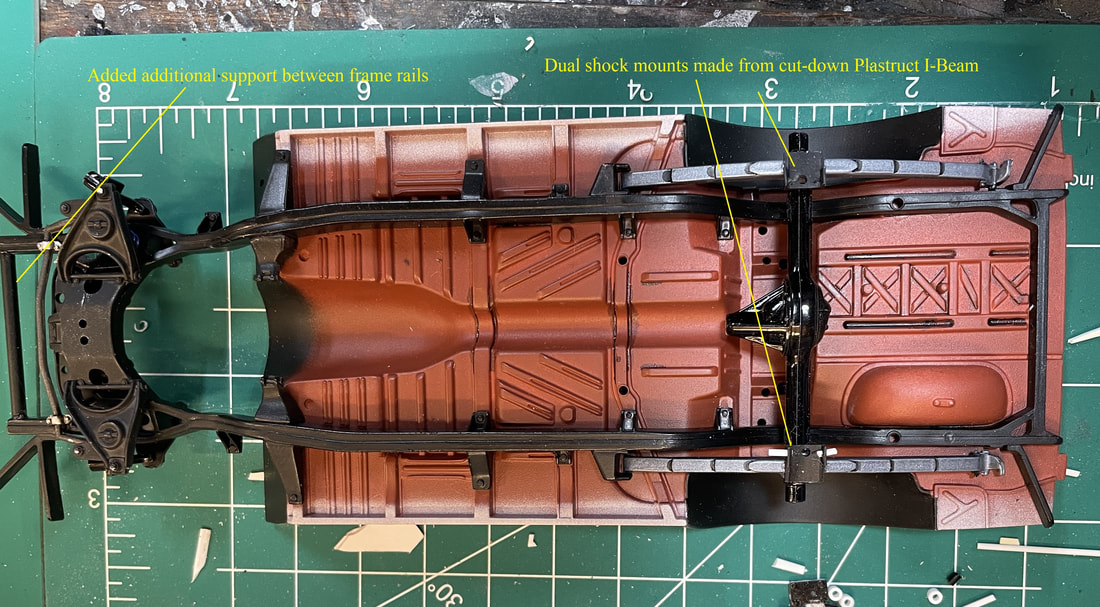
I'm trying my hand at making dual shocks for the rear. I fashioned some mounts using cutdown I-Beams and have been tinkering with making shocks out of simple styrene tubing. Limited research suggests an additional bar was added between the frame rails at the front for rigidity, so I added that. After painting the floor pan in Tamiya Red Oxide Primer, I masked off and painted the rear wheel wells semigloss black. I made a loose mask from tape and cardstock and attempted an "overspray" of Tamiya Insignia White along the edges. I'm planning to use the Insignia White as the overall color of the car.
Lastly, I thought it'd be a great idea to have some hint of the frame that would have been left behind when the headliner was removed. Again, I have zero evidence that this was the case, but it seemed logical (maybe?!?!?). It's pretty rough looking, as this is actually my second attempt at making something using some styrene bits and pieces. But, I think once the car is assembled - roll bar, etc. - it will not be too noticeable.
 [/img] [/img] |
|
| Back to top |
|
|
MarkJ
Joined: 29 Jan 2018
Posts: 1310
|
| Posted: Thu Jul 20, 2023 8:57 am Post subject: |
|
|
| Looking good. Especially like the plywood errr balsa floor pad for drivers feet. It does add a lot of interest. I'm liking all this extra detailing you are adding to the build. |
|
| Back to top |
|
|
jbherri2
Joined: 30 Jan 2018
Posts: 213
Location: Lost! In Space ...
|
| Posted: Tue Aug 01, 2023 8:21 pm Post subject: |
|
|
Did I mention that I can be a slow builder?
I had initially painted the car in Tamiya Insignia White (AS-20, Lacquer from the spray can), but once that was on the car, it looked too gray to my eye.
I certainly didn't want to strip the car, though! So, I shot one thin coat of Tamiya Pure White TS-26, also straight from the can.
I think I'm pretty happy with this.
This is in the garage, under LED's. I'll try to get a shot in daylight after work tomorrow.
Moving on.... |
|
| Back to top |
|
|
MarkJ
Joined: 29 Jan 2018
Posts: 1310
|
| Posted: Wed Aug 02, 2023 6:15 am Post subject: |
|
|
| The ts-26 looks just right. The other would have been gray for sure and not correct at all. Good save on that. |
|
| Back to top |
|
|
jbherri2
Joined: 30 Jan 2018
Posts: 213
Location: Lost! In Space ...
|
| Posted: Tue Sep 19, 2023 1:17 pm Post subject: |
|
|
| Ha! I haven't forgotten my project - just been distracted by some other things. AS noted earlier, I'm a slow and easily distracted builder ... |
|
| Back to top |
|
|
|

