| View previous topic :: View next topic |
| Author |
Message |
BW
Joined: 01 Feb 2018
Posts: 218
Location: Lick Creek, Alabama
|
 Posted: Sat Jul 18, 2020 10:35 am Post subject: Bobby Allison's 1985 Miller American Buick Regal Posted: Sat Jul 18, 2020 10:35 am Post subject: Bobby Allison's 1985 Miller American Buick Regal |
 |
|
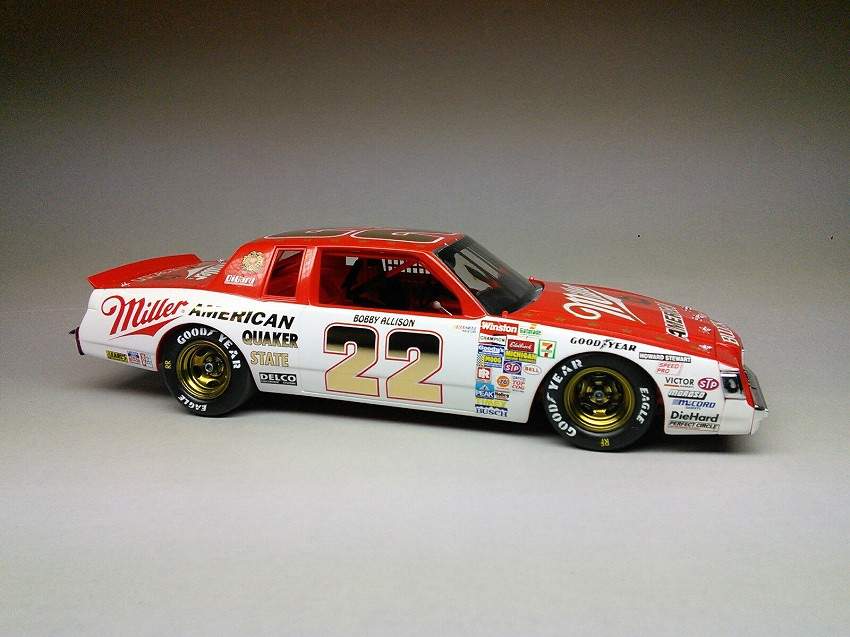
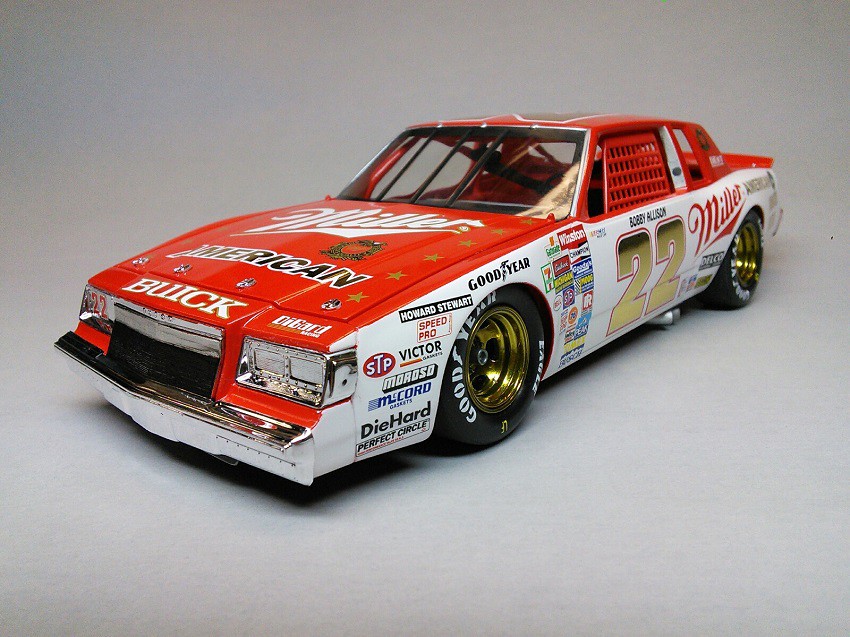
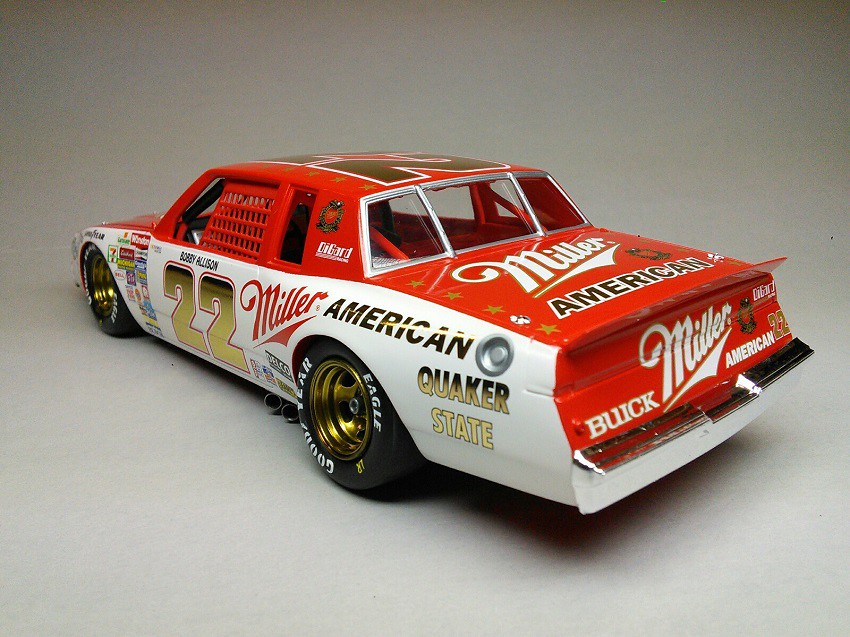
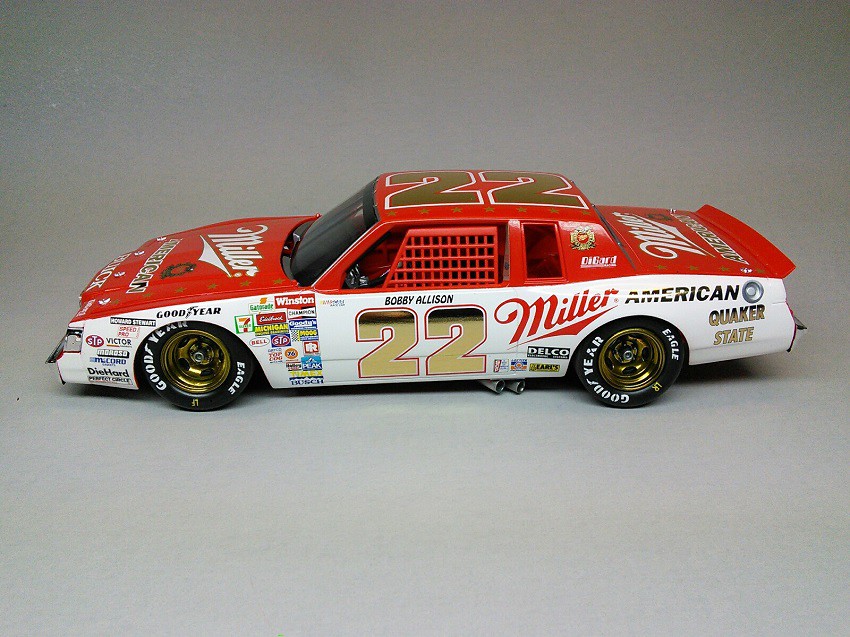
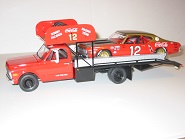
Bobby Allison's 1985 Miller American Buick Regal
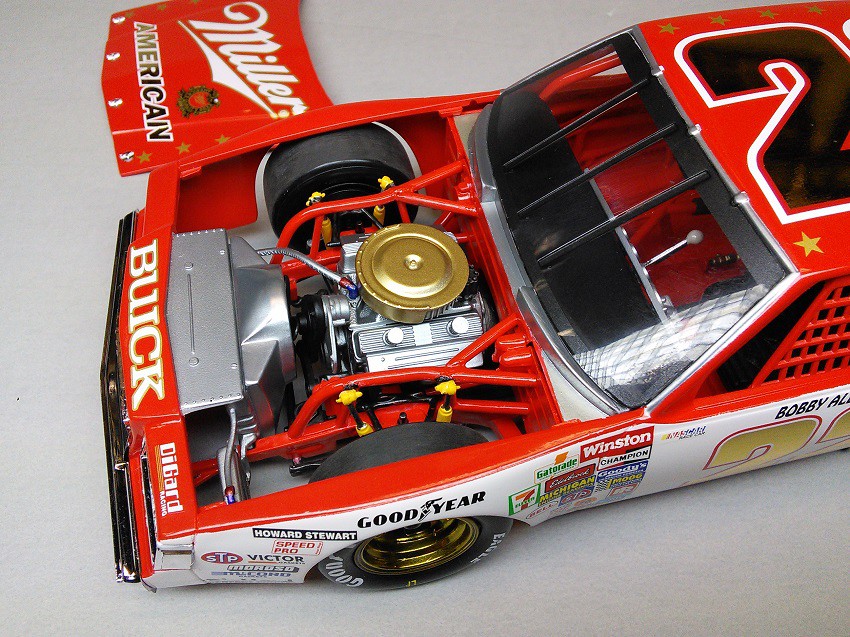
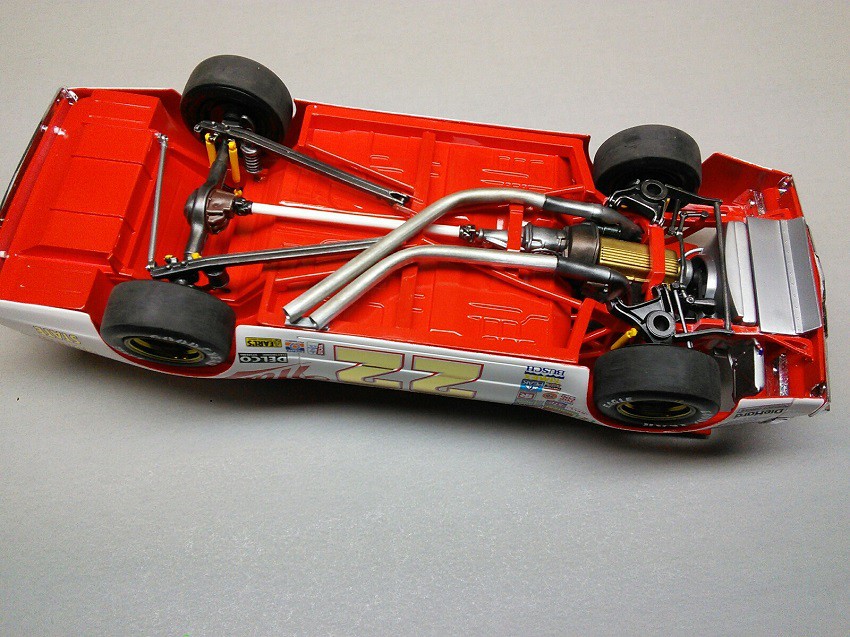
Bobby Allison's 1985 DiGard Miller American Buick Regal he drove the first half of the 1985 season. After the Firecracker 400, Bobby split with DiGard and decided to run his own cars the remainder of the season. One beautiful race car. I always liked gold or silver foil numbers on any race car.
KIT: Monogram
DECALS: Wetworks
PAINT: Tamiya TS-49 Bright Red, Tamiya TS-26 Pure White. Model Master Metalizers for all the metal work.
BUILD NOTES: Pretty much box stock. I did use the 5-Hole wheels from the spare box. I left the wheels chrome but I airbrushed a couple coats of Tamiya Clear Yellow plus Tamiya Clear Smoke with a drop of Tamiya Clear Red. After drying, I clear coated the wheels with Tamiya X-22 Gloss Clear thinned with Mr. Color Leveling thinner to protect the color. *I have discovered that Tamiya Clear colors will fade after a few years so I now seal them with the X-22 to prevent the fading. I just started using Mr. Color Leveling Thinner and have found it allows the paint to level out and give a very nice smooth finish without any eggshell or unevenness. You can use this thinner on any lacquer based paint as well as any Tamiya X or XF paints.
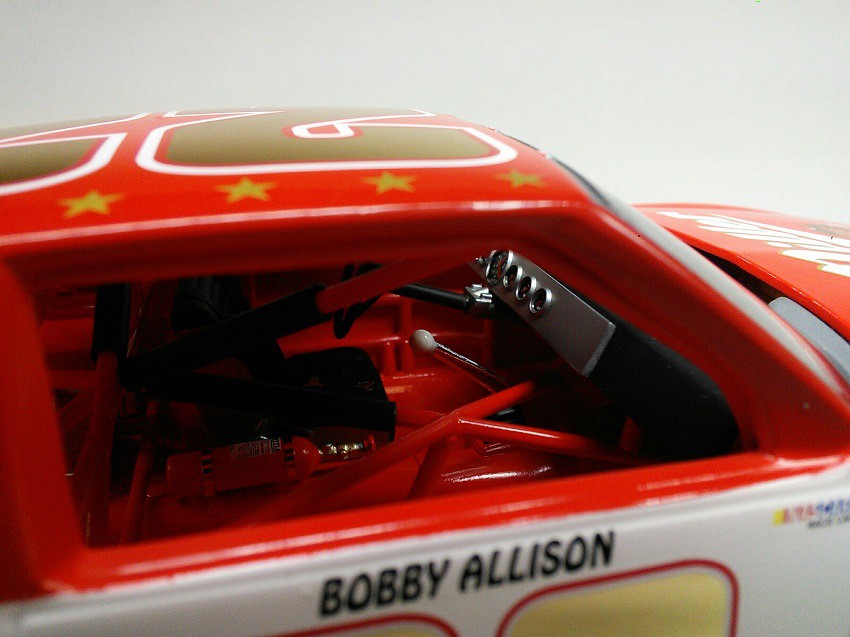
I added my own exhaust dumps using K&S aluminum tubing. I attached a small length of of shrink tubing on the end of the headers to attach the dumps. I also cut off the headers where they wrap around the bottom of the oil pan on the Monogram kits. I added some Detail Master harness buckles for the seat.
 [img] [img]
 [img] [img]
 [img] [img]
 [img] [img]
 [img] [img]
 [img] [img]
 [img] [img]
This was a fun quick build. In my opinion, this Monogram Regal kit is one of the best nascar kits ever produced. The only problem areas are the headers that wrap around the oil pan, and occasionally the front windshield can be a little fiddly. Especially if there is any slight warpage of the body. The dash can get in the way of a flush windshield fit so be sure and dry fit several times. I usually end up sanding the top edge of the dash (where the bottom edge of the windshield rests on) to get a good fit. The age of this kit now produces a lot of flash so take your time and clean off all the flash. Fun build!
Thanks for looking! Comments and questions are always welcomed!
-Bobby |
|
| Back to top |
|
 |
Dennis O
Board Moderator
Joined: 28 Jan 2018
Posts: 886
Location: Louisville, Ky.
|
| Posted: Sat Jul 18, 2020 10:49 am Post subject: |
|
|
You do some fine work!!!
_________________
Dennis
Artificial Intelligence is no match for Natural Stupidity....... |
|
| Back to top |
|
|
Hot Wheels
Joined: 11 Feb 2018
Posts: 175
Location: Gallipolis, Ohio
|
| Posted: Sat Jul 18, 2020 12:55 pm Post subject: |
|
|
Nice job...those wheels look great 
_________________
Matt |
|
| Back to top |
|
|
Dan Belcher
Joined: 10 Feb 2020
Posts: 194
|
| Posted: Sat Jul 18, 2020 7:17 pm Post subject: |
|
|
| Man, I bet those colors really pop in person. Beautiful build! |
|
| Back to top |
|
|
Orangeastre
Joined: 29 Jan 2018
Posts: 212
|
| Posted: Sat Jul 18, 2020 7:49 pm Post subject: |
|
|
| A text book example, beautiful build as always. |
|
| Back to top |
|
|
bighoo
Joined: 01 Feb 2018
Posts: 230
|
| Posted: Sat Jul 18, 2020 10:30 pm Post subject: |
|
|
| Beautiful build - love the colors! |
|
| Back to top |
|
|
Henryjint

Joined: 28 Jan 2018
Posts: 1983
Location: NY State's Hudson Valley
|
| Posted: Sun Jul 19, 2020 7:48 am Post subject: |
|
|
VERY nicely done!!!
_________________
Forum member since 10/25/2010 |
|
| Back to top |
|
|
MarkJ
Joined: 29 Jan 2018
Posts: 1317
|
| Posted: Mon Jul 20, 2020 8:20 am Post subject: |
|
|
| Absollutely stunning as all of your builds are. . The gold really pops on this model. Its one of those builds you just have to go back and look at over and over again. |
|
| Back to top |
|
|
Lee "Spud" Lo
Joined: 30 Jan 2018
Posts: 137
|
| Posted: Mon Jul 20, 2020 2:51 pm Post subject: |
|
|
| Outstanding my friend. Great job. |
|
| Back to top |
|
|
Jim N
Joined: 29 Jan 2018
Posts: 651
|
| Posted: Mon Jul 20, 2020 3:54 pm Post subject: |
|
|
| Great work! Really outstanding. |
|
| Back to top |
|
|
Mack
Joined: 28 Jan 2018
Posts: 732
Location: deep south
|
| Posted: Mon Jul 20, 2020 7:55 pm Post subject: |
|
|
Another killer build from BWs "Alabama Gang" factory. Great as usual!!
_________________
life is hard, it's harder when you're stupid. John Wayne |
|
| Back to top |
|
|
sentsat71
Joined: 03 Feb 2018
Posts: 1237
Location: Fenton, IA
|
| Posted: Wed Jul 22, 2020 11:22 am Post subject: |
|
|
WOW!!
One SHARP build!
Great job!!!!
Really like the simple paint scheme....!!
_________________
Ed. K
Last edited by sentsat71 on Sat Jul 25, 2020 10:31 am; edited 1 time in total |
|
| Back to top |
|
|
Shunter

Joined: 27 Jan 2018
Posts: 461
|
| Posted: Wed Jul 22, 2020 3:27 pm Post subject: |
|
|
| Very nice looking build. |
|
| Back to top |
|
|
wildbill72
Joined: 28 Jan 2018
Posts: 112
Location: Grand Rapids, Mi
|
| Posted: Thu Jul 23, 2020 7:59 pm Post subject: |
|
|
Awesome build. Love the wheels.
_________________

WILD Bill Motorsports, LLC |
|
| Back to top |
|
|
Matt T.
Joined: 03 Feb 2018
Posts: 114
Location: Albany, NY
|
| Posted: Fri Jul 24, 2020 11:10 am Post subject: |
|
|
Awesome build!
You are right about these Buicks - all the builds I see look great. |
|
| Back to top |
|
|
R.J.
Joined: 28 Jan 2018
Posts: 384
|
| Posted: Fri Jul 24, 2020 4:59 pm Post subject: |
|
|
Super build. Probably my favorite of all the Miller paint jobs Bobby drove just wish it had a little better history with it.
_________________
Roanoke, VA. |
|
| Back to top |
|
|
RCB
Joined: 09 Mar 2020
Posts: 44
|
| Posted: Tue Aug 11, 2020 6:21 pm Post subject: |
|
|
| What did you use for clearcoat? |
|
| Back to top |
|
|
BW
Joined: 01 Feb 2018
Posts: 218
Location: Lick Creek, Alabama
|
| Posted: Tue Aug 11, 2020 7:38 pm Post subject: |
|
|
| RCB wrote: | | What did you use for clearcoat? |
Hey RCB. No clearcoat was used. I just polished out the paint before decaling using 6000, 8000, 10000, and finally 12000 grit wet polishing cloths. After decaling, I use an infant washcloth with a small bowl of warm water and a drop of Dawn dishwashing liquid and GENTLY wipe down the entire body to clean off any decal residue.
I use to use Tamiya TS-13 Clear Glosscoat but I no longer do because I ruined a few sets of decals due to how "hot" the TS-13 seems to be. I thought about using the 2 Part clearcoats but I'm concerned about how bad they are for your health. Even though I have a vented paint booth and I use a 3M respirator, I'm still concerned about the heath effects. I am thinking of testing out the Mr. Color GX 100 Glosscoat. I've read good reviews about it.
-Bobby |
|
| Back to top |
|
|
RCB
Joined: 09 Mar 2020
Posts: 44
|
| Posted: Tue Aug 11, 2020 9:09 pm Post subject: |
|
|
| I used to have access to Dupont clears that did a great job without damaging the decals, but that access is closed now. Looking for something else and Model Master is now not an option. Have you ever used the Aqua clear gloss by Alclad? I thought about Pledge Future but glass and window cleaner will ruin the finish of that. |
|
| Back to top |
|
|
BW
Joined: 01 Feb 2018
Posts: 218
Location: Lick Creek, Alabama
|
| Posted: Wed Aug 12, 2020 9:33 pm Post subject: |
|
|
| RCB wrote: | | I used to have access to Dupont clears that did a great job without damaging the decals, but that access is closed now. Looking for something else and Model Master is now not an option. Have you ever used the Aqua clear gloss by Alclad? I thought about Pledge Future but glass and window cleaner will ruin the finish of that. |
Hey RCB. Never used the Alclad Aqua Gloss but have seen some good reviews about it. I used to use Pledge Future all the time but I found it would yellow over time especially noticeable over white paint. The best clear gloss I've used has been the Tamiya TS-13 but you have to be extremely careful with it. Several light dusting coats followed by a couple medium coats and finish with a good slightly heavier than medium coat. I had to allow each coat to dry thoroughly before adding the next. I have also had good success using Tamiya X-22 Clear Gloss thinned with Mr. Color Leveling Thinners but it takes a while to dry completely.
-Bobby |
|
| Back to top |
|
|
RCB
Joined: 09 Mar 2020
Posts: 44
|
| Posted: Fri Aug 21, 2020 6:02 am Post subject: |
|
|
| Did you use white prime? the match of the red t the decals looks really close. |
|
| Back to top |
|
|
arca guy
Joined: 31 Jan 2018
Posts: 96
|
| Posted: Tue Sep 08, 2020 7:03 am Post subject: |
|
|
| Another beauty! |
|
| Back to top |
|
|
|

