 |
Randy Ayers Nascar Modeling Forums
|
| View previous topic :: View next topic |
| Author |
Message |
"Fireball"
Joined: 09 Feb 2018
Posts: 202
|
 Posted: Sun May 27, 2018 8:11 am Post subject: Bill's narrowed up speedway 'Birds Posted: Sun May 27, 2018 8:11 am Post subject: Bill's narrowed up speedway 'Birds |
 |
|
| There was some discussion on the old board, about building a more accurate narrowed up, ears pinned back super speedway model of "Awesome Bill's" famous ride, because the Monogram 'Bird of that kit had some inaccuracies, and I believe the consensus was that it actually had more short track features, than SS features, of Bill's actual ride. There was a board member here that went to great lengths in an attempt to achieve an accurate representation of this "Awesome" ride, and his efforts inspired me to do a feasibility study of using the Pro Stock kit of this car as the basis for said body. Well, I took it a step further and included the "Beak Bird" as well since there was a Pro Stock kit of it also. TomM, and I believe another member here, put forth the idea that they thought the Pro Stock 'Birds' would be a better starting point, than doing all the mods to the 'Cup kit to achieve basically the same end result. Tom, and the other member were spot on, after comparing the four kits. Yes, there will still be some minor, basic mods required. However, a much better, and easier starting point to get a nice result. I'd like to thank Blake McNeely, posthumously, and David Long for their help with this study. I'd also like to apologize for not being computer literate enough to post pics for this project. Any comments, thoughts, and suggestions would be greatly appreciated. |
|
| Back to top |
|
 |
Pas.U.By Car#21

Joined: 04 Apr 2018
Posts: 25
|
| Posted: Sun May 27, 2018 1:21 pm Post subject: |
|
|
| I would love to get a good representation of Elliot's 1985 Southern 500 Thunderbird so reading whatever you did to achieve this would be great. |
|
| Back to top |
|
|
"Fireball"
Joined: 09 Feb 2018
Posts: 202
|
| Posted: Tue May 29, 2018 11:21 pm Post subject: |
|
|
| Pas.U.By Car#21 wrote: | | I would love to get a good representation of Elliot's 1985 Southern 500 Thunderbird so reading whatever you did to achieve this would be great. |
First get both kits. All you'll need from the Pro Stock 'Bird kit, or a decent built kit, are the body components. Then get the NASCAR 'Bird kit, and you'll use both the chassis, and some body pieces from it. Now get some good reference pics of that particular car, front, rear, side, top, and as many views as possible. That's where I started. Hope this helps. |
|
| Back to top |
|
|
Tom M.
Board Moderator
Joined: 01 Feb 2018
Posts: 604
|
| Posted: Fri Jun 01, 2018 9:58 pm Post subject: |
|
|
| Don't forget to stretch the wheelbase of the kit chassis. It's always been too short. |
|
| Back to top |
|
|
"Fireball"
Joined: 09 Feb 2018
Posts: 202
|
| Posted: Sat Jun 02, 2018 2:50 pm Post subject: |
|
|
| Tom M. wrote: | | Don't forget to stretch the wheelbase of the kit chassis. It's always been too short. |
I was actually mulling over the idea of using one of the newer 90's something 'Bird chassis that is more detailed, and better in several aspects than the older 'Bird chassis. Tom, what's your take on that idea? |
|
| Back to top |
|
|
Rob de Bie
Joined: 27 Jun 2018
Posts: 34
|
| Posted: Wed Jun 27, 2018 6:39 am Post subject: Re: Bill's narrowed up speedway 'Birds |
|
|
| "Fireball" wrote: | | There was a board member here that went to great lengths in an attempt to achieve an accurate representation of this "Awesome" ride, and his efforts inspired me to do a feasibility study of using the Pro Stock kit of this car as the basis for said body. |
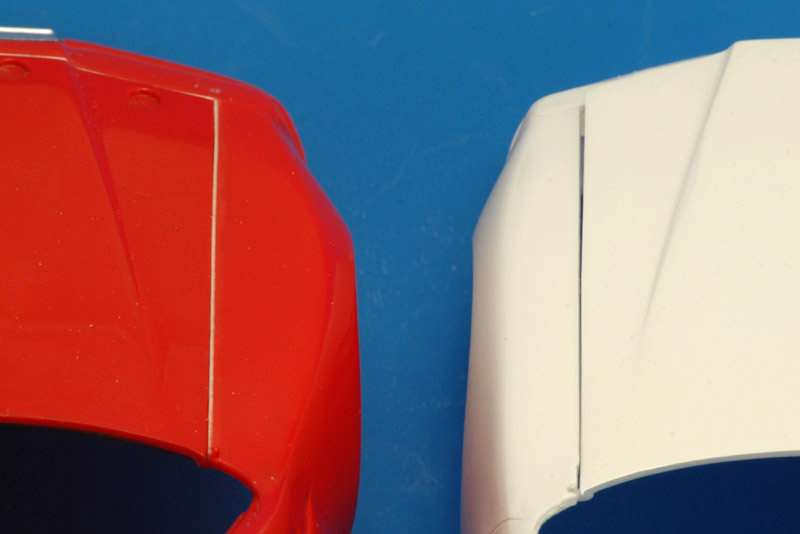
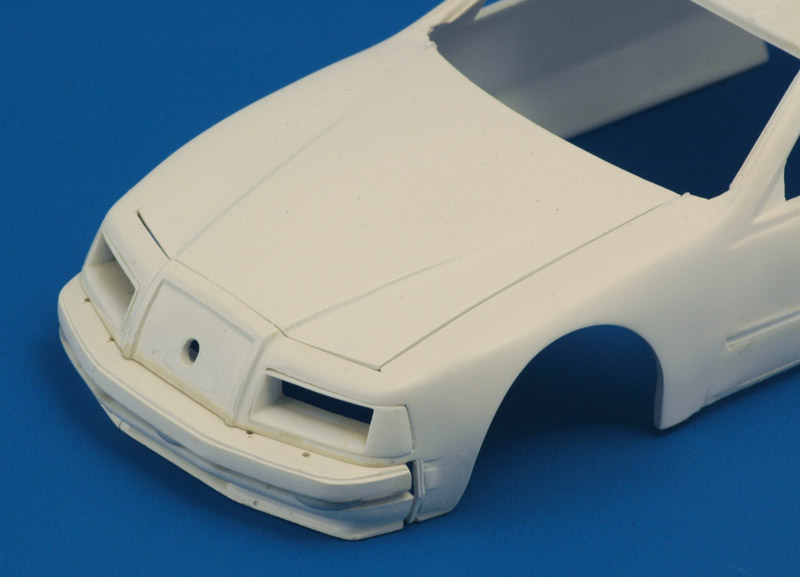
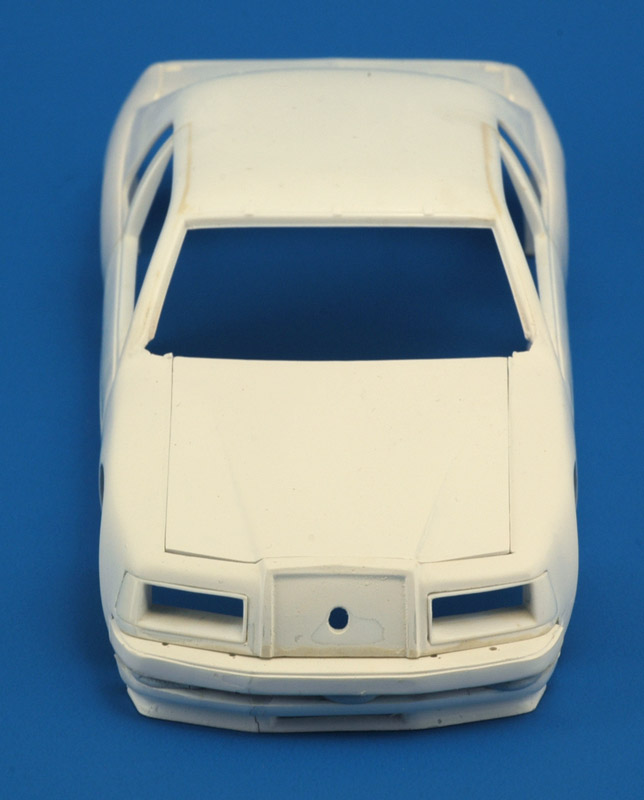
That was probably me, I posted some in-progress photos of my modifications in 2016 and 2017. The main ones are:
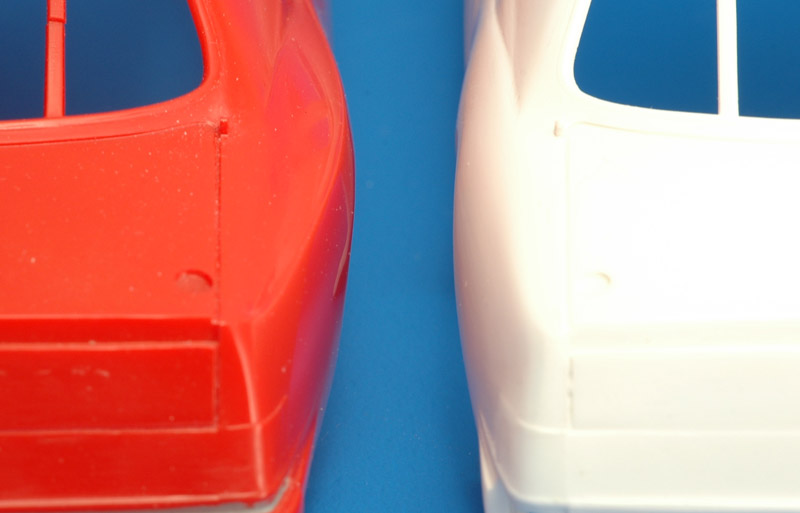
- narrowed front fenders
- narrowed rear fenders
- wheel opening moved forward
- longer hood
- whole nose lowered compared to greenhouse
- pointier nose
Here are some photos where you can see most of the changes listed:
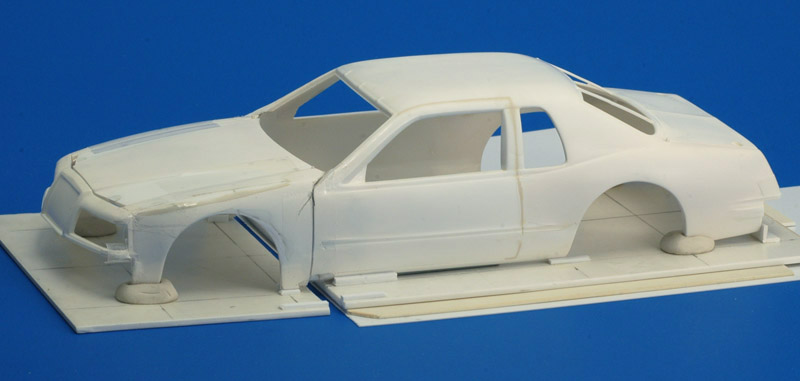
The chassis / frame will be another challenge, since the front suspension is now too wide to fit under the body.
I'm curious how your approach will work out. For me that Pro Stock kit was nearly impossible to find (in the Netherlands). Plus, the approach I chose was something I wanted to try for a long time. I had never modified a car body this way before. It worked pretty well, better than expected.
I should also add that my modifications were partly based on photo analysis, partly on observations from photos. Both methods have their limitations, and my changes could be off the mark. I'm still learning how to 'see' and analyse shapes.
Rob
Last edited by Rob de Bie on Wed Jun 27, 2018 8:06 am; edited 3 times in total |
|
| Back to top |
|
|
Rob de Bie
Joined: 27 Jun 2018
Posts: 34
|
| Posted: Wed Jun 27, 2018 6:42 am Post subject: |
|
|
| Tom M. wrote: | | Don't forget to stretch the wheelbase of the kit chassis. It's always been too short. |
There's also this problem:
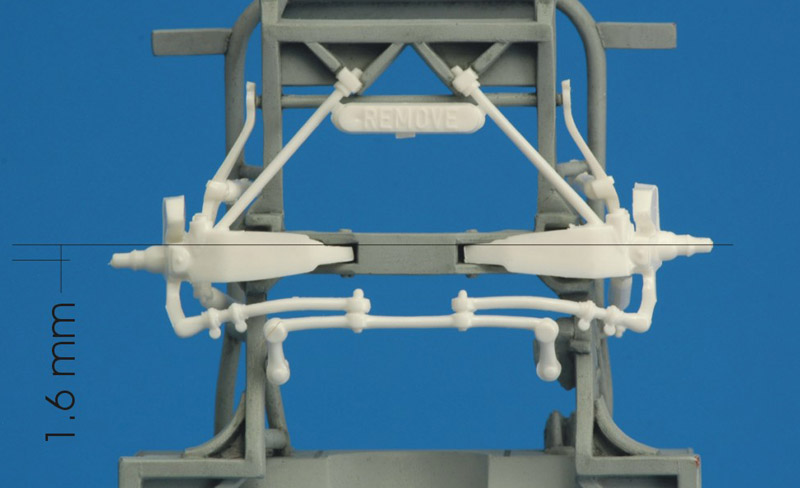
It messes up the wheelbase measurements by 1.5 inches 
Rob |
|
| Back to top |
|
|
Firefly

Joined: 28 Jan 2018
Posts: 813
Location: New Jersey
|
| Posted: Wed Jun 27, 2018 8:14 pm Post subject: |
|
|
Thanks for bringing this back!
Regarding that issue with the front end - should we assume that the correct alignment would have the center of the spindles on-center with the frame crossmember? (which means both sides are off, in both directions...)
_________________
Bill Jobson is my real name. |
|
| Back to top |
|
|
Mack
Joined: 28 Jan 2018
Posts: 732
Location: deep south
|
| Posted: Wed Jun 27, 2018 8:34 pm Post subject: |
|
|
Just a thought. Could you compare the width of an AMT Thunderbird front clip to the Monogram. I wonder how much more narrow the AMT front end would be? And would it be enough to make it worthwhile to graft the AMT front end chassis assembly to the Monogram chassis? Just curious.
_________________
life is hard, it's harder when you're stupid. John Wayne |
|
| Back to top |
|
|
Rob de Bie
Joined: 27 Jun 2018
Posts: 34
|
| Posted: Thu Jun 28, 2018 8:28 am Post subject: |
|
|
| Firefly wrote: | Thanks for bringing this back!
Regarding that issue with the front end - should we assume that the correct alignment would have the center of the spindles on-center with the frame crossmember? (which means both sides are off, in both directions...) |
The 'short' side measured the equivalent of a 108 inch chassis. That would mean the 'long' side was close to the 110 inch wheelbase, it's theoretically 0.5 mm too short. Therefore I would not worry about alignment with the crossmember, and use the most forward position of the spindles.
Also, I noticed that the rear axle can be mounted with a millimeter of play. So that gives more opportunities to achieve the correct wheelbase.
Rob |
|
| Back to top |
|
|
Rob de Bie
Joined: 27 Jun 2018
Posts: 34
|
| Posted: Thu Jun 28, 2018 8:31 am Post subject: |
|
|
| "Fireball" wrote: | | I was actually mulling over the idea of using one of the newer 90's something 'Bird chassis that is more detailed, and better in several aspects than the older 'Bird chassis. Tom, what's your take on that idea? |
I'm all ears on that idea, because the front end of my original chassis needs substantial modifications due to the much reduced track. I'll try to make a photo of the current status of the front wheel suspension.
Rob |
|
| Back to top |
|
|
"Fireball"
Joined: 09 Feb 2018
Posts: 202
|
| Posted: Fri Jun 29, 2018 3:23 pm Post subject: |
|
|
| Firefly wrote: | Thanks for bringing this back!
Regarding that issue with the front end - should we assume that the correct alignment would have the center of the spindles on-center with the frame crossmember? (which means both sides are off, in both directions...) |
Yes, good observation, and can easily be fixed by razor sawing the lower arms from the other front suspension components, repositioning them, and then squaring them to the desired wheel base length, and narrowing the front track as well. Then reattaching the other suspension components once the desired affect is achieved. |
|
| Back to top |
|
|
"Fireball"
Joined: 09 Feb 2018
Posts: 202
|
| Posted: Fri Jun 29, 2018 3:38 pm Post subject: |
|
|
| Rob de Bie wrote: | | "Fireball" wrote: | | I was actually mulling over the idea of using one of the newer 90's something 'Bird chassis that is more detailed, and better in several aspects than the older 'Bird chassis. Tom, what's your take on that idea? |
I'm all ears on that idea, because the front end of my original chassis needs substantial modifications due to the much reduced track. I'll try to make a photo of the current status of the front wheel suspension.
Rob |
My girl friend's Mom passed, and I'm with her now at her home at the beach. Away from my kits, so haven't got to look at that part of my feasibility study, yet. Will also try to get some side by side pics on my cell phone, of each NASCAR model 'Bird, beside the same model drag 'Bird, for some quick comparative analysis looks. If you were in the US, I'd send you an old, built drag 'Bird for you to compare yourself. Your work looks outstanding, and it doesn't have to be exact, as long as it looks "right" to the eye, and close to your reference pics, for YOU. |
|
| Back to top |
|
|
Rob de Bie
Joined: 27 Jun 2018
Posts: 34
|
| Posted: Fri Jun 29, 2018 5:23 pm Post subject: |
|
|
| "Fireball" wrote: | | My girl friend's Mom passed, and I'm with her now at her home at the beach. Away from my kits, so haven't got to look at that part of my feasibility study, yet. Will also try to get some side by side pics on my cell phone, of each NASCAR model 'Bird, beside the same model drag 'Bird, for some quick comparative analysis looks. If you were in the US, I'd send you an old, built drag 'Bird for you to compare yourself. Your work looks outstanding, and it doesn't have to be exact, as long as it looks "right" to the eye, and close to your reference pics, for YOU. |
Thanks for the kind offer, but sending a kit across the Atlantic is way too expensive these days. A good start however would be to know from what year Monogram reduced the wheel track. I studied an Excel sheet that lists all sprue numbers of all Monogram Nascar kits, but it doesn't answer the question. So if anyone could get their calipers out and measure the width over the wheels of different T-birds? Pretty please?
Whether it looks right to my eye is the exact problem: I'm still developing that skill! I have learned by now that people / modelers have widely varying talents for seeing shapes. I'm trying by different means, and these usually do not agree, so it's a difficult undertaking. The actual reshaping of the body is usually the easy part!! 
Rob |
|
| Back to top |
|
|
"Fireball"
Joined: 09 Feb 2018
Posts: 202
|
| Posted: Fri Jun 29, 2018 9:02 pm Post subject: |
|
|
| The track, and wheel base are easy to adjust. No need to get scale calipers out. You mentioned the rear suspension components have built in adjustments. I think everything is close enough in the kit car,with only minor adjustments needed to make it fit, and "look" right. None of our models are exactly perfect, as compared to the actual real life subject. No matter how hard we might try. Some of us just get closer than others to the actual vehicle we are attempting to replicate in our scale models. "If it 'looks right" to me, it's close enough for me", as my mentor Blake McNeely once told me. |
|
| Back to top |
|
|
George Andrews
Joined: 30 Jan 2018
Posts: 460
|
| Posted: Fri Jun 29, 2018 10:39 pm Post subject: |
|
|
| One problem you may encounter concerns the body sitting too high on the chassis. On my T-Bird I found that the door ledges were too thick, and sat on top of the upper door roll bars. I thinned down the inside of both door ledges with files, but next time I would just cut off the ledges flush with the inside of the body, and glue thin plastic strips on top of the existing ledges. |
|
| Back to top |
|
|
Rob de Bie
Joined: 27 Jun 2018
Posts: 34
|
| Posted: Sat Jun 30, 2018 6:25 am Post subject: |
|
|
| "Fireball" wrote: | | The track, and wheel base are easy to adjust. No need to get scale calipers out. You mentioned the rear suspension components have built in adjustments. I think everything is close enough in the kit car,with only minor adjustments needed to make it fit, and "look" right. |
My body modifications reduced the wheel track from around 62 inches (the old standard track width, and the maximum allowed at that time) to around 58 inches. Now I do not know whether that figure is accurate, I never found any data of the Elliott cars.
That reduction means 4.2 mm in scale, 2.1 mm on either side. That's a lot to take out of the control arms at the front, and it leaves no room for the dampers. That's why I would prefer to use a later frame, that is already set up for a smaller track. At least that's what I hope that Monogram did!
At the back it's probably easier, a width reduction of the axle shouldn't be too hard.
Therefore I'm still curious to know the tracks of later years of T-bird models.
Rob |
|
| Back to top |
|
|
Rob de Bie
Joined: 27 Jun 2018
Posts: 34
|
| Posted: Sat Jun 30, 2018 6:28 am Post subject: |
|
|
| George Andrews wrote: | | One problem you may encounter concerns the body sitting too high on the chassis. On my T-Bird I found that the door ledges were too thick, and sat on top of the upper door roll bars. I thinned down the inside of both door ledges with files, but next time I would just cut off the ledges flush with the inside of the body, and glue thin plastic strips on top of the existing ledges. |
Yep, I encountered that very problem during my first attempt to build this car. In the end I did just what you describe: cut them out and replace with thins plastic strips. At the same time you can 'thicken' the B-pillar about 50% to the inside, that will also improve the appearance.
Rob |
|
| Back to top |
|
|
"Fireball"
Joined: 09 Feb 2018
Posts: 202
|
| Posted: Sat Jun 30, 2018 12:18 pm Post subject: |
|
|
| You can also cut down the firewall to get the body down more on the chassis. |
|
| Back to top |
|
|
"Fireball"
Joined: 09 Feb 2018
Posts: 202
|
| Posted: Tue Jul 10, 2018 8:39 pm Post subject: |
|
|
| Rob de Bie wrote: | | "Fireball" wrote: | | The track, and wheel base are easy to adjust. No need to get scale calipers out. You mentioned the rear suspension components have built in adjustments. I think everything is close enough in the kit car,with only minor adjustments needed to make it fit, and "look" right. |
My body modifications reduced the wheel track from around 62 inches (the old standard track width, and the maximum allowed at that time) to around 58 inches. Now I do not know whether that figure is accurate, I never found any data of the Elliott cars.
That reduction means 4.2 mm in scale, 2.1 mm on either side. That's a lot to take out of the control arms at the front, and it leaves no room for the dampers. That's why I would prefer to use a later frame, that is already set up for a smaller track. At least that's what I hope that Monogram did!
At the back it's probably easier, a width reduction of the axle shouldn't be too hard.
Therefore I'm still curious to know the tracks of later years of T-bird models.
Rob |
I looked at Monogram built 'Birds from various newer models, and a built AMT 'Bird, and not seeing any difference in track width in any of them. There is a difference in wheel base, with the Monogram kits obviously being longer. Would've thought the AMT 'Bird to be narrower in track width, but not so on my two built kits. |
|
| Back to top |
|
|
"Fireball"
Joined: 09 Feb 2018
Posts: 202
|
| Posted: Tue Jul 10, 2018 9:39 pm Post subject: |
|
|
| As I posted previously, you could razor saw the lower control arms from the front steering, and suspension components, then square them to the desired wheel base length, and front track by removing material from the arms, and engine cradle, as needed. Then reattaching the steering, and suspension components once the desired affect is achieved. Also, the front cage hoop tubes could be razored off in four places per side, and moved for more clearance, if needed. Just some rough observations I made from your pics, that you might try. |
|
| Back to top |
|
|
Rob de Bie
Joined: 27 Jun 2018
Posts: 34
|
| Posted: Wed Jul 11, 2018 2:40 pm Post subject: |
|
|
| "Fireball" wrote: | | I looked at Monogram built 'Birds from various newer models, and a built AMT 'Bird, and not seeing any difference in track width in any of them. There is a difference in wheel base, with the Monogram kits obviously being longer. Would've thought the AMT 'Bird to be narrower in track width, but not so on my two built kits. |
Many thanks for checking! That finally answers a question that I had on my mind for a long time. But it now seems my track problem can be solved in an easier way!
Rob |
|
| Back to top |
|
|
Rob de Bie
Joined: 27 Jun 2018
Posts: 34
|
| Posted: Wed Jul 11, 2018 2:44 pm Post subject: |
|
|
| "Fireball" wrote: | | As I posted previously, you could razor saw the lower control arms from the front steering, and suspension components, then square them to the desired wheel base length, and front track by removing material from the arms, and engine cradle, as needed. Then reattaching the steering, and suspension components once the desired affect is achieved. Also, the front cage hoop tubes could be razored off in four places per side, and moved for more clearance, if needed. Just some rough observations I made from your pics, that you might try. |
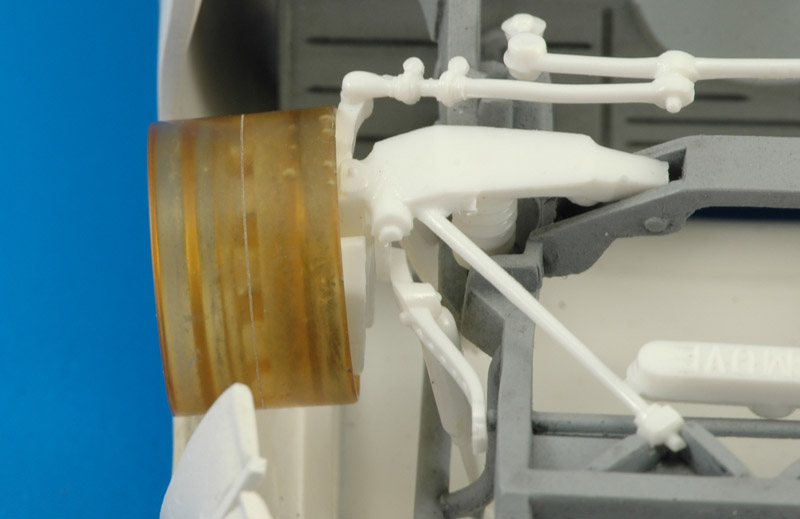
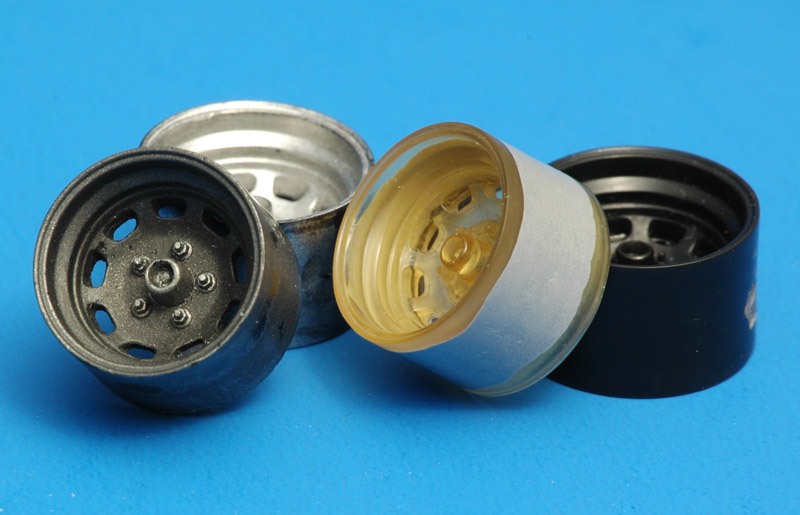
Thanks again for all the suggestions. My old plan was to cut up various parts as you describe, but with the fear of a substantially weakened structure and various failures. Instead the wheel modification is working better than expected. Here's a short version of what I just posted in the 'Grayside Racers Corner 1973 - 1989' section.
My original resin wheel (seen at the left) had a boss that put the brake disc at the same position as in the plastic original. I made two test wheels: the middle one where I removed 2.0 mm, and the right one where I removed 2.5 mm. Not shown is the separate resin disc.
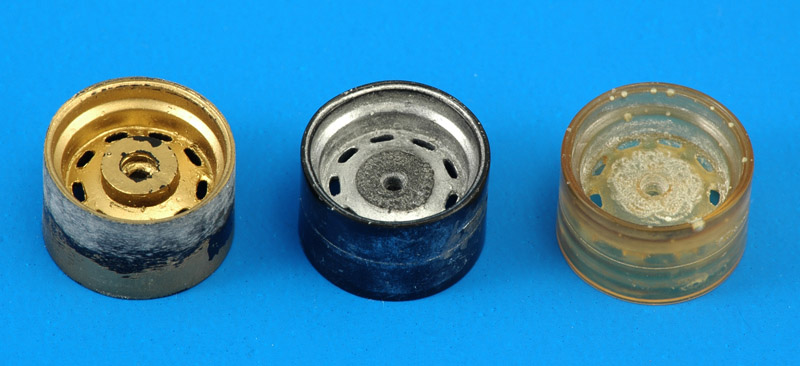
Here's the test wheel with 2.5 mm removed on the front suspension. It does not fit completely: it conflicts with the steering arm. But if that is solved, the situation looks promising.
Rob |
|
| Back to top |
|
|
Helio Neto
Joined: 05 Feb 2018
Posts: 3
|
| Posted: Wed Jul 11, 2018 9:26 pm Post subject: |
|
|
Hey Rob, what resin are you using using for your wheels, polyurethane or polyesther?
Thank you for bringing back this topic! |
|
| Back to top |
|
|
Rob de Bie
Joined: 27 Jun 2018
Posts: 34
|
| Posted: Thu Jul 12, 2018 6:24 am Post subject: |
|
|
| Helio Neto wrote: | Hey Rob, what resin are you using using for your wheels, polyurethane or polyesther?
Thank you for bringing back this topic! |
These are very old castings, when I still used epoxy resin. I guess they are at least 20 years old, and that's when I was building the first version of this kit. At that time I hadn't found polyurethane resin in small quantities, hence epoxy.
I do notice how much stronger and harder this resin is, so it is very suitable for parts that need strength and / or stiffness. But the silicone rubber molds deteriorate much quicker, I don't think you can get more than 10 castings from a mold.
My casting techniques were also under development, hence the air bubbles in some castings. In the first photo you can see the master wheel, that I assembled from two resin castings, the joint covered with Tamiya putty.
In the second photo you can see the mold and some castings. It was amazing that I could pull a large casting through a small slot in the mold. I learned a lesson about single-piece molds, and I never used two-piece molds after that! Therefore these wheels were a bit of a landmark for me
Rob |
|
| Back to top |
|
|
Rob de Bie
Joined: 27 Jun 2018
Posts: 34
|
| Posted: Thu Jul 26, 2018 2:51 pm Post subject: |
|
|
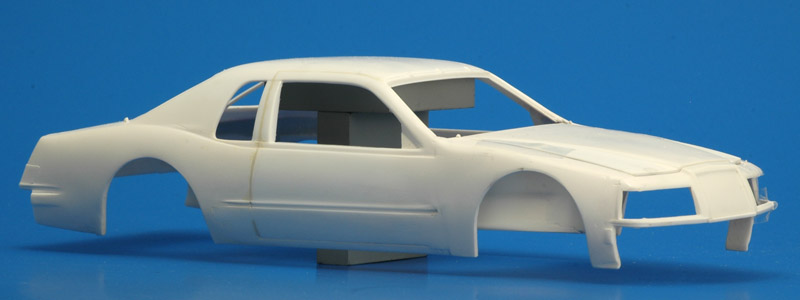
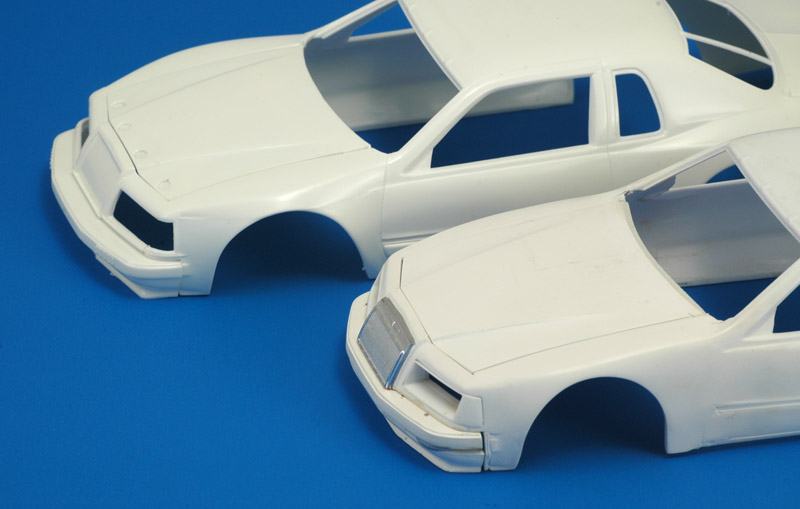
I finally found an unbuilt kit with a white body, so I could finally photograph them side by side:

Rob |
|
| Back to top |
|
|
joe b
Joined: 31 Jan 2018
Posts: 209
Location: New Jersey
|
| Posted: Mon Jul 30, 2018 3:11 pm Post subject: |
|
|
| Rob de Bie wrote: | | Helio Neto wrote: | Hey Rob, what resin are you using using for your wheels, polyurethane or polyesther?
Thank you for bringing back this topic! |
These are very old castings, when I still used epoxy resin. I guess they are at least 20 years old, and that's when I was building the first version of this kit. At that time I hadn't found polyurethane resin in small quantities, hence epoxy.
I do notice how much stronger and harder this resin is, so it is very suitable for parts that need strength and / or stiffness. But the silicone rubber molds deteriorate much quicker, I don't think you can get more than 10 castings from a mold.
My casting techniques were also under development, hence the air bubbles in some castings. In the first photo you can see the master wheel, that I assembled from two resin castings, the joint covered with Tamiya putty.
In the second photo you can see the mold and some castings. It was amazing that I could pull a large casting through a small slot in the mold. I learned a lesson about single-piece molds, and I never used two-piece molds after that! Therefore these wheels were a bit of a landmark for me
Rob |
rob, i've been playing with casting too and been having problems with air bubbles also. what do you do to avoid them short of using a vacume chamber? also what did you learn about one piece molds? i try using one piece molds as much as possible but certain things are tough to do. |
|
| Back to top |
|
|
Rob de Bie
Joined: 27 Jun 2018
Posts: 34
|
| Posted: Mon Jul 30, 2018 4:42 pm Post subject: |
|
|
| joe b wrote: | | rob, i've been playing with casting too and been having problems with air bubbles also. what do you do to avoid them short of using a vacume chamber? also what did you learn about one piece molds? i try using one piece molds as much as possible but certain things are tough to do. |
Joe, I do use a vacuum chamber, things like this cannot be done without one I would say. Vacuum sets have become very affordable, the cheapest I see here (the Netherlands) is 170 euros (say 200$) for a small rotary vane pump plus a polycabonate / PP vacuum chamber. Look on Ebay to get an idea.
The lesson learned (back then) was that I should use single-piece molds all the time, for all products. I never used a two-part mold since then. Don't slice the single-piece molds down the sides, otherwise the vacuum technique won't work. Follow what you see in commercial products.
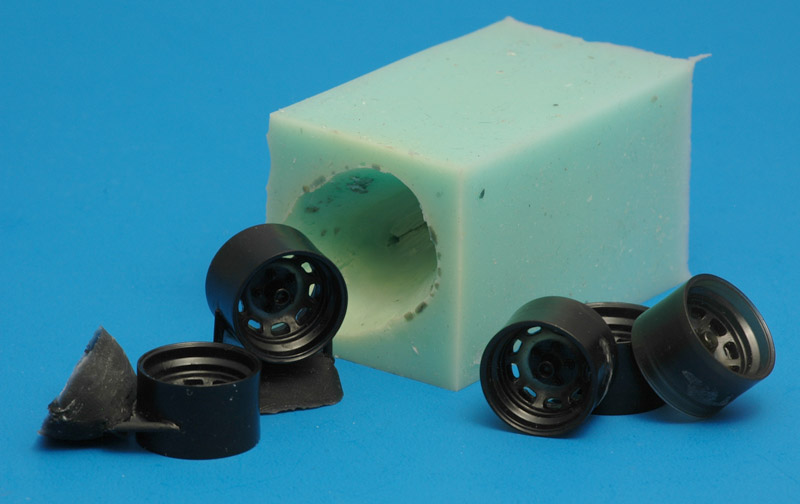
I don't have good photos of my current molds except this one. The parts show the mold shape better than the mold itself :
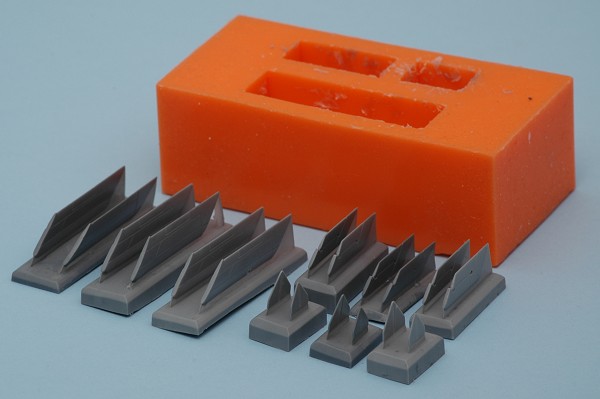
Having said this, I think the pressure casting technique is far more popular in the US. Vacuum casting is more Euro style it seems. Since you need a vacuum anyway to de-air the silicone rubber, it seem like a logical route to me, and I'm totally happy with the results.
Rob |
|
| Back to top |
|
|
dawgvet
Joined: 29 Dec 2018
Posts: 44
|
| Posted: Tue Apr 21, 2020 2:52 pm Post subject: |
|
|
Love this info as I just bought a 1985 Monogram kit to start trying to replicate the Bill Elliott '85 T-Bird.
Did you guys ever finish the Pro Stock body into a NASCAR ride? |
|
| Back to top |
|
|
hemiman_1999
Joined: 29 Jan 2018
Posts: 296
|
| Posted: Wed Apr 22, 2020 6:20 am Post subject: |
|
|
For years I have heard the story of Bills narrow-bird as well as Petty's narrow Charger and Roadrunner's and others. I know
Smokey did a lot of rule pushing probably with his 59-62 Pontiac's but never documented that I have seen. My question is this seeing Bill was never caught or penalized for any of this as Petty never was, did it actually happen, what proof is there I mean I do not go by a restored cars dimensions as it can be way off. Was he the only one with a narrow-bird were the others the same as his or was his just better? I don't mean to get a big thing started here I don't know for sure that's why I am asking. |
|
| Back to top |
|
|
Rob de Bie
Joined: 27 Jun 2018
Posts: 34
|
| Posted: Wed Apr 22, 2020 6:55 am Post subject: |
|
|
| hemiman_1999 wrote: | For years I have heard the story of Bills narrow-bird as well as Petty's narrow Charger and Roadrunner's and others. I know
Smokey did a lot of rule pushing probably with his 59-62 Pontiac's but never documented that I have seen. My question is this seeing Bill was never caught or penalized for any of this as Petty never was, did it actually happen, what proof is there I mean I do not go by a restored cars dimensions as it can be way off. Was he the only one with a narrow-bird were the others the same as his or was his just better? I don't mean to get a big thing started here I don't know for sure that's why I am asking. |
Since I'm building that narrow-body version too (see the white bodies halfway this thread), I wondered about it too. My current understanding is that in those years there was a 62" wheel track rule. But this was very likely a *maximum* wheel track. Nevertheless, everyone went for that maximum number, because it gives better performance in turns.
In my own conversion, I got a 58" wheel track. Now this is very unscientific, since it was dictated by the Monogram body, that has lots of shape problems.
But still, this is what I think happened: the Elliott team saw the potential of a narrower car, in terms of lower drag and higher top speed. You lose a bit in the corners but gain on the straights. And there was nothing illegal about it, I think.
Rob |
|
| Back to top |
|
|
Rob de Bie
Joined: 27 Jun 2018
Posts: 34
|
| Posted: Wed Apr 22, 2020 7:15 am Post subject: |
|
|
Out of curiosity I tried the calculate the advantage. For my modified T-bird model I calculated (roughly) a 2.13 sqm frontal area. If I add two inch wider fenders, I get 2.19 sqm.
2.19 divided by 2.13 gives 1.028. Assuming equal power for both the narrow and wider cars, and also assuming the same CD-value (which is a bit rough), the gain in speed is the third-power root of 1.028. That gives 1.0093.
Which means the top speed of the narrow car is 0.93% higher. So 200 mph becomes 202 mph on the same power. I think that's a useful advantage.
You can also express it differently: one would need 1.028 more power to achieve that same speed advantage. So say 617 hp instead of 600 hp.
I cannot calculate the loss of cornering power that easily, and you would need that to give an overall judgement of a narrow car.
Rob |
|
| Back to top |
|
|
Rob de Bie
Joined: 27 Jun 2018
Posts: 34
|
| Posted: Wed Apr 22, 2020 7:44 am Post subject: |
|
|
I just found this YouTube video:
https://www.youtube.com/watch?v=mvGLh4zn2Uw
The opening shot shows how 'straight' the sides of Elliott's car are: both fenders are in line with the door. That's what I ended up with too. And it's a huge difference with the Monogram T-Bird from the box
Rob |
|
| Back to top |
|
|
pettyblue
Joined: 09 Feb 2018
Posts: 11
|
| Posted: Sun Jul 12, 2020 12:14 pm Post subject: |
|
|
| Thanks for bringing this topic back. At the time, I was interested in the offset of the front suspension and disregarded the difference the body modifications made. Then I built a Pro-stock T-bird, and plainly saw the differences. |
|
| Back to top |
|
|
|
|
You cannot post new topics in this forum
You cannot reply to topics in this forum
You cannot edit your posts in this forum
You cannot delete your posts in this forum
You cannot vote in polls in this forum
|
Powered by phpBB © 2001, 2005 phpBB Group
|

