| View previous topic :: View next topic |
| Author |
Message |
Vdc

Joined: 04 Sep 2022
Posts: 128
|
 Posted: Sat Jan 13, 2024 10:35 am Post subject: T-Bird slabside. Alternative method. Final update. Posted: Sat Jan 13, 2024 10:35 am Post subject: T-Bird slabside. Alternative method. Final update. |
 |
|
As it's too cold to spray gloss paint, I began this slabside conversion, but using the Monte Carlo body method.

But first I have to find a place to cut off the lower body, so I used the shadow that's cast under a strong light. And pen mark at its highest point.

Make level across the body and then razorsaw. I installed the new lower with super glue and some talc powder rubbed into the join, will dry as a filler.
I think some plastic shims glued inside the body, to push the rear outwards can be a fix for a truly vertical appearance.
This was actually an easy job, just need to be certain of that join whilst parts are drying. I glued just one end then the rest of it.
Last edited by Vdc on Wed Apr 24, 2024 4:52 am; edited 2 times in total |
|
| Back to top |
|
 |
Crime Dog
Joined: 27 Jan 2018
Posts: 332
|
| Posted: Wed Jan 17, 2024 10:30 am Post subject: |
|
|
| Nice work, big improvement. Hope to see the finished project! |
|
| Back to top |
|
|
hurricane21
Joined: 05 Feb 2018
Posts: 211
Location: Fayetteville NC
|
| Posted: Wed Jan 17, 2024 3:37 pm Post subject: |
|
|
| My biggest issue with slabsiding a round MC is the sides end up sitting out and away from the chassis too much to where it looks noticeable. The T-Birds I find easier to leave the rounded bottoms on the sides, styrene and the putty on the outside and I angle cut back in to the driver's compartment the rounded side so it's not noticeable on the shelf. What's the best way to maintain a proper gap on the sides or at least giving the appearance of the sides flaring out at the bottom? |
|
| Back to top |
|
|
Vdc
Joined: 04 Sep 2022
Posts: 128
|
| Posted: Sat Jan 27, 2024 10:34 am Post subject: |
|
|
An update.
Have slabbed a 95 and a 97.

Here's the 95, ready to block sand.

And filler around the arch edges. Do this before removing the lower body part. I use CA + talc which cuts well with the razor saw. Block sand the filler area and perhaps again after the new lower is fitted.

And the 95. Measuring 75mm at the rear and 72mm at the front. The 97, it measures the same too. The photo in my first post, that red bodyshell was heavily warped. A too hot dehydrator.

The vertical body taper. Very little, just a 1 to 1.5 mm difference.

So a successful trial run.
The job is not too large, about two hours to cut and replace both sides. I used a combo of CA and Tamiya cement with sprue goo smeared on the rear of the join.
Last edited by Vdc on Wed Apr 24, 2024 4:47 am; edited 1 time in total |
|
| Back to top |
|
|
Crime Dog
Joined: 27 Jan 2018
Posts: 332
|
| Posted: Sat Jan 27, 2024 10:35 pm Post subject: |
|
|
| That looks great, look forward to more of it! |
|
| Back to top |
|
|
TN Vols fan
Joined: 18 Jan 2022
Posts: 274
Location: Crossett, AR
|
| Posted: Sun Jan 28, 2024 11:57 am Post subject: |
|
|
That's really looking good!
_________________
"Many men fish all their lives without knowing it is not the fish they are after." Henry David Thoreau
"I am, Sir, a brother of the angle" quote from The Compleat Angler, lzzak Walton 1654 |
|
| Back to top |
|
|
Vdc
Joined: 04 Sep 2022
Posts: 128
|
| Posted: Tue Mar 12, 2024 1:34 pm Post subject: |
|
|
Some update pics of the 96 body. Gloss white, ready for a 2nd colour or decal. Not sure yet.


And the chassis. I glued some 4mm wide strips just below the cage bar.

The body, with shims glued inside, will lock over these strips and perhaps make them wider too so body is pushed out and more vertical.
Last edited by Vdc on Wed Apr 24, 2024 4:46 am; edited 1 time in total |
|
| Back to top |
|
|
Vdc
Joined: 04 Sep 2022
Posts: 128
|
| Posted: Wed Apr 24, 2024 4:44 am Post subject: |
|
|
An update to show the joint area before decals is applied. And all good, no problems with cracking or joint area showing.
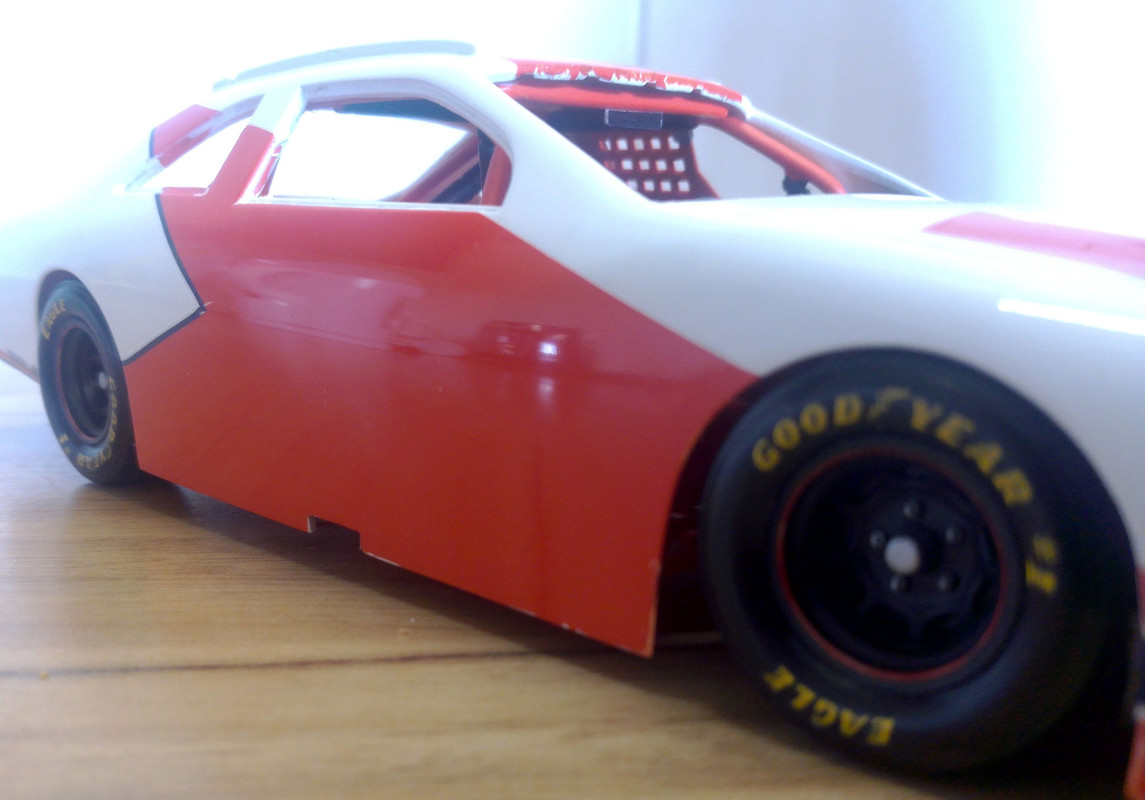

Will be removing the body to continue decaling. The joint has backing strips, so bodyshell can take a slight stretching apart when removing.

The above pic, can see how the body side is still quite upright. Holding it's shape. |
|
| Back to top |
|
|
|

