| View previous topic :: View next topic |
| Author |
Message |
Pierre Rivard
Joined: 25 Feb 2021
Posts: 378
Location: Montreal, Canada
|
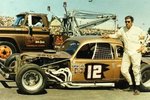
 Posted: Wed Apr 14, 2021 2:32 pm Post subject: Junior Johnson Mystery Motor Impala Posted: Wed Apr 14, 2021 2:32 pm Post subject: Junior Johnson Mystery Motor Impala |
 |
|
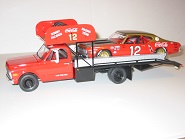
This race car was built using a Revell kit. It is a rebuild from a previous project (see fab shop for the story)
PPP wheels and tires
JNJ decals provided significant grief. 
Chassis was modified for long arm rear suspension (Monogram parts)
Scratchbuilding of other chassis/engine items: shocks, air inlet, headers and dumps, fuel filler.
Interior cage built from 2mm Evergreen rod
Scratch built safety belts with 26 gauge wire, thin sheet styrene and masking tape.
Paint: Vallejo white primer and off-white color coat and Future clear, all brush painted.
Tamiya smoke and flat varnish on bumpers to tone them down and make them look battle scarred.
Thank you for looking.
[url
[/url
[url
[/url
[url
[/url
[url
[/url
_________________
"When you arrive at a fork in the road, take it" - Yogi Berra |
|
| Back to top |
|
 |
MarkJ
Joined: 29 Jan 2018
Posts: 1306
|
| Posted: Wed Apr 14, 2021 3:55 pm Post subject: |
|
|
| Wow, Pierre. Excellent build. Its amazing what you can do with a brush. That paint looks perfect. And the decals you were worried about look fresh as if you just bought them. Love the Mystery motor and you nailed the stance. She sits perfectly. And the interior came out awesome too. Dont see many Sixty's Nascar builds that look this good. |
|
| Back to top |
|
|
Pierre Rivard
Joined: 25 Feb 2021
Posts: 378
Location: Montreal, Canada
|
| Posted: Wed Apr 14, 2021 4:33 pm Post subject: |
|
|
| MarkJ wrote: | | Wow, Pierre. Excellent build. Its amazing what you can do with a brush. That paint looks perfect. And the decals you were worried about look fresh as if you just bought them. Love the Mystery motor and you nailed the stance. She sits perfectly. And the interior came out awesome too. Dont see many Sixty's Nascar builds that look this good. |
Thank you sir, your comments are much appreciated. The more I build the more I realize that getting the stance right is what helps provide some realism.
I forgot to mention that I cut up the front fender wheel opening and I also cut up the top of the tires to allow a lower stance.
I think "aging" the bumpers also helped the look.
The last element was improving my photo set up.
Trust me it looks better in pictures than "in the flesh"
_________________
"When you arrive at a fork in the road, take it" - Yogi Berra |
|
| Back to top |
|
|
MarkJ
Joined: 29 Jan 2018
Posts: 1306
|
| Posted: Wed Apr 14, 2021 5:15 pm Post subject: |
|
|
| Pierre Rivard wrote: | | MarkJ wrote: | | Wow, Pierre. Excellent build. Its amazing what you can do with a brush. That paint looks perfect. And the decals you were worried about look fresh as if you just bought them. Love the Mystery motor and you nailed the stance. She sits perfectly. And the interior came out awesome too. Dont see many Sixty's Nascar builds that look this good. |
Thank you sir, your comments are much appreciated. The more I build the more I realize that getting the stance right is what helps provide some realism.
I forgot to mention that I cut up the front fender wheel opening and I also cut up the top of the tires to allow a lower stance.
I think "aging" the bumpers also helped the look.
The last element was improving my photo set up.
Trust me it looks better in pictures than "in the flesh" |
Yes, the chrome does have a more realistic look to it. You need to explain to me again what you put on the bumpers and grille and how you put it on. |
|
| Back to top |
|
|
Tom Birky
Joined: 01 Feb 2018
Posts: 200
Location: Eastern Iowa
|
| Posted: Wed Apr 14, 2021 6:33 pm Post subject: |
|
|
Wow! Well done Pierre. Just the right amount of detail. Great job!
Tom |
|
| Back to top |
|
|
Bill J

Joined: 28 Jan 2018
Posts: 393
|
| Posted: Wed Apr 14, 2021 6:50 pm Post subject: |
|
|
Perfect looking 63 Impala. All the right details and all came out great. Nice work  |
|
| Back to top |
|
|
bigryan18
Joined: 29 Jan 2018
Posts: 191
|
| Posted: Thu Apr 15, 2021 2:47 am Post subject: |
|
|
| Nice looking ride... |
|
| Back to top |
|
|
Pierre Rivard
Joined: 25 Feb 2021
Posts: 378
Location: Montreal, Canada
|
| Posted: Thu Apr 15, 2021 6:23 am Post subject: |
|
|
| MarkJ wrote: | | Pierre Rivard wrote: | | MarkJ wrote: | | Wow, Pierre. Excellent build. Its amazing what you can do with a brush. That paint looks perfect. And the decals you were worried about look fresh as if you just bought them. Love the Mystery motor and you nailed the stance. She sits perfectly. And the interior came out awesome too. Dont see many Sixty's Nascar builds that look this good. |
Thank you sir, your comments are much appreciated. The more I build the more I realize that getting the stance right is what helps provide some realism.
I forgot to mention that I cut up the front fender wheel opening and I also cut up the top of the tires to allow a lower stance.
I think "aging" the bumpers also helped the look.
The last element was improving my photo set up.
Trust me it looks better in pictures than "in the flesh" |
Yes, the chrome does have a more realistic look to it. You need to explain to me again what you put on the bumpers and grille and how you put it on. |
For chrome I find that darker and less shiny looks more realistic
Bumpers and grilles: I brush Tamiya Smoke X-19 which darkens and fills recesses for contrast.
I then add a layer of Future mixed with a bit of Tamiya flat base X-19 to achieve a semi gloss finish.
Painted chrome trim: I avoid silver paint and go for a darker color like Tamiya XF-56 metallic gray then clear over with future (no flat base)
_________________
"When you arrive at a fork in the road, take it" - Yogi Berra |
|
| Back to top |
|
|
Racer14
Joined: 13 Feb 2018
Posts: 282
Location: Rockford, IL
|
| Posted: Thu Apr 15, 2021 7:36 am Post subject: |
|
|
| Very nice build. Excellent attention to the details! |
|
| Back to top |
|
|
sentsat71
Joined: 03 Feb 2018
Posts: 1237
Location: Fenton, IA
|
| Posted: Thu Apr 15, 2021 9:27 am Post subject: |
|
|
WOW!!!
VERY NICELY DONE!!!!!

_________________
Ed. K |
|
| Back to top |
|
|
Henryjint

Joined: 28 Jan 2018
Posts: 1973
Location: NY State's Hudson Valley
|
| Posted: Thu Apr 15, 2021 4:00 pm Post subject: |
|
|
Very nicely done!!!!
_________________
Forum member since 10/25/2010 |
|
| Back to top |
|
|
MarkJ
Joined: 29 Jan 2018
Posts: 1306
|
| Posted: Fri Apr 16, 2021 8:18 am Post subject: |
|
|
| So, Pierre. What did you say you use around the windshield, back glass, roof belt, and drip mouldings? Looks really good. |
|
| Back to top |
|
|
Pierre Rivard
Joined: 25 Feb 2021
Posts: 378
Location: Montreal, Canada
|
| Posted: Fri Apr 16, 2021 12:42 pm Post subject: |
|
|
| MarkJ wrote: | | So, Pierre. What did you say you use around the windshield, back glass, roof belt, and drip mouldings? Looks really good. |
I paint with Tamiya XF-56 metallic gray (darker than aluminium) after the base coat and clear over it with Future along with the rest of the body.
Just my own opinion but I find that a darker metallic tone looks more realistic.
_________________
"When you arrive at a fork in the road, take it" - Yogi Berra |
|
| Back to top |
|
|
MarkJ
Joined: 29 Jan 2018
Posts: 1306
|
| Posted: Fri Apr 16, 2021 1:41 pm Post subject: |
|
|
| Pierre Rivard wrote: | | MarkJ wrote: | | So, Pierre. What did you say you use around the windshield, back glass, roof belt, and drip mouldings? Looks really good. |
I paint with Tamiya XF-56 metallic gray (darker than aluminium) after the base coat and clear over it with Future along with the rest of the body.
Just my own opinion but I find that a darker metallic tone looks more realistic. |
Thanks, Pierre. I just wish I had a source for tamiya paints locally. I think Micro Mark might sell them. I'll check. You're right though , The chrome bare metal foil is really too bright for the trim they had on 60's window trim and really all the mouldings on the cars. They weren't really chrome, they were aluminum or maybe stainless steel. In other words you can't see a mirror image of yourself if you look at a windshield moulding on a 63 impala. |
|
| Back to top |
|
|
Pierre Rivard
Joined: 25 Feb 2021
Posts: 378
Location: Montreal, Canada
|
| Posted: Fri Apr 16, 2021 4:55 pm Post subject: |
|
|
| MarkJ wrote: | | Pierre Rivard wrote: | | MarkJ wrote: | | So, Pierre. What did you say you use around the windshield, back glass, roof belt, and drip mouldings? Looks really good. |
I paint with Tamiya XF-56 metallic gray (darker than aluminium) after the base coat and clear over it with Future along with the rest of the body.
Just my own opinion but I find that a darker metallic tone looks more realistic. |
Thanks, Pierre. I just wish I had a source for tamiya paints locally. I think Micro Mark might sell them. I'll check. You're right though , The chrome bare metal foil is really too bright for the trim they had on 60's window trim and really all the mouldings on the cars. They weren't really chrome, they were aluminum or maybe stainless steel. In other words you can't see a mirror image of yourself if you look at a windshield moulding on a 63 impala. |
Mark, I had a doubt about this one and went back to my notes
Although I usually use Tamiya XF-56 for this vehicle I used Vallejo Duraluminium 77.702.
Same idea here, it is a darker shade vs the standard aluminium
Just be careful with it, it is thin (airbrush viscosity) but brushes well on small surfaces like trim.
Many other shades of Vallejo Metal Colors are available too.
Hope it offers you with a doable alternative.
https://acrylicosvallejo.com/en/category/hobby/metal-color-en/
_________________
"When you arrive at a fork in the road, take it" - Yogi Berra |
|
| Back to top |
|
|
MarkJ
Joined: 29 Jan 2018
Posts: 1306
|
| Posted: Sat Apr 17, 2021 8:25 am Post subject: |
|
|
| Pierre Rivard wrote: | | MarkJ wrote: | | Pierre Rivard wrote: | | MarkJ wrote: | | So, Pierre. What did you say you use around the windshield, back glass, roof belt, and drip mouldings? Looks really good. |
I paint with Tamiya XF-56 metallic gray (darker than aluminium) after the base coat and clear over it with Future along with the rest of the body.
Just my own opinion but I find that a darker metallic tone looks more realistic. |
Thanks, Pierre. I just wish I had a source for tamiya paints locally. I think Micro Mark might sell them. I'll check. You're right though , The chrome bare metal foil is really too bright for the trim they had on 60's window trim and really all the mouldings on the cars. They weren't really chrome, they were aluminum or maybe stainless steel. In other words you can't see a mirror image of yourself if you look at a windshield moulding on a 63 impala. |
Mark, I had a doubt about this one and went back to my notes
Although I usually use Tamiya XF-56 for this vehicle I used Vallejo Duraluminium 77.702.
Same idea here, it is a darker shade vs the standard aluminium
Just be careful with it, it is thin (airbrush viscosity) but brushes well on small surfaces like trim.
Many other shades of Vallejo Metal Colors are available too.
Hope it offers you with a doable alternative.
https://acrylicosvallejo.com/en/category/hobby/metal-color-en/ |
Thanks, Pierre. I dont have the duraluminum but maybe I can darken regular vallejo aluminum a little with some vallejo steel. I'll play with it and see what I can come up with. The b.m.f. doesnt seem to work as well as it use to. And I really dont look forward to using it anymore. |
|
| Back to top |
|
|
nolansims1
Joined: 14 Apr 2021
Posts: 14
|
| Posted: Sat Apr 17, 2021 10:54 am Post subject: |
|
|
| Excellent work! |
|
| Back to top |
|
|
Pierre Rivard
Joined: 25 Feb 2021
Posts: 378
Location: Montreal, Canada
|
| Posted: Sat Apr 17, 2021 5:34 pm Post subject: |
|
|
Thank you all for your kind feedback
_________________
"When you arrive at a fork in the road, take it" - Yogi Berra |
|
| Back to top |
|
|
Wakefan77
Joined: 22 Apr 2020
Posts: 140
Location: North Carolina
|
| Posted: Wed Apr 21, 2021 8:55 pm Post subject: |
|
|
Helluva build my friend. Always look forward to your work.
_________________
<a><img></a> |
|
| Back to top |
|
|
BW
Joined: 01 Feb 2018
Posts: 218
Location: Lick Creek, Alabama
|
| Posted: Thu Apr 22, 2021 7:34 pm Post subject: |
|
|
Excellent work Pierre! Your attention to detail is inspiring. I could look at this build for hours! Incredible brush painting. Thanks for posting and keep'em comin'!
-Bobby |
|
| Back to top |
|
|
Pierre Rivard
Joined: 25 Feb 2021
Posts: 378
Location: Montreal, Canada
|
| Posted: Fri Apr 23, 2021 4:32 pm Post subject: |
|
|
| BW wrote: | Excellent work Pierre! Your attention to detail is inspiring. I could look at this build for hours! Incredible brush painting. Thanks for posting and keep'em comin'!
-Bobby |
Thank you Bobby, considering this started as a black and gold glue bomb, I'm satisfied with the result of this rebuild.
Pierre
_________________
"When you arrive at a fork in the road, take it" - Yogi Berra |
|
| Back to top |
|
|
hobbyguy
Joined: 30 Jan 2018
Posts: 15
|
| Posted: Tue May 04, 2021 1:37 pm Post subject: |
|
|
| Hi Pierre looks great what did you use for the heat matting on the floor thanks. |
|
| Back to top |
|
|
Pierre Rivard
Joined: 25 Feb 2021
Posts: 378
Location: Montreal, Canada
|
| Posted: Wed May 05, 2021 6:55 am Post subject: |
|
|
| hobbyguy wrote: | | Hi Pierre looks great what did you use for the heat matting on the floor thanks. |
I used medical adhesive tape purchased at the drugstore, available in many sizes and a few colors in the first aid section. Got this tip from MarkJ.
_________________
"When you arrive at a fork in the road, take it" - Yogi Berra |
|
| Back to top |
|
|
Gary Davis
Joined: 02 Feb 2018
Posts: 242
Location: Tacoma,Washington
|
| Posted: Tue Jun 08, 2021 12:51 pm Post subject: |
|
|
Now that came out GREAT ALL around Pierre! The sit on this car is spot on. It looks fast just sittin there.
_________________
Short Track racing....Ya gotta love it.
I've been a member since 2006 |
|
| Back to top |
|
|
hobbyguy
Joined: 30 Jan 2018
Posts: 15
|
| Posted: Wed Jun 16, 2021 4:05 pm Post subject: |
|
|
Hi Pierre what did use for upper rear shock mounts.
thanks |
|
| Back to top |
|
|
Pierre Rivard
Joined: 25 Feb 2021
Posts: 378
Location: Montreal, Canada
|
| Posted: Thu Jun 17, 2021 8:21 am Post subject: |
|
|
| hobbyguy wrote: | Hi Pierre what did use for upper rear shock mounts.
thanks |
Darn, caught cheating again! 
Seriously, there is no room for mounting shocks to the underside of the floorpan so I faked a Holman Moody type setup with mounts on the upper side in the trunk, which can't be seen on this model.
So I just drilled 4 pass throughs in the pan above the axle. The shocks pass through the openings but are unatached on the other side. You just can't see it.
_________________
"When you arrive at a fork in the road, take it" - Yogi Berra |
|
| Back to top |
|
|
R.J.
Joined: 28 Jan 2018
Posts: 383
|
| Posted: Fri Sep 17, 2021 9:22 pm Post subject: |
|
|
Nice build
_________________
Roanoke, VA. |
|
| Back to top |
|
|
MarkJ
Joined: 29 Jan 2018
Posts: 1306
|
| Posted: Sat Sep 18, 2021 7:29 am Post subject: |
|
|
| I'm glad this popped back up again. Pierre, how many coats of white did you put on the model. I'm going to be color coating my latest build and wanted to know what a normal amount of coats would be of the actual paint. Thanks. Wish me luck on my first brush painted model. |
|
| Back to top |
|
|
Pierre Rivard
Joined: 25 Feb 2021
Posts: 378
Location: Montreal, Canada
|
| Posted: Sat Sep 18, 2021 10:36 am Post subject: |
|
|
| MarkJ wrote: | | I'm glad this popped back up again. Pierre, how many coats of white did you put on the model. I'm going to be color coating my latest build and wanted to know what a normal amount of coats would be of the actual paint. Thanks. Wish me luck on my first brush painted model. |
Mark, I don't have the info recorded on my build notes but since this was over white primer I would say 2 or 3 coats thinned to milk like viscosity.
For one coat I usually use 8 drops paint, 8 drops medium thinner and 1 or 2 drops water.
Use a thin flat brush and load it lightly.
Too thinned paint is better than not enough because it gives you time to work the paint without worries of it "gelling" up on you.
Multiple thin coats is the way to go with Vallejo.
good luck!
_________________
"When you arrive at a fork in the road, take it" - Yogi Berra |
|
| Back to top |
|
|
MarkJ
Joined: 29 Jan 2018
Posts: 1306
|
| Posted: Sat Sep 18, 2021 5:24 pm Post subject: |
|
|
| Pierre Rivard wrote: | | MarkJ wrote: | | I'm glad this popped back up again. Pierre, how many coats of white did you put on the model. I'm going to be color coating my latest build and wanted to know what a normal amount of coats would be of the actual paint. Thanks. Wish me luck on my first brush painted model. |
Mark, I don't have the info recorded on my build notes but since this was over white primer I would say 2 or 3 coats thinned to milk like viscosity.
For one coat I usually use 8 drops paint, 8 drops medium thinner and 1 or 2 drops water.
Use a thin flat brush and load it lightly.
Too thinned paint is better than not enough because it gives you time to work the paint without worries of it "gelling" up on you.
Multiple thin coats is the way to go with Vallejo.
good luck! |
Thanks , Pierre. My only problem is to get the right shade of paint color I had to use 9 drops white with 1 drop color to get it light enough to match the color I need. So then would you recommend 10 drops thinner and 2 drops water? And I might have paint left over after each coat? Do you sand between coats, or is it necessary? Thanks for your reply. |
|
| Back to top |
|
|
Pierre Rivard
Joined: 25 Feb 2021
Posts: 378
Location: Montreal, Canada
|
| Posted: Sun Sep 19, 2021 7:01 am Post subject: |
|
|
| MarkJ wrote: | | Pierre Rivard wrote: | | MarkJ wrote: | | I'm glad this popped back up again. Pierre, how many coats of white did you put on the model. I'm going to be color coating my latest build and wanted to know what a normal amount of coats would be of the actual paint. Thanks. Wish me luck on my first brush painted model. |
Mark, I don't have the info recorded on my build notes but since this was over white primer I would say 2 or 3 coats thinned to milk like viscosity.
For one coat I usually use 8 drops paint, 8 drops medium thinner and 1 or 2 drops water.
Use a thin flat brush and load it lightly.
Too thinned paint is better than not enough because it gives you time to work the paint without worries of it "gelling" up on you.
Multiple thin coats is the way to go with Vallejo.
good luck! |
Thanks , Pierre. My only problem is to get the right shade of paint color I had to use 9 drops white with 1 drop color to get it light enough to match the color I need. So then would you recommend 10 drops thinner and 2 drops water? And I might have paint left over after each coat? Do you sand between coats, or is it necessary? Thanks for your reply. |
Don't worry about leaving some leftover paint, just get your color mix as you want it to be. Just throw it away and start fresh for the next coat.
I usually match paint to thinner drop count and complete with water (1 or 2 drops usually) to achieve the viscosity I like.
I don't sand between coats but the primer has to be very smooth to start with.
Here's a pic of a body I did with 2 coats primer and 3 coats color. What appears to be brush marks is not. It's more like variations of grossness which goes away with clear coats.
[url [/url] [/url]
_________________
"When you arrive at a fork in the road, take it" - Yogi Berra |
|
| Back to top |
|
|
MarkJ
Joined: 29 Jan 2018
Posts: 1306
|
| Posted: Sun Sep 19, 2021 7:31 am Post subject: |
|
|
| Pierre Rivard wrote: | | MarkJ wrote: | | Pierre Rivard wrote: | | MarkJ wrote: | | I'm glad this popped back up again. Pierre, how many coats of white did you put on the model. I'm going to be color coating my latest build and wanted to know what a normal amount of coats would be of the actual paint. Thanks. Wish me luck on my first brush painted model. |
Mark, I don't have the info recorded on my build notes but since this was over white primer I would say 2 or 3 coats thinned to milk like viscosity.
For one coat I usually use 8 drops paint, 8 drops medium thinner and 1 or 2 drops water.
Use a thin flat brush and load it lightly.
Too thinned paint is better than not enough because it gives you time to work the paint without worries of it "gelling" up on you.
Multiple thin coats is the way to go with Vallejo.
good luck! |
Thanks , Pierre. My only problem is to get the right shade of paint color I had to use 9 drops white with 1 drop color to get it light enough to match the color I need. So then would you recommend 10 drops thinner and 2 drops water? And I might have paint left over after each coat? Do you sand between coats, or is it necessary? Thanks for your reply. |
Don't worry about leaving some leftover paint, just get your color mix as you want it to be. Just throw it away and start fresh for the next coat.
I usually match paint to thinner drop count and complete with water (1 or 2 drops usually) to achieve the viscosity I like.
I don't sand between coats but the primer has to be very smooth to start with.
Here's a pic of a body I did with 2 coats primer and 3 coats color. What appears to be brush marks is not. It's more like variations of grossness which goes away with clear coats.
[url[/url] |
Thanks again, Pierre. By the way, what do you use for your clear coats? |
|
| Back to top |
|
|
jchrisf
Joined: 11 Jul 2018
Posts: 103
|
| Posted: Sun Sep 19, 2021 8:47 am Post subject: |
|
|
| Pierre Rivard wrote: |
Don't worry about leaving some leftover paint, just get your color mix as you want it to be. Just throw it away and start fresh for the next coat.
|
That looks great Pierre. I wonder if you used a wet palette if you'd have to throw it away. The people who use them say they keep their paint on them for weeks without an issue. |
|
| Back to top |
|
|
Pierre Rivard
Joined: 25 Feb 2021
Posts: 378
Location: Montreal, Canada
|
| Posted: Sun Sep 19, 2021 10:15 am Post subject: |
|
|
| jchrisf wrote: | | Pierre Rivard wrote: |
Don't worry about leaving some leftover paint, just get your color mix as you want it to be. Just throw it away and start fresh for the next coat.
|
That looks great Pierre. I wonder if you used a wet palette if you'd have to throw it away. The people who use them say they keep their paint on them for weeks without an issue. |
I mix small quantities for one coat at a time and throw away the rest. I avoid the issues of adjusting viscosities. Fresh paint for every coat. A $2.28 bottle is good for many bodies so why the hassle dealing with viscosity issues of aging leftovers to save a few pennies?
_________________
"When you arrive at a fork in the road, take it" - Yogi Berra |
|
| Back to top |
|
|
Pierre Rivard
Joined: 25 Feb 2021
Posts: 378
Location: Montreal, Canada
|
| Posted: Sun Sep 19, 2021 11:00 am Post subject: |
|
|
MarkJ,
I use Pledge Future for clear, brush painted of course
btw I am getting my stuff out and test painting a black body, starting with primer.
I will update results in the Brush Painter Society
_________________
"When you arrive at a fork in the road, take it" - Yogi Berra |
|
| Back to top |
|
|
MarkJ
Joined: 29 Jan 2018
Posts: 1306
|
| Posted: Sun Sep 19, 2021 12:24 pm Post subject: |
|
|
| Pierre Rivard wrote: | MarkJ,
I use Pledge Future for clear, brush painted of course
btw I am getting my stuff out and test painting a black body, starting with primer.
I will update results in the Brush Painter Society |
Sounds good . I'll be watching for it. Thanks again for all the info. |
|
| Back to top |
|
|
|

