| View previous topic :: View next topic |
| Author |
Message |
BW
Joined: 01 Feb 2018
Posts: 218
Location: Lick Creek, Alabama
|
 Posted: Wed May 09, 2018 7:35 pm Post subject: Pete Hamilton's Superbird Posted: Wed May 09, 2018 7:35 pm Post subject: Pete Hamilton's Superbird |
 |
|
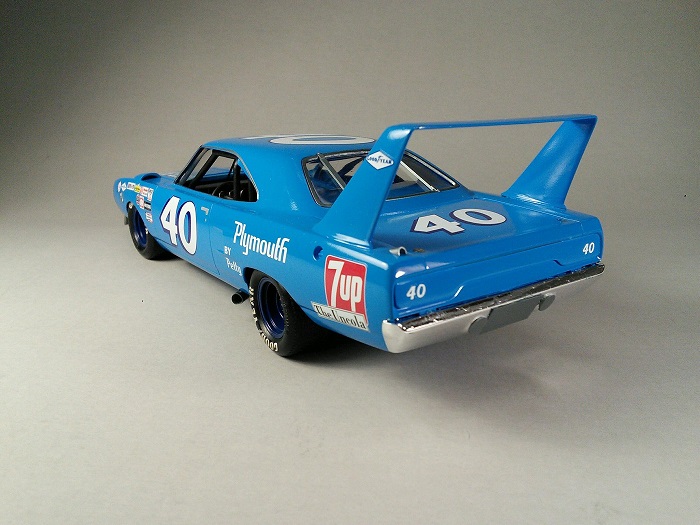
Pete Hamilton's Superbird
Model depicts Pete's 1970 Superbird. Pete won the Daytona 500 as well as both Talladega races in the 1970 season.
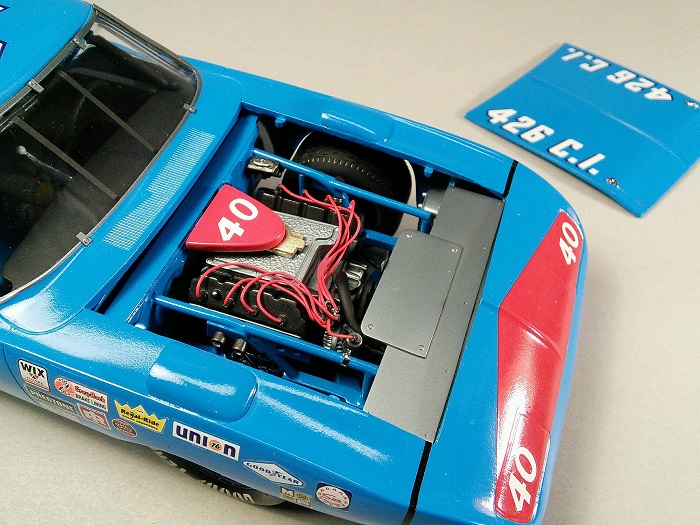
KIT: JoHan body. Used a Revell 1/24 scale Superbird for a more correct nose. Chassis is an AMT 1969 GTX donor.
PAINT: Tamiya TS-23 Light Blue for body and chassis. Engine and other metal parts painted with various shades of Model Master Metalizers.
DECALS: Powerslide
WHEELS & TIRES: PPP
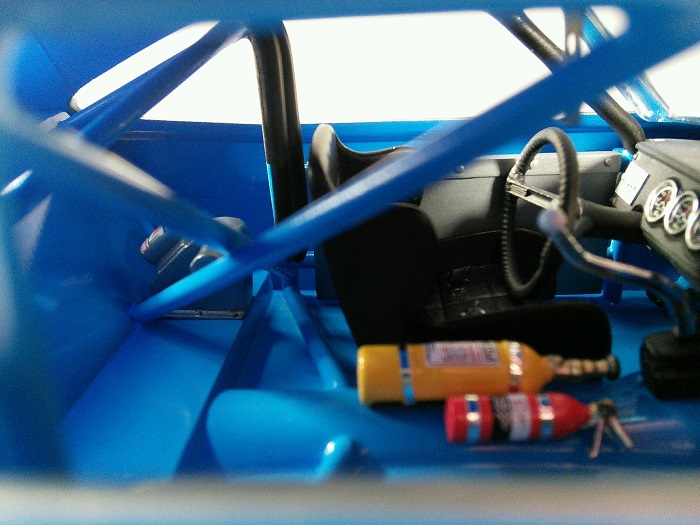
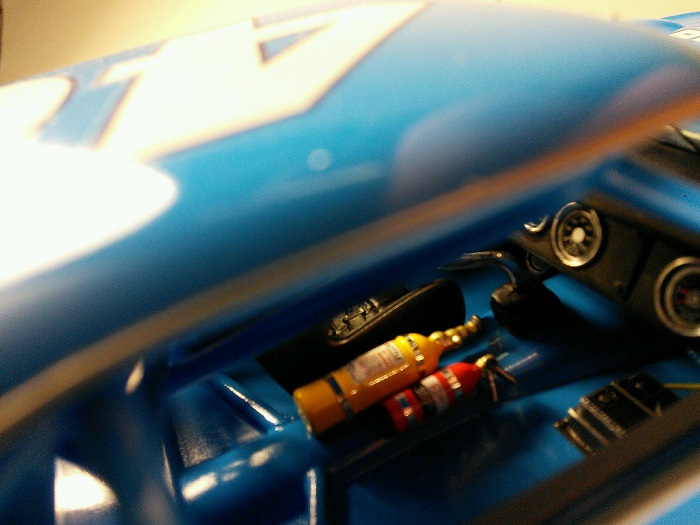
BUILD NOTES: Modified AMT '69 GTX for chassis. Scratch built roll cage and interior door panels using Evergreen 1/16" for cage and sheet plastic for door panels. Scratch built front spoiler and fan shroud using Evergreen sheet plastic. Other parts came from spares. Followed wingcar builder's excellent tutorial on how to build a winged car.
THE REAL THING:
 [img] [img]
 [img] [img]
 [img] [img]
 [img] [img]
 [img] [img]
 [img] [img]
 [img] [img]
 [img] [img]
Pete after one of his Talladega wins:
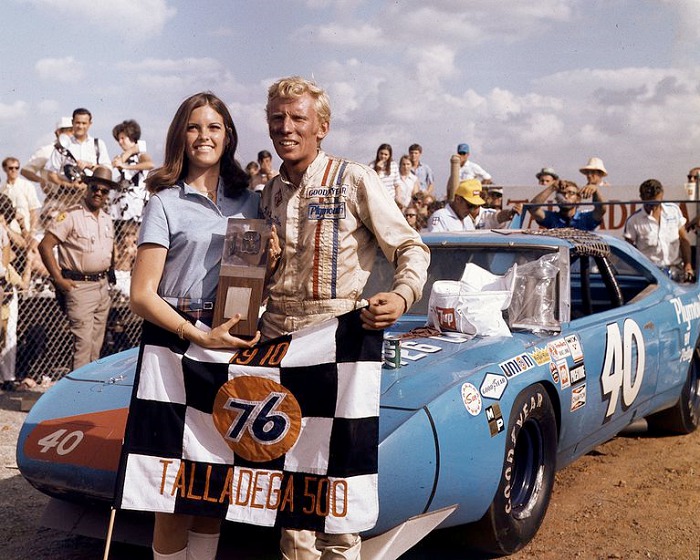 [img] [img]
Thanks for looking!
Bobby |
|
| Back to top |
|
 |
Jetdoc
Joined: 03 Feb 2018
Posts: 13
|
| Posted: Wed May 09, 2018 7:47 pm Post subject: |
|
|
| WOW!!!!!!!!!!!!!! |
|
| Back to top |
|
|
Irish Murphy

Joined: 28 Jan 2018
Posts: 47
Location: Upstate SC
|
| Posted: Thu May 10, 2018 6:42 am Post subject: |
|
|
| SWEET!!! |
|
| Back to top |
|
|
afx

Joined: 28 Jan 2018
Posts: 270
|
| Posted: Thu May 10, 2018 6:46 am Post subject: |
|
|
| Another beauty Bobby. |
|
| Back to top |
|
|
Racer14
Joined: 13 Feb 2018
Posts: 282
Location: Rockford, IL
|
| Posted: Thu May 10, 2018 6:54 am Post subject: |
|
|
| Great build and excellent detail! |
|
| Back to top |
|
|
Henryjint

Joined: 28 Jan 2018
Posts: 1970
Location: NY State's Hudson Valley
|
| Posted: Thu May 10, 2018 8:07 am Post subject: |
|
|
Outstanding build!!!!
_________________
Forum member since 10/25/2010 |
|
| Back to top |
|
|
sentsat71
Joined: 03 Feb 2018
Posts: 1237
Location: Fenton, IA
|
| Posted: Thu May 10, 2018 8:11 am Post subject: |
|
|
Great looking build!!!!
luv those Superbirds!!
_________________
Ed. K |
|
| Back to top |
|
|
BVAUGHN
Joined: 29 Jan 2018
Posts: 504
|
| Posted: Thu May 10, 2018 8:49 am Post subject: |
|
|
Great looking model. i love the wing cars especially the Pettys.
Bill |
|
| Back to top |
|
|
Jim N
Joined: 29 Jan 2018
Posts: 650
|
| Posted: Thu May 10, 2018 12:16 pm Post subject: |
|
|
| Another spectacular model Bobby. Great job! |
|
| Back to top |
|
|
Firefly

Joined: 28 Jan 2018
Posts: 810
Location: New Jersey
|
| Posted: Thu May 10, 2018 7:20 pm Post subject: |
|
|
Fantastic!!
_________________
Bill Jobson is my real name. |
|
| Back to top |
|
|
"Fireball"
Joined: 09 Feb 2018
Posts: 202
|
| Posted: Thu May 10, 2018 11:29 pm Post subject: |
|
|
Bobby, that's a beautiful build, great attention to detail, and the stance looks right on the money!!! I did Petty's Bird the hard way, before Winged Car's excellent tutorial, using Monogram's Bird with the vinyl top, and sanded it off. Used the cage, and hoops from a Monogram NASCAR kit, with bits, and pieces added from the spars box, or scratched. Not near as nice as yours, but way back then it was the shiznit. I like the kits you used in your build, better than the kits I used in my build. You always amaze, and inspire me with your builds. Thanks for sharing with all of us.
Last edited by "Fireball" on Sat Jun 09, 2018 3:45 pm; edited 1 time in total |
|
| Back to top |
|
|
BVAUGHN
Joined: 29 Jan 2018
Posts: 504
|
| Posted: Fri May 11, 2018 8:18 am Post subject: |
|
|
When I built my superbirds it was box stock out of the Johan Petty Superbird kit.
Bill |
|
| Back to top |
|
|
Mack
Joined: 28 Jan 2018
Posts: 732
Location: deep south
|
| Posted: Fri May 11, 2018 5:10 pm Post subject: |
|
|
Yet another stunning build!!! I love your builds, they make the rest of us better builders....keep em coming!
_________________
life is hard, it's harder when you're stupid. John Wayne |
|
| Back to top |
|
|
scooter64
Joined: 27 Jan 2018
Posts: 301
|
| Posted: Sat May 12, 2018 8:45 pm Post subject: |
|
|
wow!
(i am always in awe of your interiors...so clean and crisp.)
_________________
 |
|
| Back to top |
|
|
halfbreed999
Joined: 31 Jan 2018
Posts: 181
Location: Just west of Chicago
|
| Posted: Sun May 13, 2018 8:41 pm Post subject: |
|
|
Hey Bobby when you going to post the model pictures.  Great build as always, right down to the smallest detail. Great build as always, right down to the smallest detail.
_________________
If you bought it a trucker hauled it.
A mind is a terrible thing to waste, have you seen mine? |
|
| Back to top |
|
|
Slim
Joined: 21 Feb 2018
Posts: 40
|
| Posted: Thu May 24, 2018 1:11 pm Post subject: |
|
|
| Great looking build, the attention to detail and paint is beautiful! |
|
| Back to top |
|
|
Shunter

Joined: 27 Jan 2018
Posts: 459
|
| Posted: Thu May 24, 2018 3:56 pm Post subject: |
|
|
| That is very nice |
|
| Back to top |
|
|
71roadrunner426
Joined: 02 Feb 2018
Posts: 5
|
| Posted: Sat Jun 09, 2018 11:28 am Post subject: |
|
|
| Simply stunning! Fantastic build Bobby, |
|
| Back to top |
|
|
BW
Joined: 01 Feb 2018
Posts: 218
Location: Lick Creek, Alabama
|
| Posted: Tue Jun 12, 2018 8:01 pm Post subject: |
|
|
Thanks for all the kind words. Means a lot to me.
Bobby |
|
| Back to top |
|
|
Snydez09
Joined: 08 Feb 2019
Posts: 13
|
| Posted: Fri Feb 08, 2019 10:59 am Post subject: |
|
|
| Great bird!! Any issues with grafting the monogram nose to the johan body? |
|
| Back to top |
|
|
DaveVan
Joined: 27 Jan 2018
Posts: 1578
|
| Posted: Fri Feb 08, 2019 11:03 am Post subject: |
|
|
| Not sure how I missed this one....WOW....info on adapting the nose??? |
|
| Back to top |
|
|
scooter64
Joined: 27 Jan 2018
Posts: 301
|
| Posted: Fri Feb 08, 2019 8:19 pm Post subject: |
|
|
Jedi Master.
quality still blows me away.
_________________
|
|
| Back to top |
|
|
BW
Joined: 01 Feb 2018
Posts: 218
Location: Lick Creek, Alabama
|
| Posted: Fri Feb 08, 2019 10:56 pm Post subject: |
|
|
Grafting the Revell 1/24 scale nose onto the 1/25 scale Johan body wasn't that hard. The alignment was pretty close. The nose was a bit wider than the body so I knew I had to grind down each side where the nose attached to the fenders. Before I glued on the nose, I superglued some thick plastic sheet inside each side of the nose just in case I ground through. This would give me a backer in case I sanded through. After I glued the nose on, I started sanding away with sanding sticks starting with coarse and ending with fine grit. Luckily, I only sanded through in one small spot so I used superglue with accelerator and re-sanded. The backer did it's job and allowed me to fill the spot easily. Just took my time. Hope this makes sense.
Bobby |
|
| Back to top |
|
|
AdamtheWayne
Joined: 09 Jul 2018
Posts: 1182
|
| Posted: Fri Feb 08, 2019 11:33 pm Post subject: |
|
|
Very nicely done. Clean execution and nice paint.
_________________
"Dude, it's not Camelot... it's only a model." "Details man, I need details!!" |
|
| Back to top |
|
|
|

